This sewing project was a special one. It connected two passions of mine: crafts and Irish Dance. It was also complex and long: I split it in two phases, the first one spanning from Winter to May 2019, the second one from Summer 2019 to the beginning of 2020. But then I found out I didn’t want to quit the project, so I started the third phase after the pandemic (that’s still a work-in-progress).
After a few years competing at Irish dancing feiseanna, I decided I wanted to make me a proper Solo dress. If never heard about those kind of dresses, you have to know they are intricated, sparkling, decorated, complicated, and also expensive.
Since my husband and I love making things by ourselves, we planned and sewed it together.
Back in 2019 I didn’t have a sewing machine and my only experience with clothes making was my Medieval gown. As I said, Solo dresses are usually complicated, so we said to ourselves we needed a starting point to make things easier: a dress to modify. We started from a 50’s black dress with the perfect shape, but too long and lacking sleeves.
So the plan was: first round, adding sleeves; second round, taking care of the skirt, that needed to be shorter, fuller and less black; final step, decorating the whole dress. I had a basic idea of what I wanted to accomplish, but a few details changed along the way.

Click for the finished project detailed photos
Table of contents
The design and inspirations

Before diving into the making itself, let me explain how I conceived the basic idea and design for my own Irish dance solo dress.
I browsed loads of dresses for inspiration, then drew several ideas on basic templates. The one that came out as the winner, was a compromise between what I desidered and what I thought we could be able to accomplish.
I wanted the dress to be black and emerald green, following the main colors of the skirt we wore at my Irish dance school for beginner solo competitions and team competitions.
Without thinking about the decorations yet, I planned a little collar and skirt with two layers of fabric, the green one emerging from the black one through a series of triangles.
About the sleeves, I drew them in green, while the main body of the dress was black, because I thought finding the perfect matching fabric the exact same color and material would be a tough task. So I decided to make them different from the start.
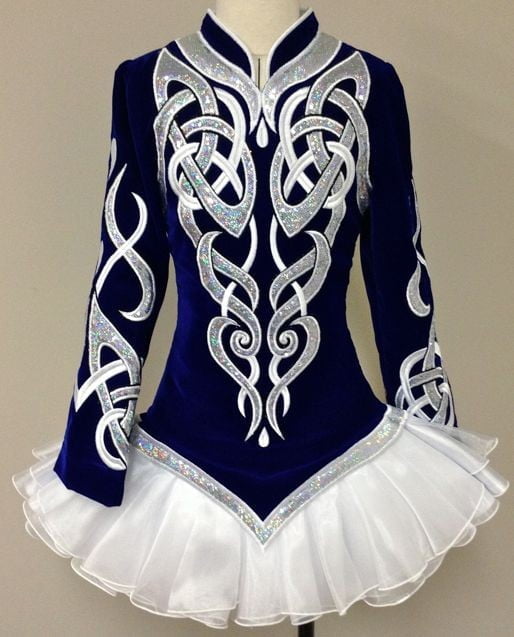
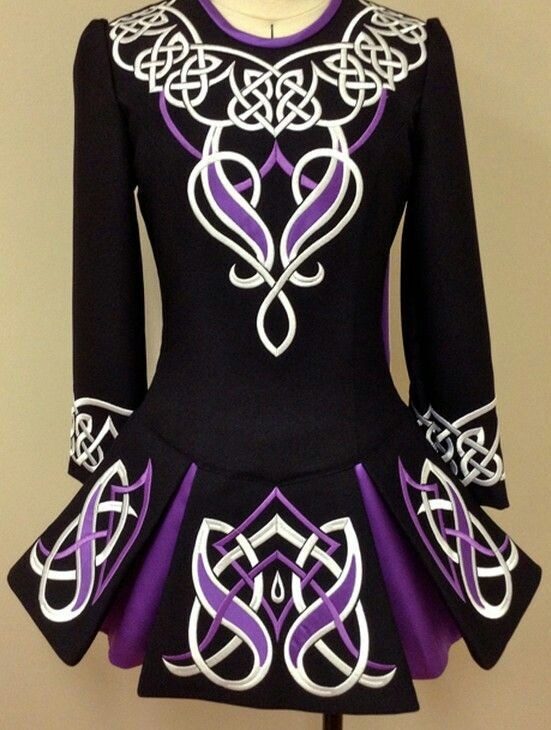
And just for reference, here I show you the main inspirations I selected for my sketch. Also, a good example of what an Irish dance Solo dress is, for anyone not familiar with them.
I got inspiration for the collar design from a Prime Dress Designs creation. They use this kind of swan-neck collar a lot, and I loved its look.
From another of their dresses I picked the idea for the skirt. Well, that’s not a Solo dress, is a school dress, usually worn by members of a team. This skirt has a first layer with cuts, from which it emerges a second layer with a different color. I love this, and I was imagining the effect while dancing.
Also, I found a white and red dress of which I loved the shape of the decorations. On the front there’s a sort of vertical flame decoration that slims the figure a lot. I was thinking about replicating it with embroidery. And a few crystals, since you can’t call Solo dress a dress that has no sparkles!
Some of the Solo dresses around are shinier than a star, but I wanted something more delicate.


About Irish dance competitions and dresses
Irish dance competitions have guidelines about dresses. For ladies, the Solo dress is intricate, shiny and colorful. Those dresses must have wide skirts, as short as to allow easy movements but not lacking modesty, necklines at collarbone level, long sleeves.
The making of the dress


Adding the sleeves
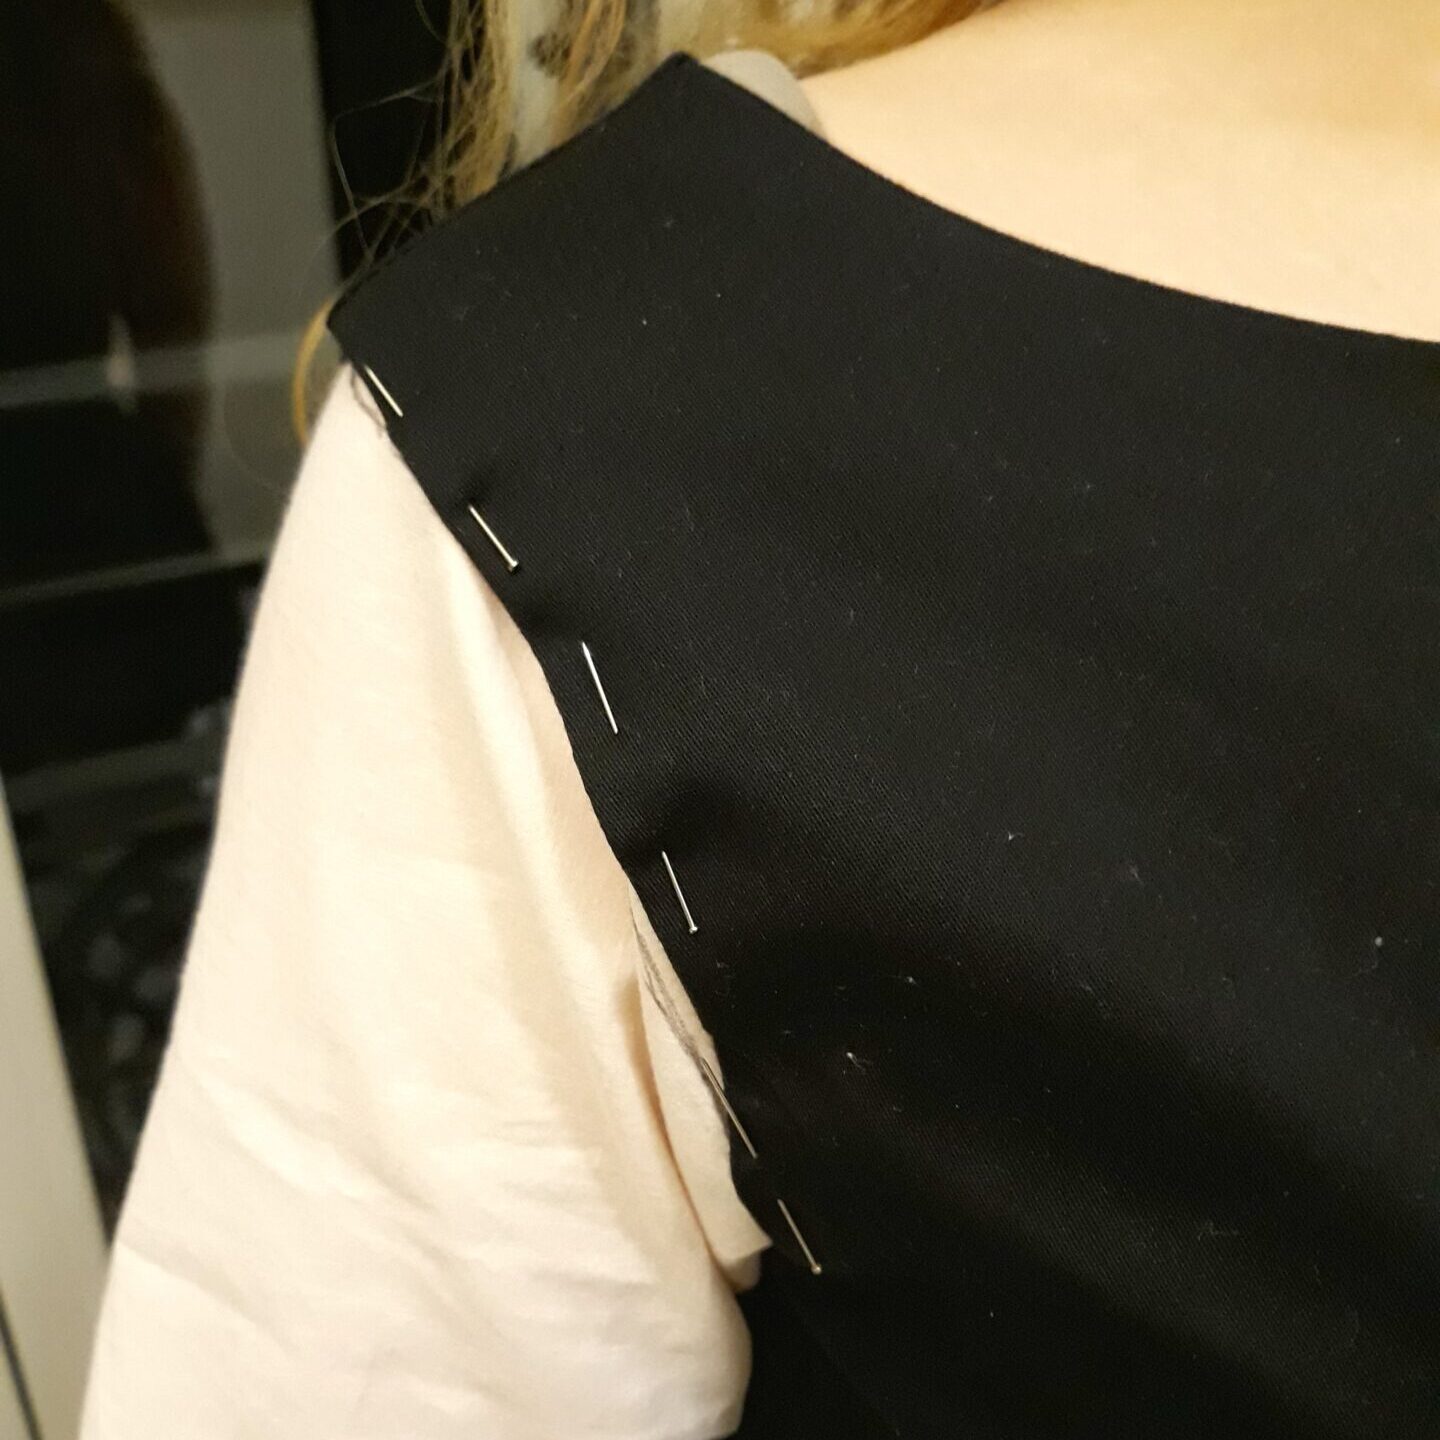
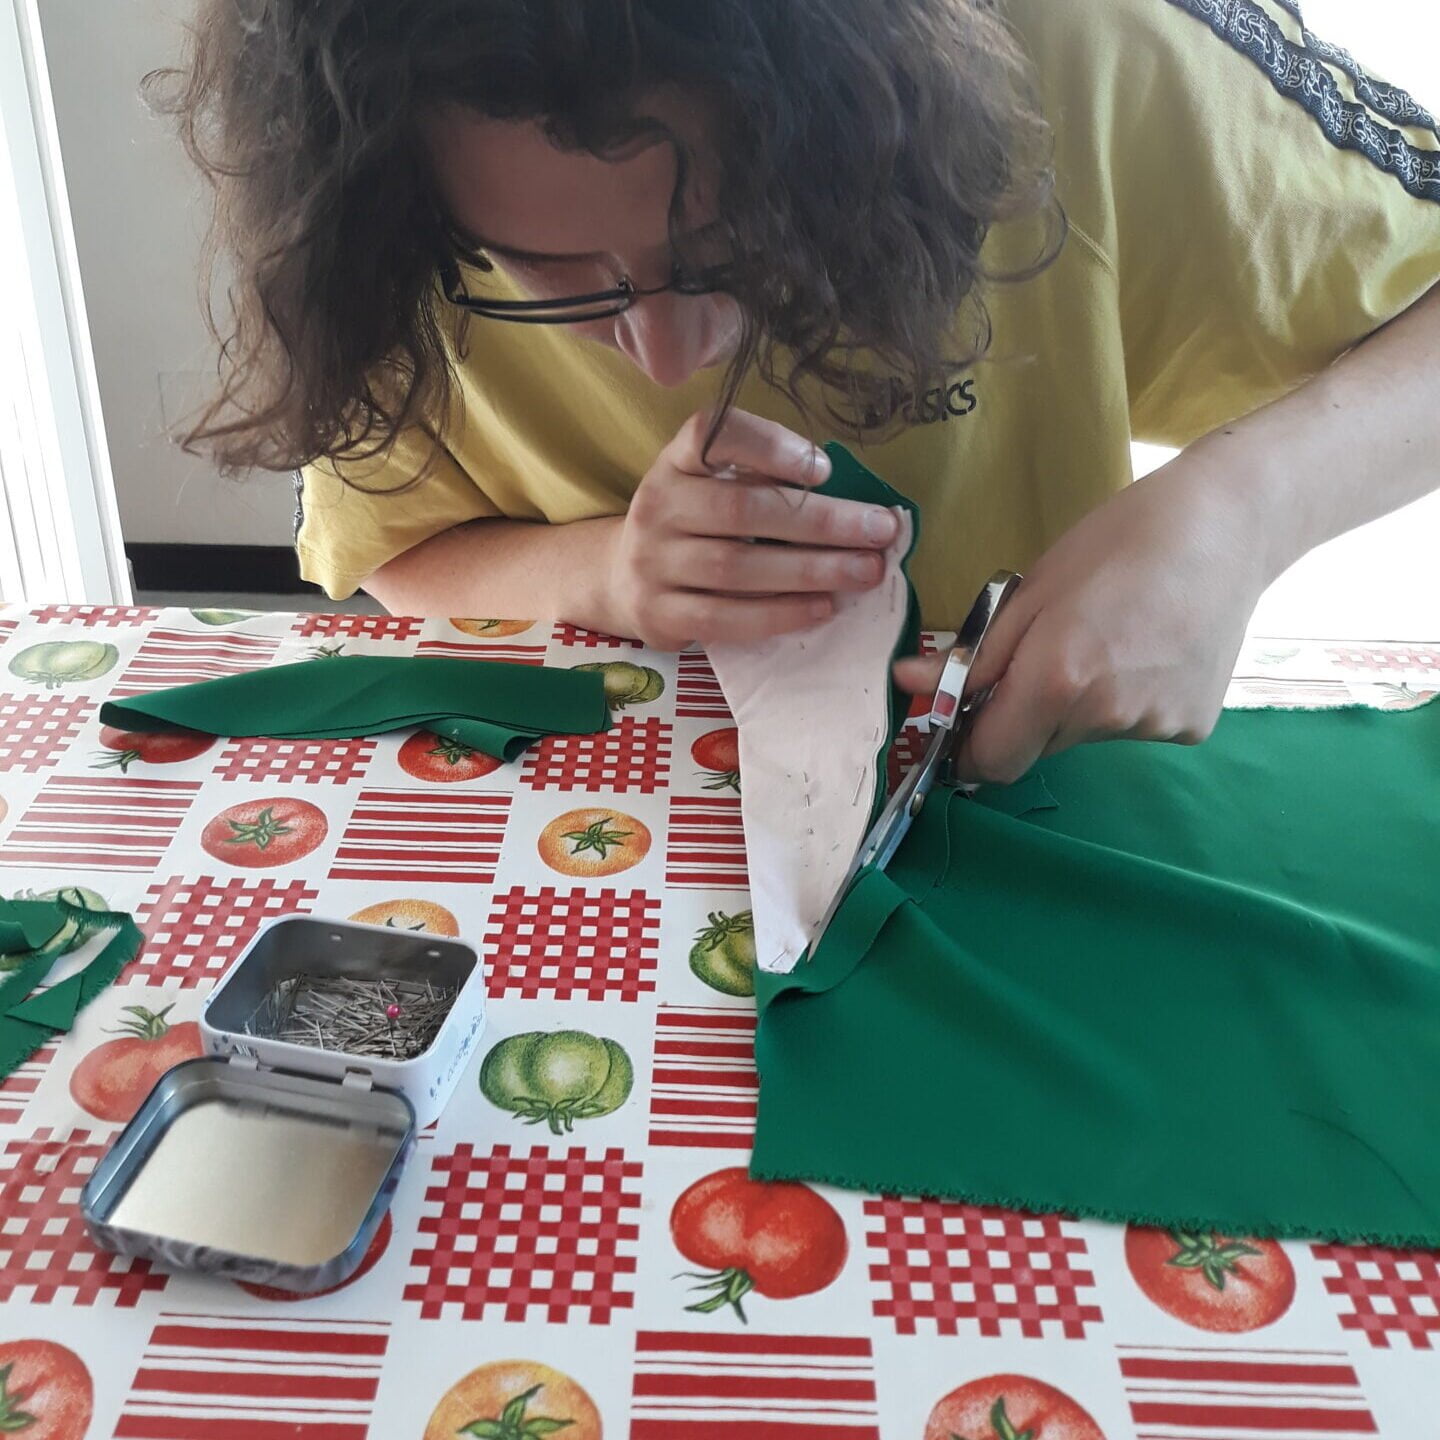
To make the sleeves, we first made a pattern with scrap fabric and tried it on the dress. When we did it to make my Medieval gown, it was a really useful step, better than working with paper patterns. Well, this time we were not satisfied with the outcome.
Yes, we knew it would have been the hardest task, but after an evening trying and trying again we almost surrendered, thinking about hiring a proper tailor to make the sleeved for us.
I was beginning to think we wanted to make a project too hard for us, having made just one dress with a 6-months struggle.
Well, the morning after I woke up realising which mistake we were making: we placed the dress on the table and attached the sleeve with a 90° angle! So the following evening we gave it another try, attaching the sleeves with a 45ish° angle and… the sleeves came out perfect! When I saw the sleeves finished I was really thrilled!
We chose a not-so-easy sleeve design, also.
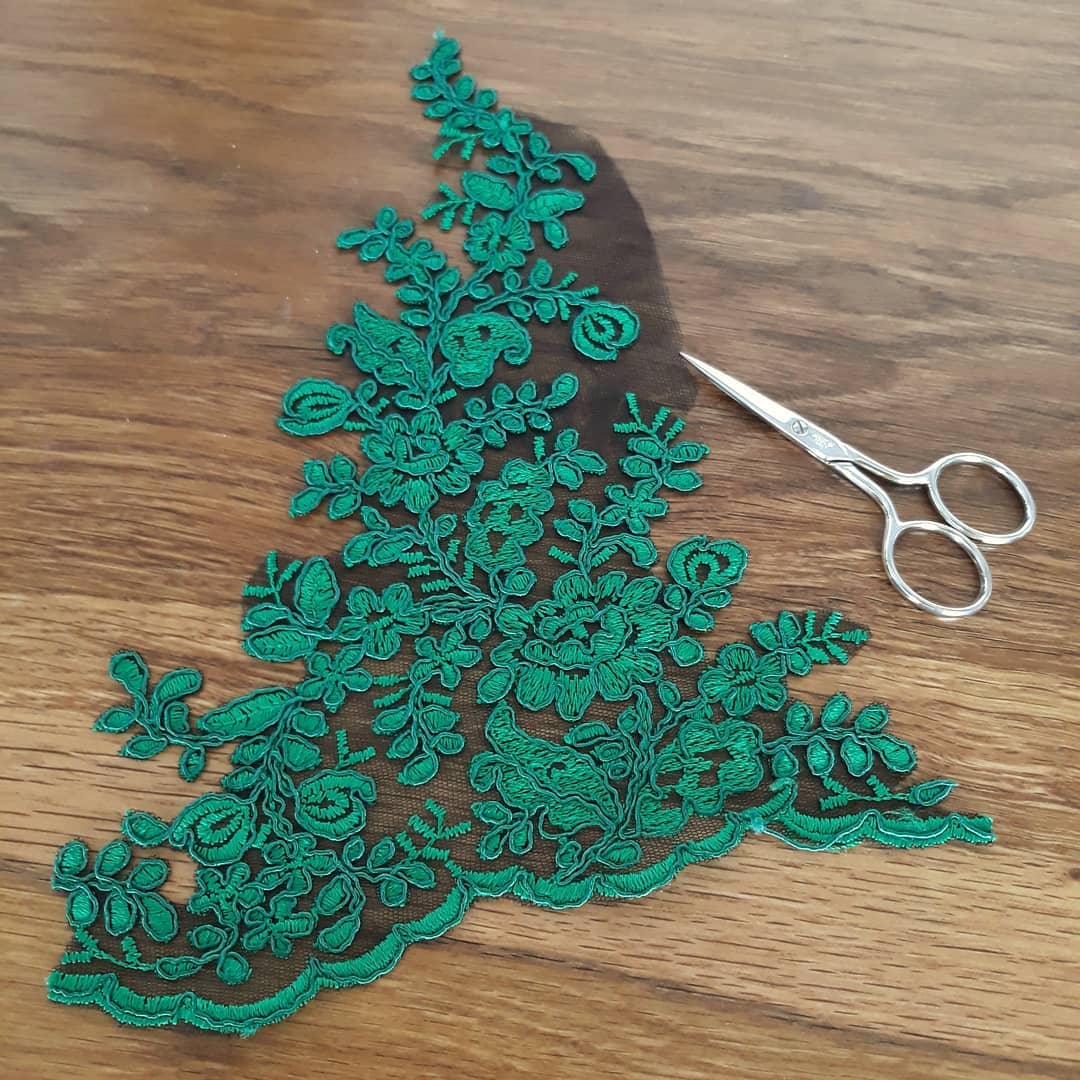
My first plan was to make a basic dress, then decorating it myself with hand-embroidery and appliques. But one day we were browsing our favourite fabric shop for materials and my husband came out with a lovely green lace. The same emerald green I have on my dance school skirt! I fell so in love with it that I completely changed my original design to adapt it to that awesome fabric!
I decided to add black sleeves all covered in that green lace. Then, on the bodice and all the skirt, I wanted to add cut-out pieces of the lace, to form a regular pattern.
So, for the sleeves, we cut two layers, one on in black fabric and one in lace, pinned them together and machine sewed. The advantage was that we could use a light black fabric without having to look for the exact same one that made the main dress, since the lace is the part that stands out.
After attaching the finished sleeves, I picked up needle and thread and began hand sewing all the cuff borders, to fix the lace on the black fabric. It took me a lot of work, but this way I refinished the edges and gave strenght to the whole sleeve.


The skirt
Next step: taking care of the skirt.
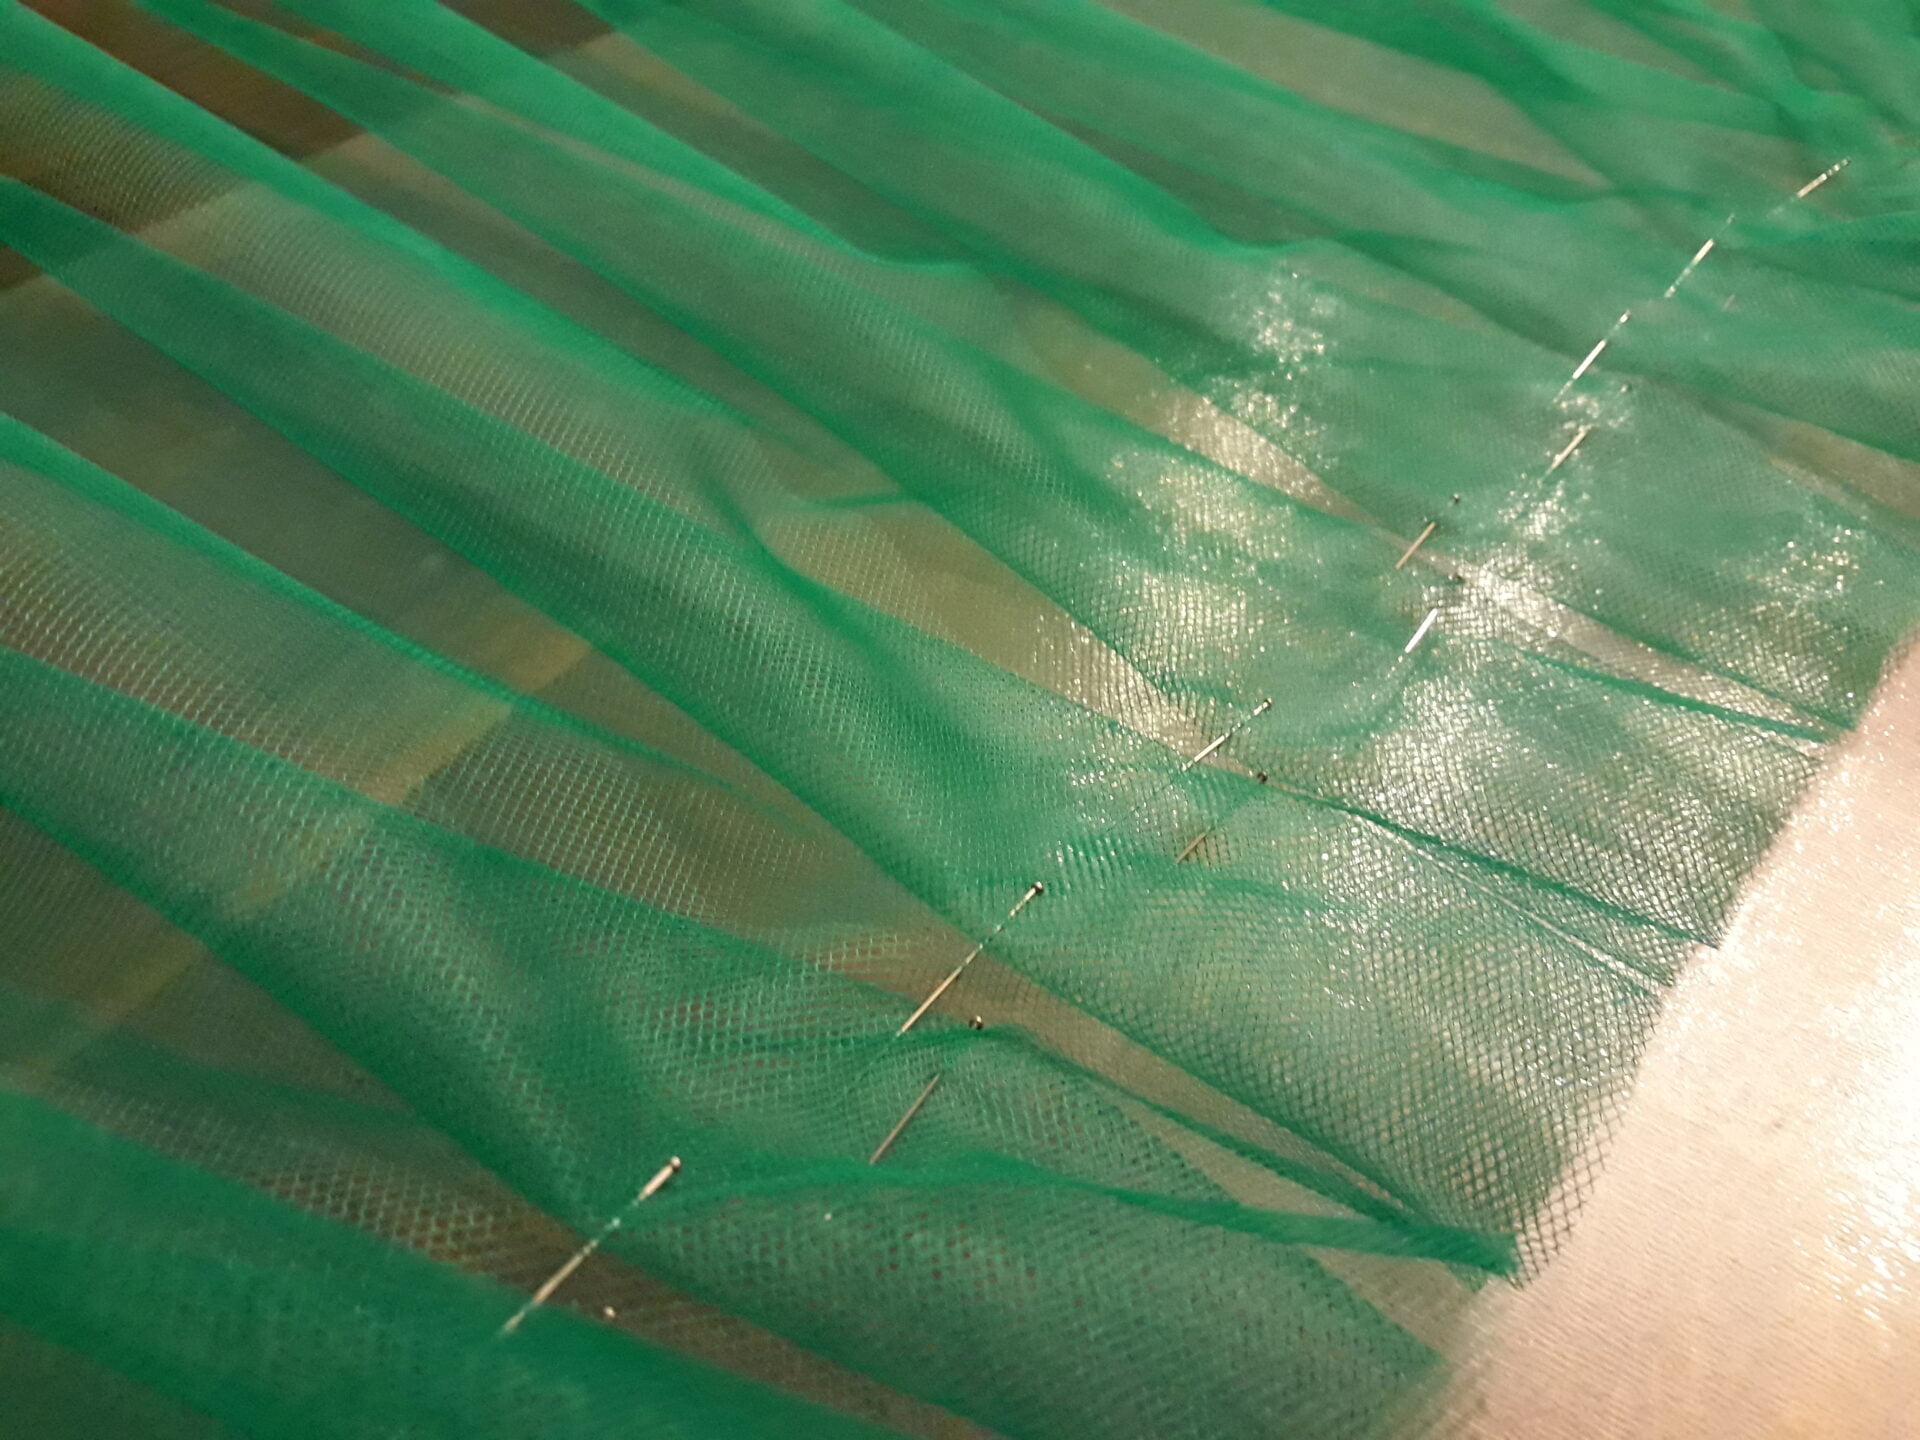
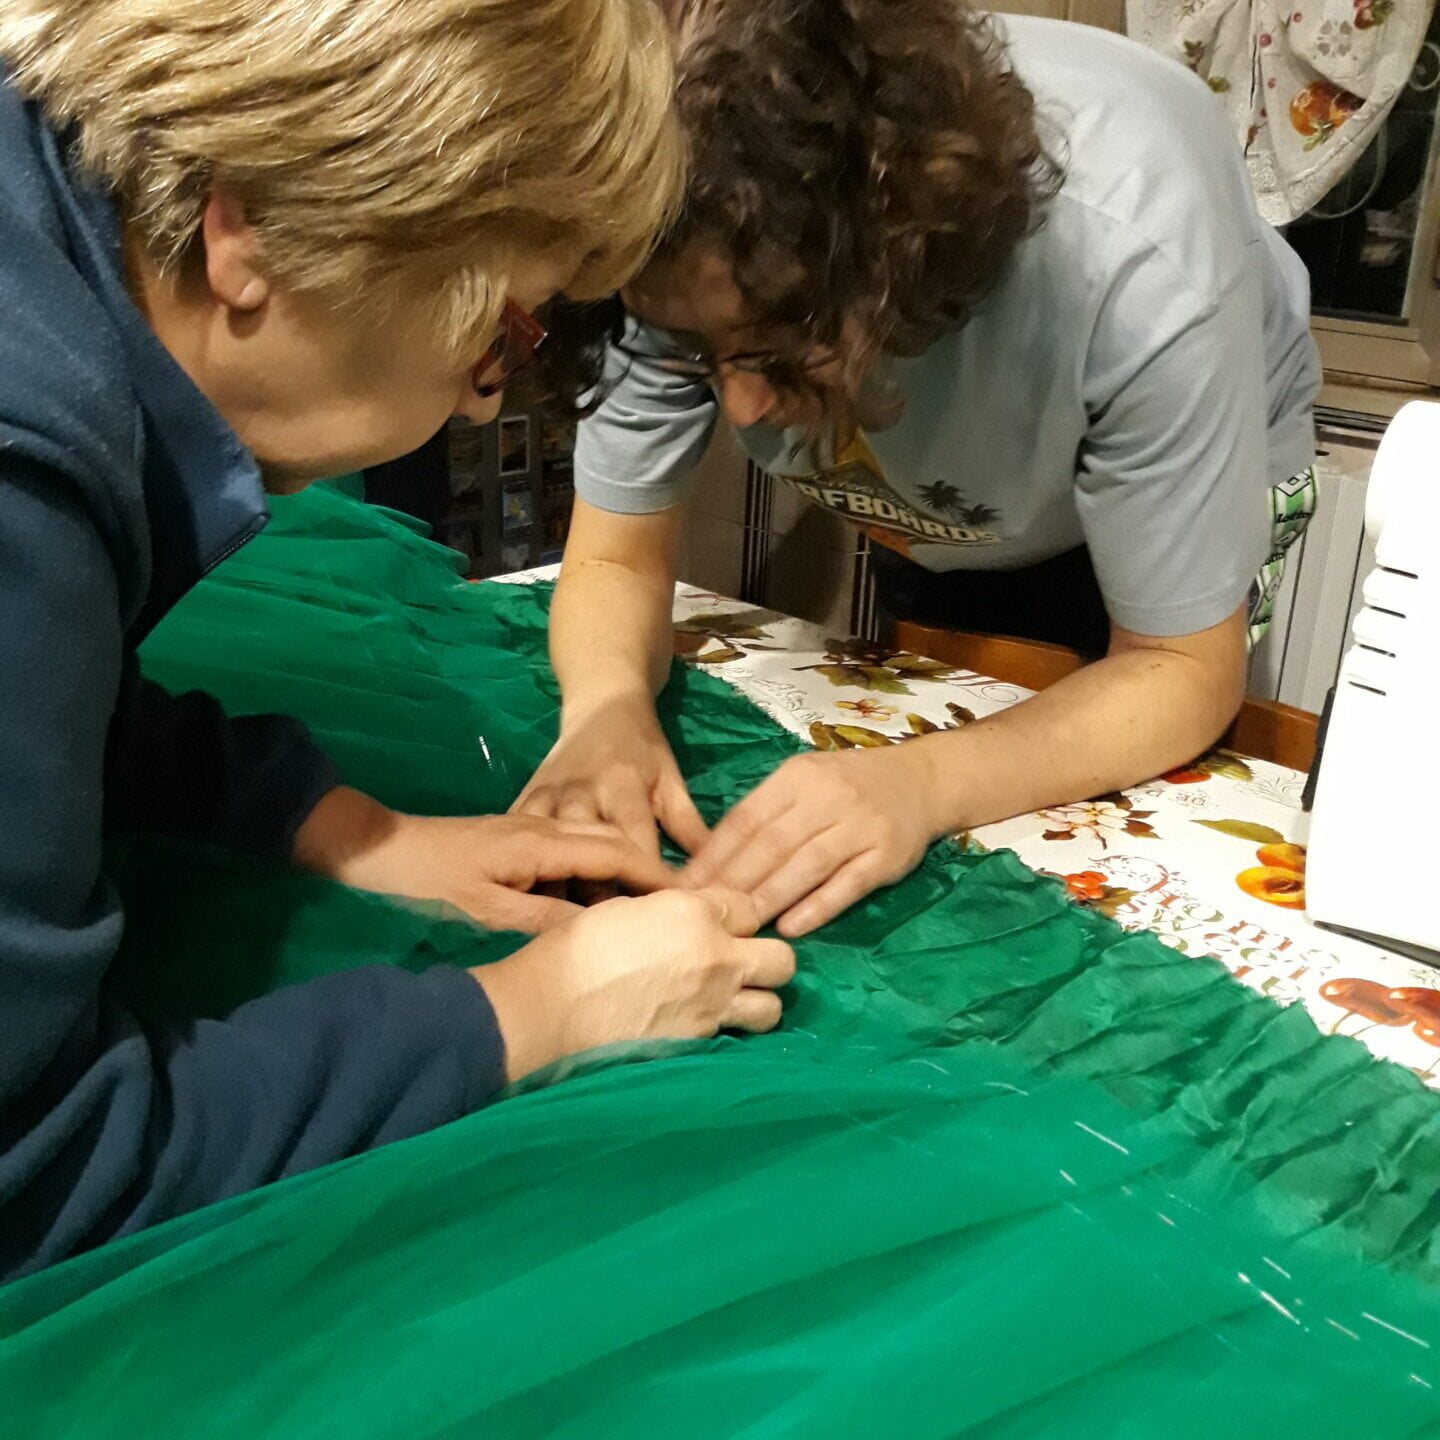
First, we made a green tulle underskirt to give volume and width. The beginning was quite complicated, with three layers of fabric to pin together for sewing. Fortunately I’ve a box full of pins!
Each layer was a little shifted down from the previous one, so the waist was thinner than the lower edge, volume increasing progressively.
Layer by layer, with the help of my sister-in-law, I was able to prepare all the pleated tulle layers for my husband, who machine sewed it to their green lining. The lining was paramount, since I have to wear tights and didn’t want them to get stuck to the tulle: I wanted a softer fabric between my legs and the underskirt.
Following that, we had to join the underskirt to the main dress.
The choice about how to join skirt and underskirt was not straightforward.
The first idea was to sew them together along the waist, but then I begun thinking about how to handle the full dress. It would certainly be handier with two separated parts, especially when I need to wash it.
The question then was: can I secure the underskirt to the dress to make them strongly attached during the dances but easy to separate when needed? In short, the final answer was no. Nor popper buttons or velcro were a good option.
I thought about it a lot, I did researches, asked friends and grannies and, in the end, I dedided the best way to attach them together… was just sewing.
The main issue that made me think a lot about this was the idea of washing the tulle together with the rest of the dress. Well, in the end I decided to set the matter aside and went for the easiest way.
And I’m also happy with the final result because from the outside you don’t see the stitches: I was able to hide them thanks to a thin inner lining the dress has.


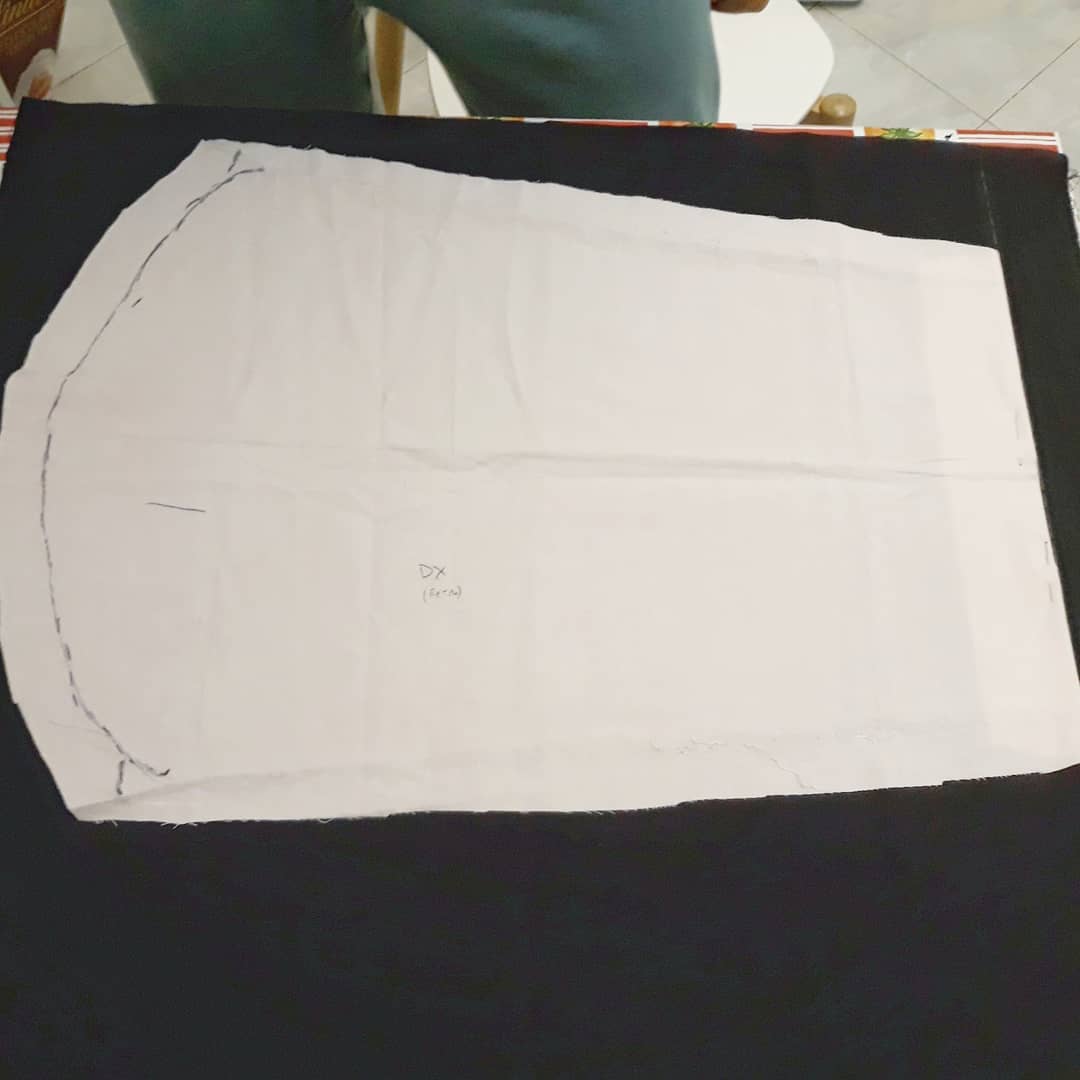
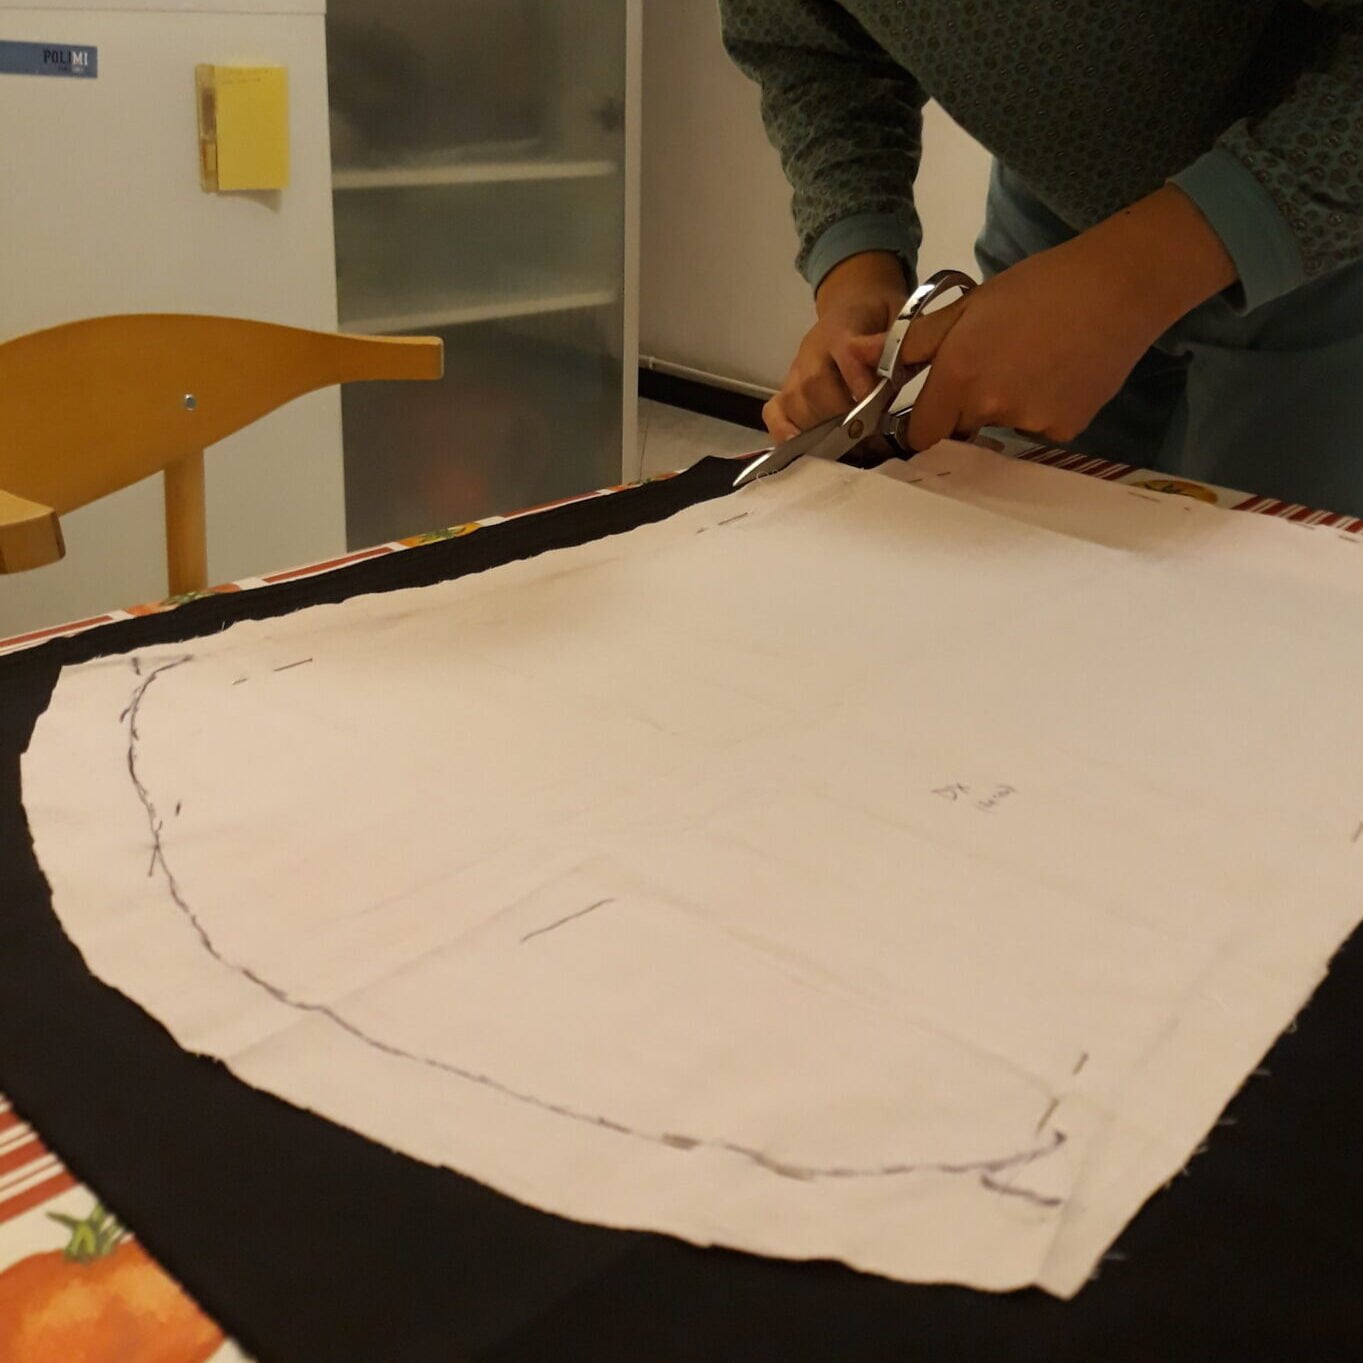
Well, the skirt was far from being finished! Next came the part I feared most: cutting!
The dress I chose as a base had a too long skirt for my purpose, so I had to cut. What if I cut too much? What if the final result is not good on me or doesn’t adhere to the competition rules?
This is why I first secured the underskirt: to see the real final volume and make a precise cut. I checked the lenght twice, also with the help of my dance teacher and fellow dancers. Even when I made up my mind about the correct lenght, I still feared I could make a mistake and ruin the whole project without repair!
I let my husband do the cut (both of the dress and underskirt with its lining) and, after a lot of worries, we were both satisfied of the result. I even decided it was worth cutting another couple of centimeters, after the first cut. Yes, my husband was right this time: he wanted to cut more from the start!
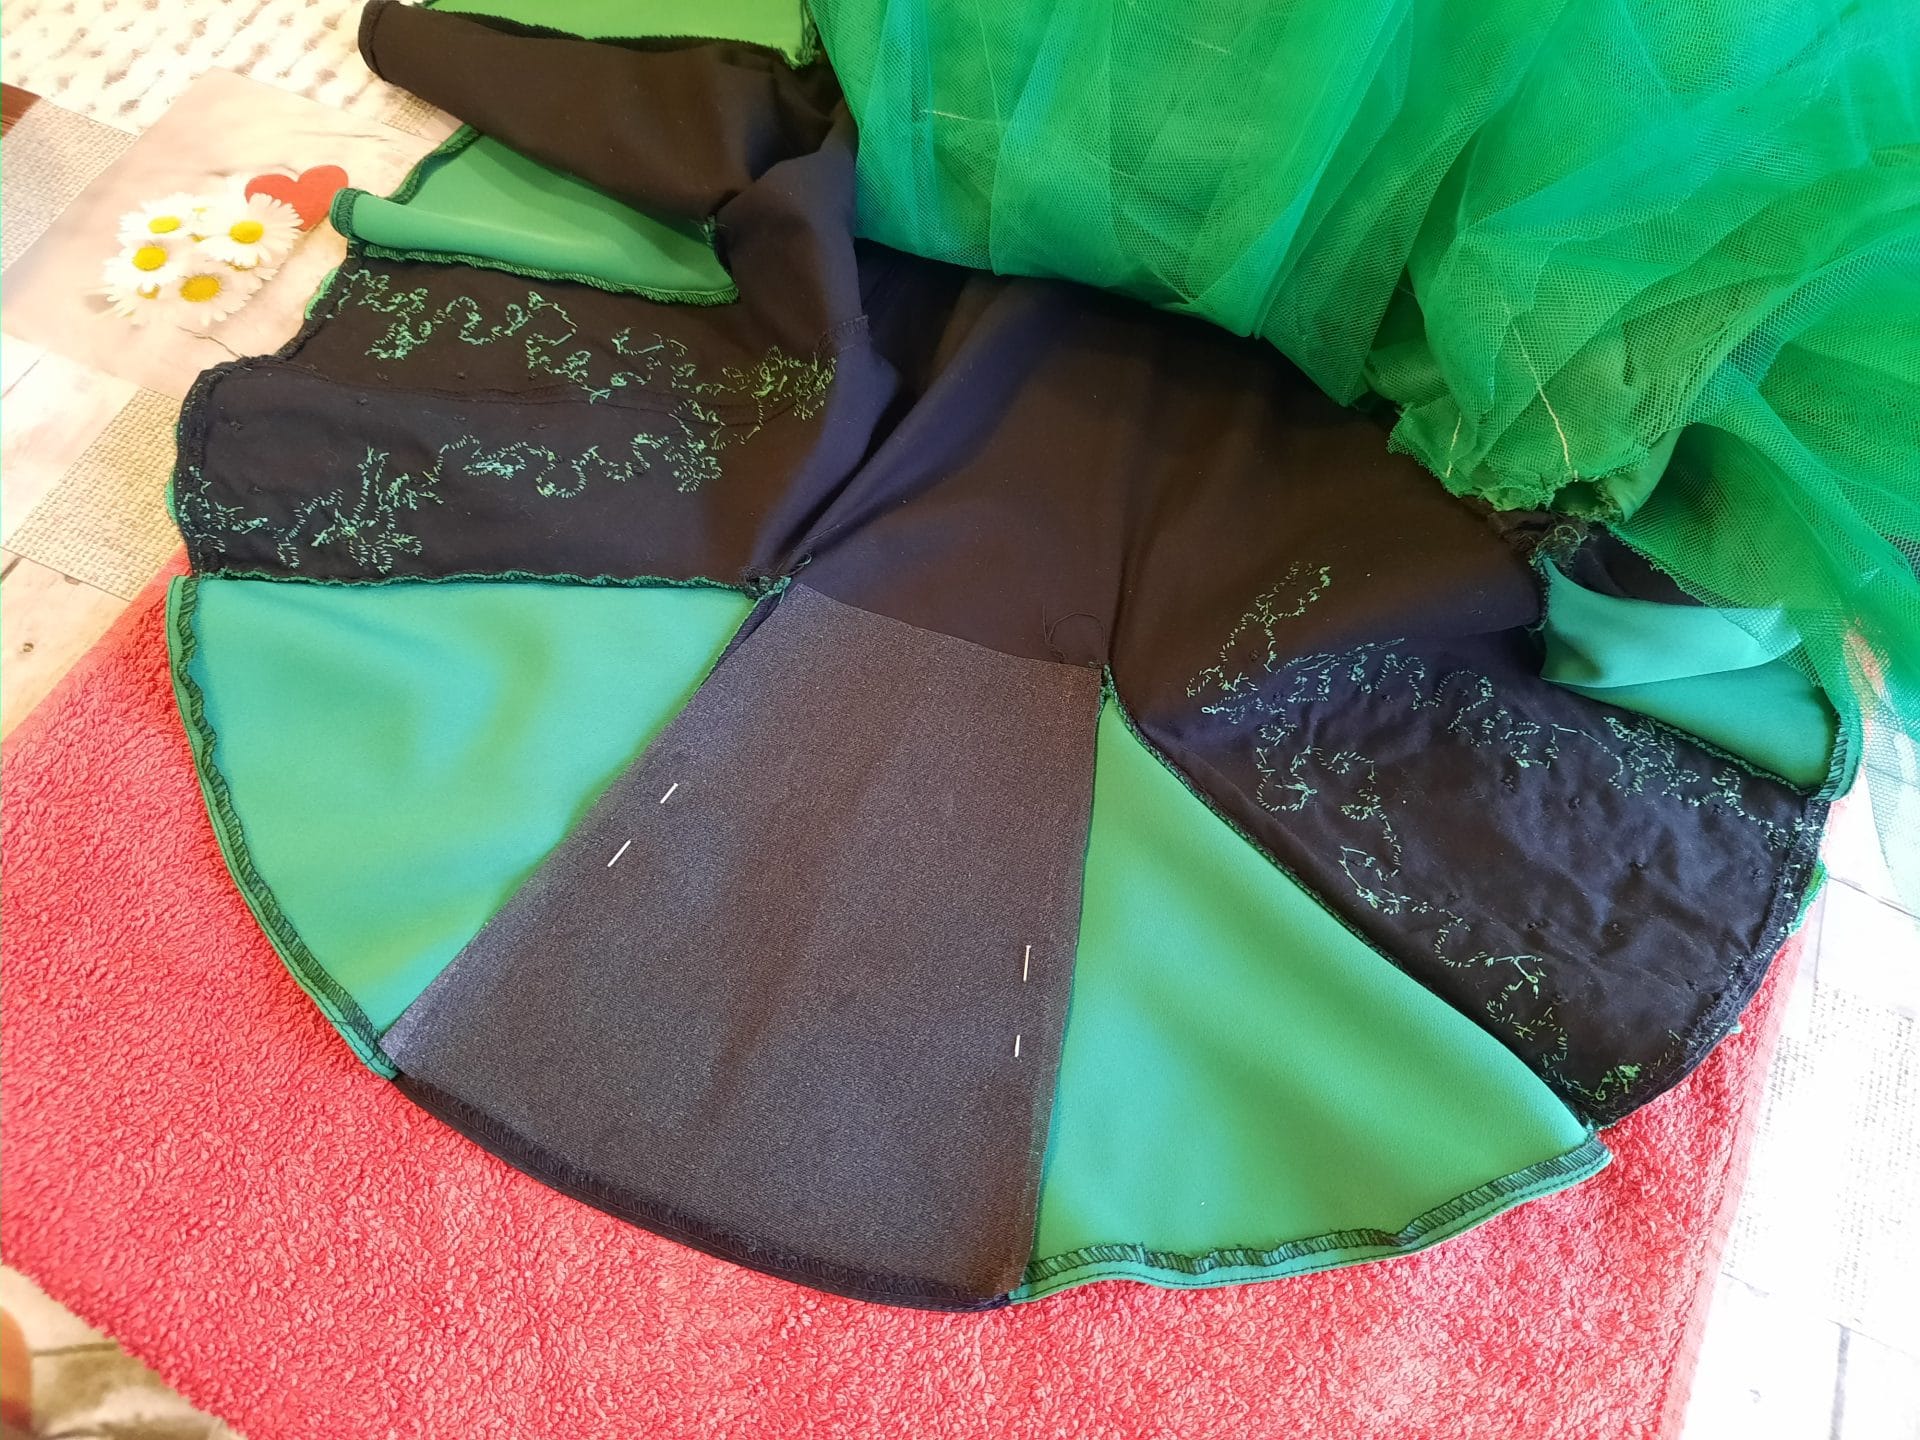
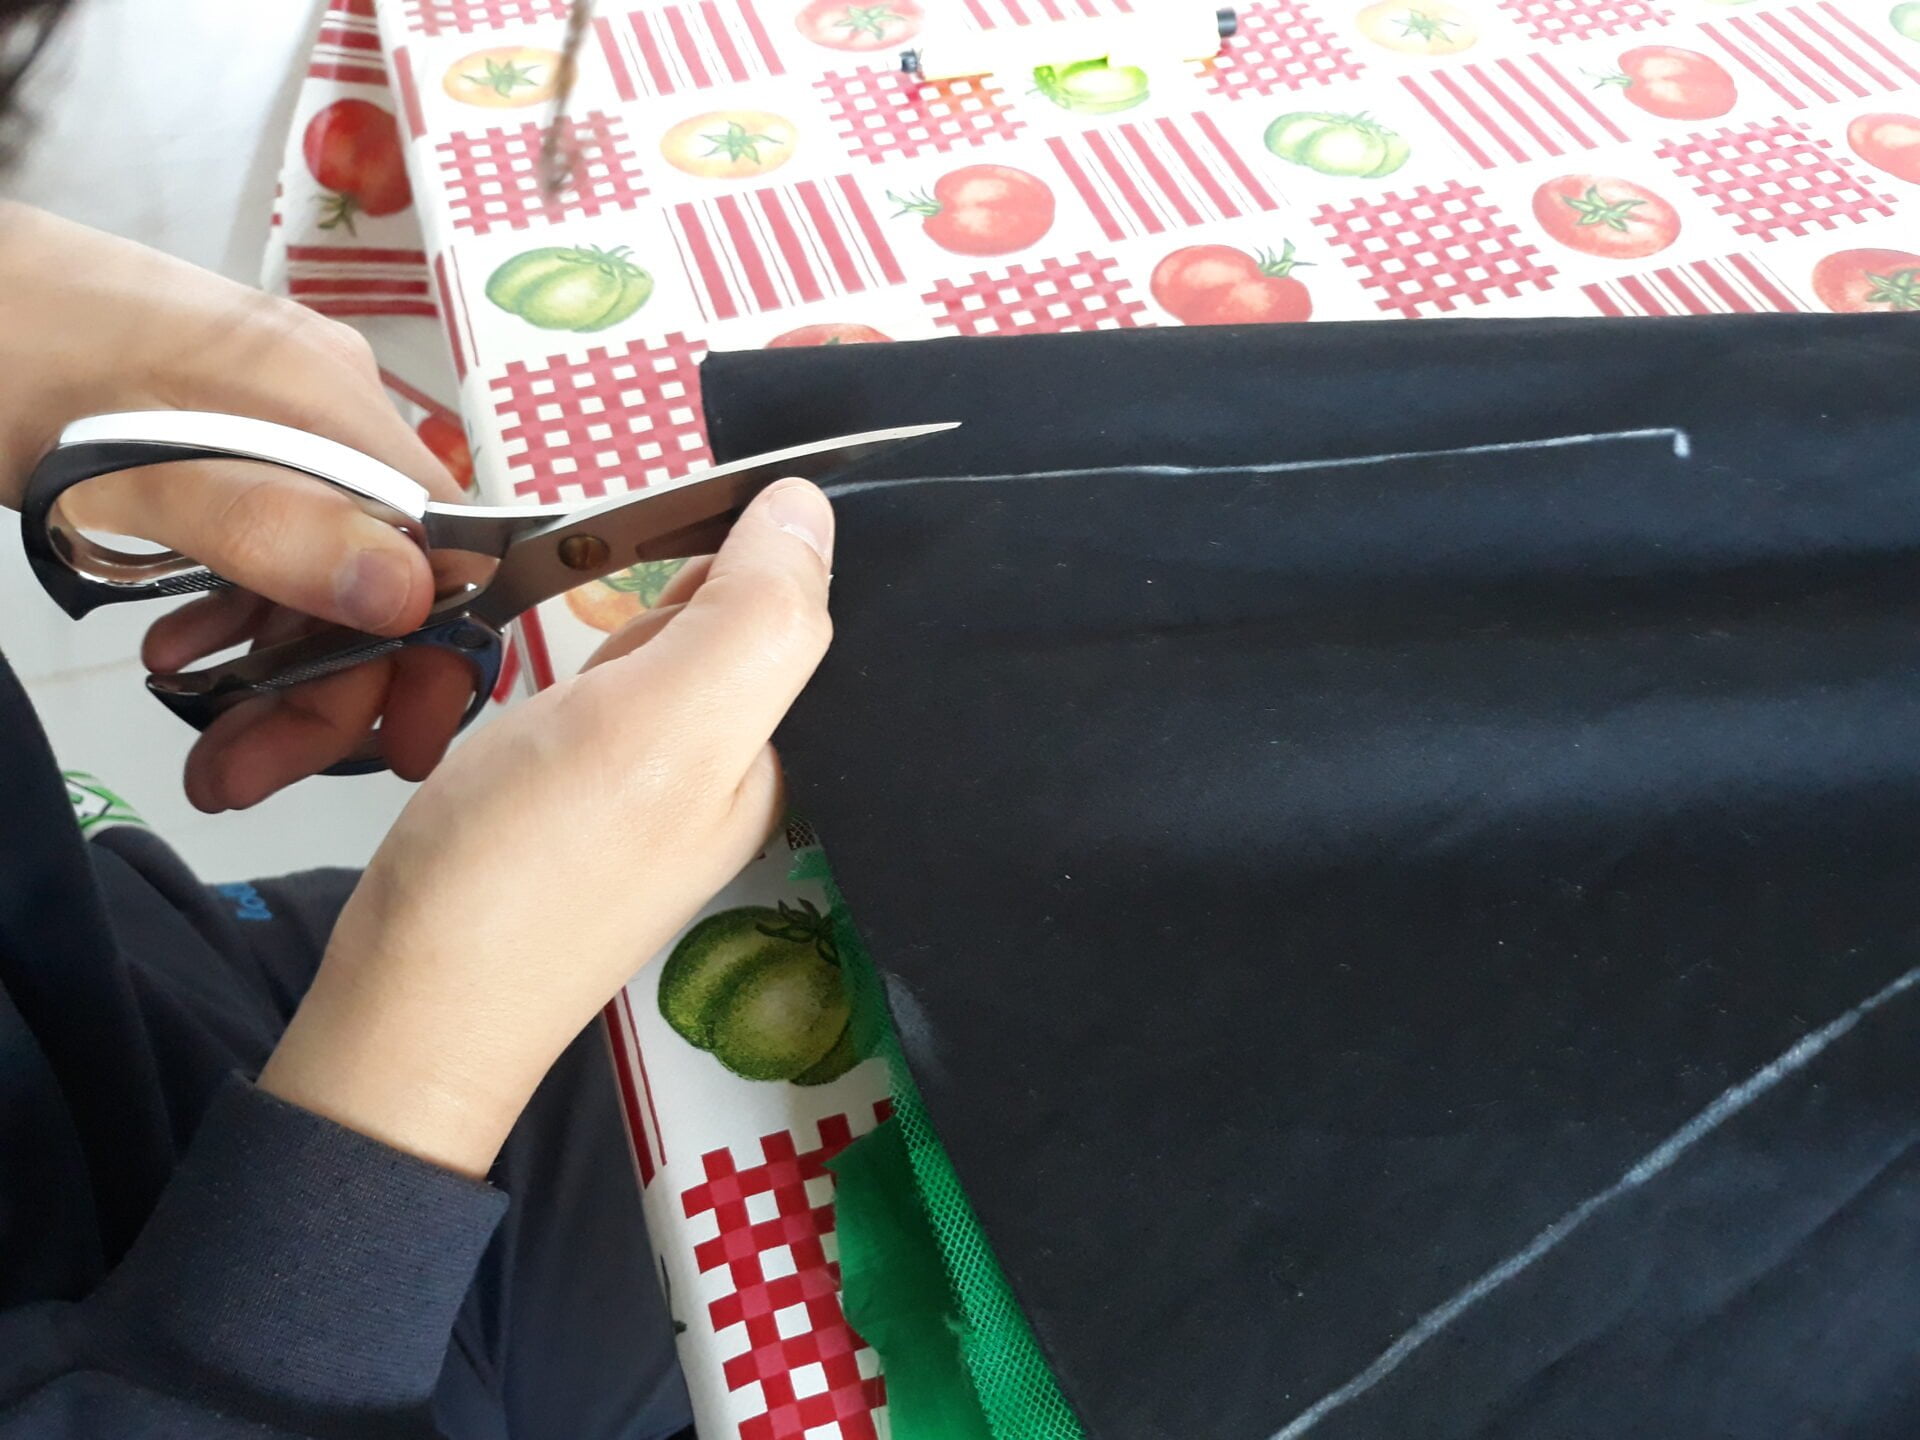
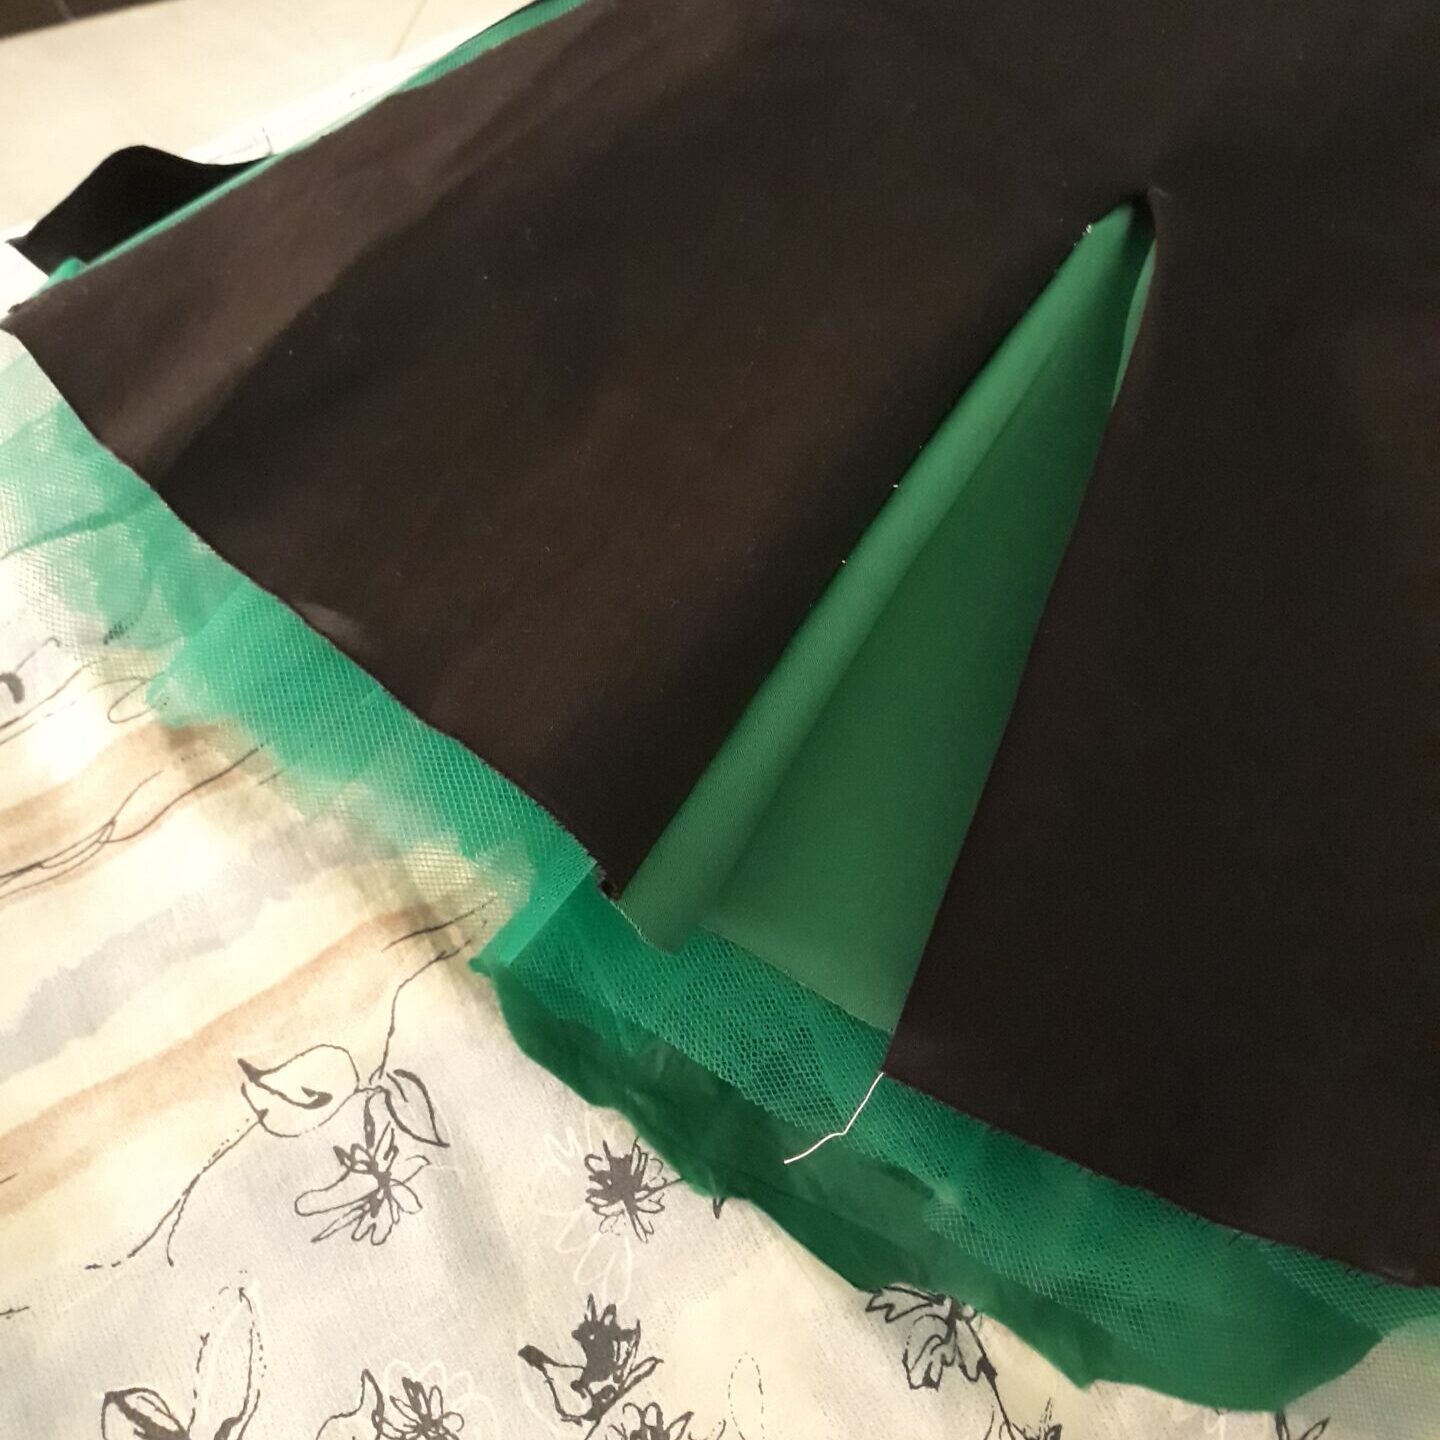
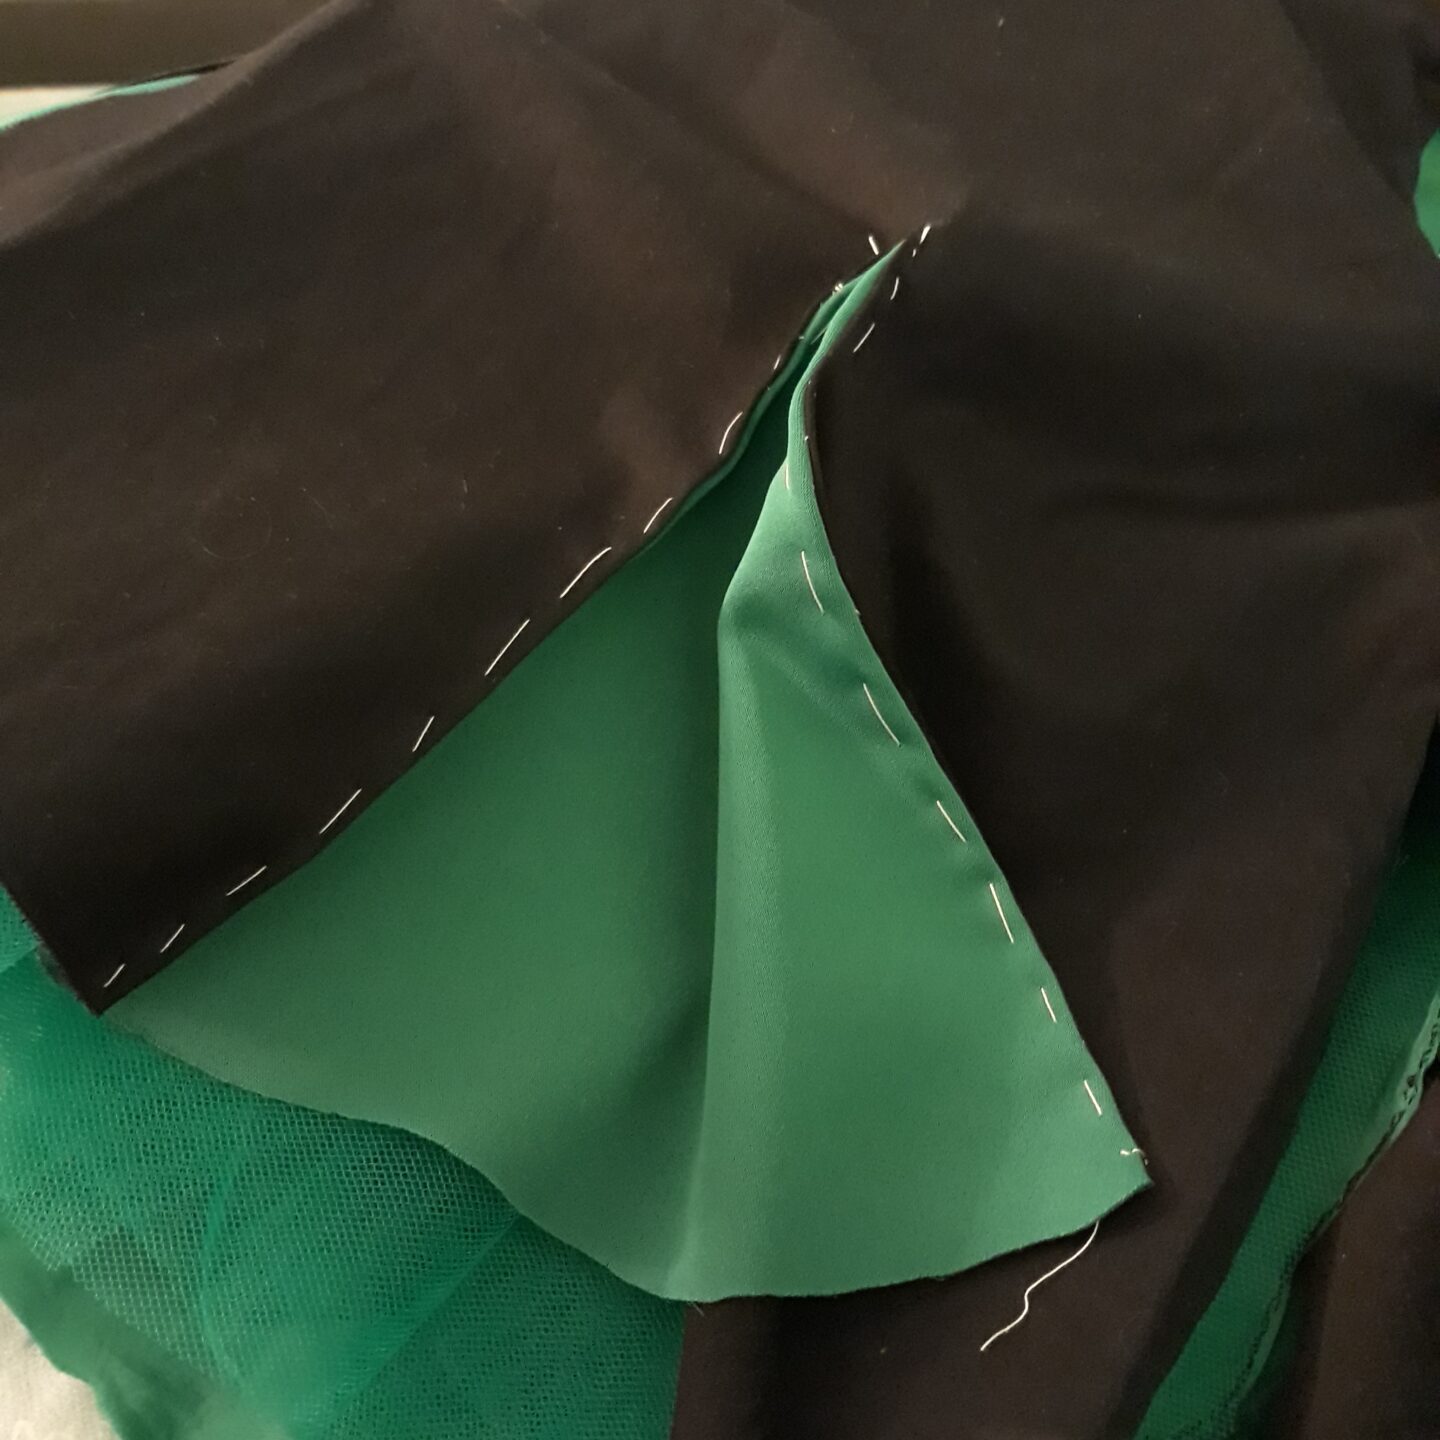
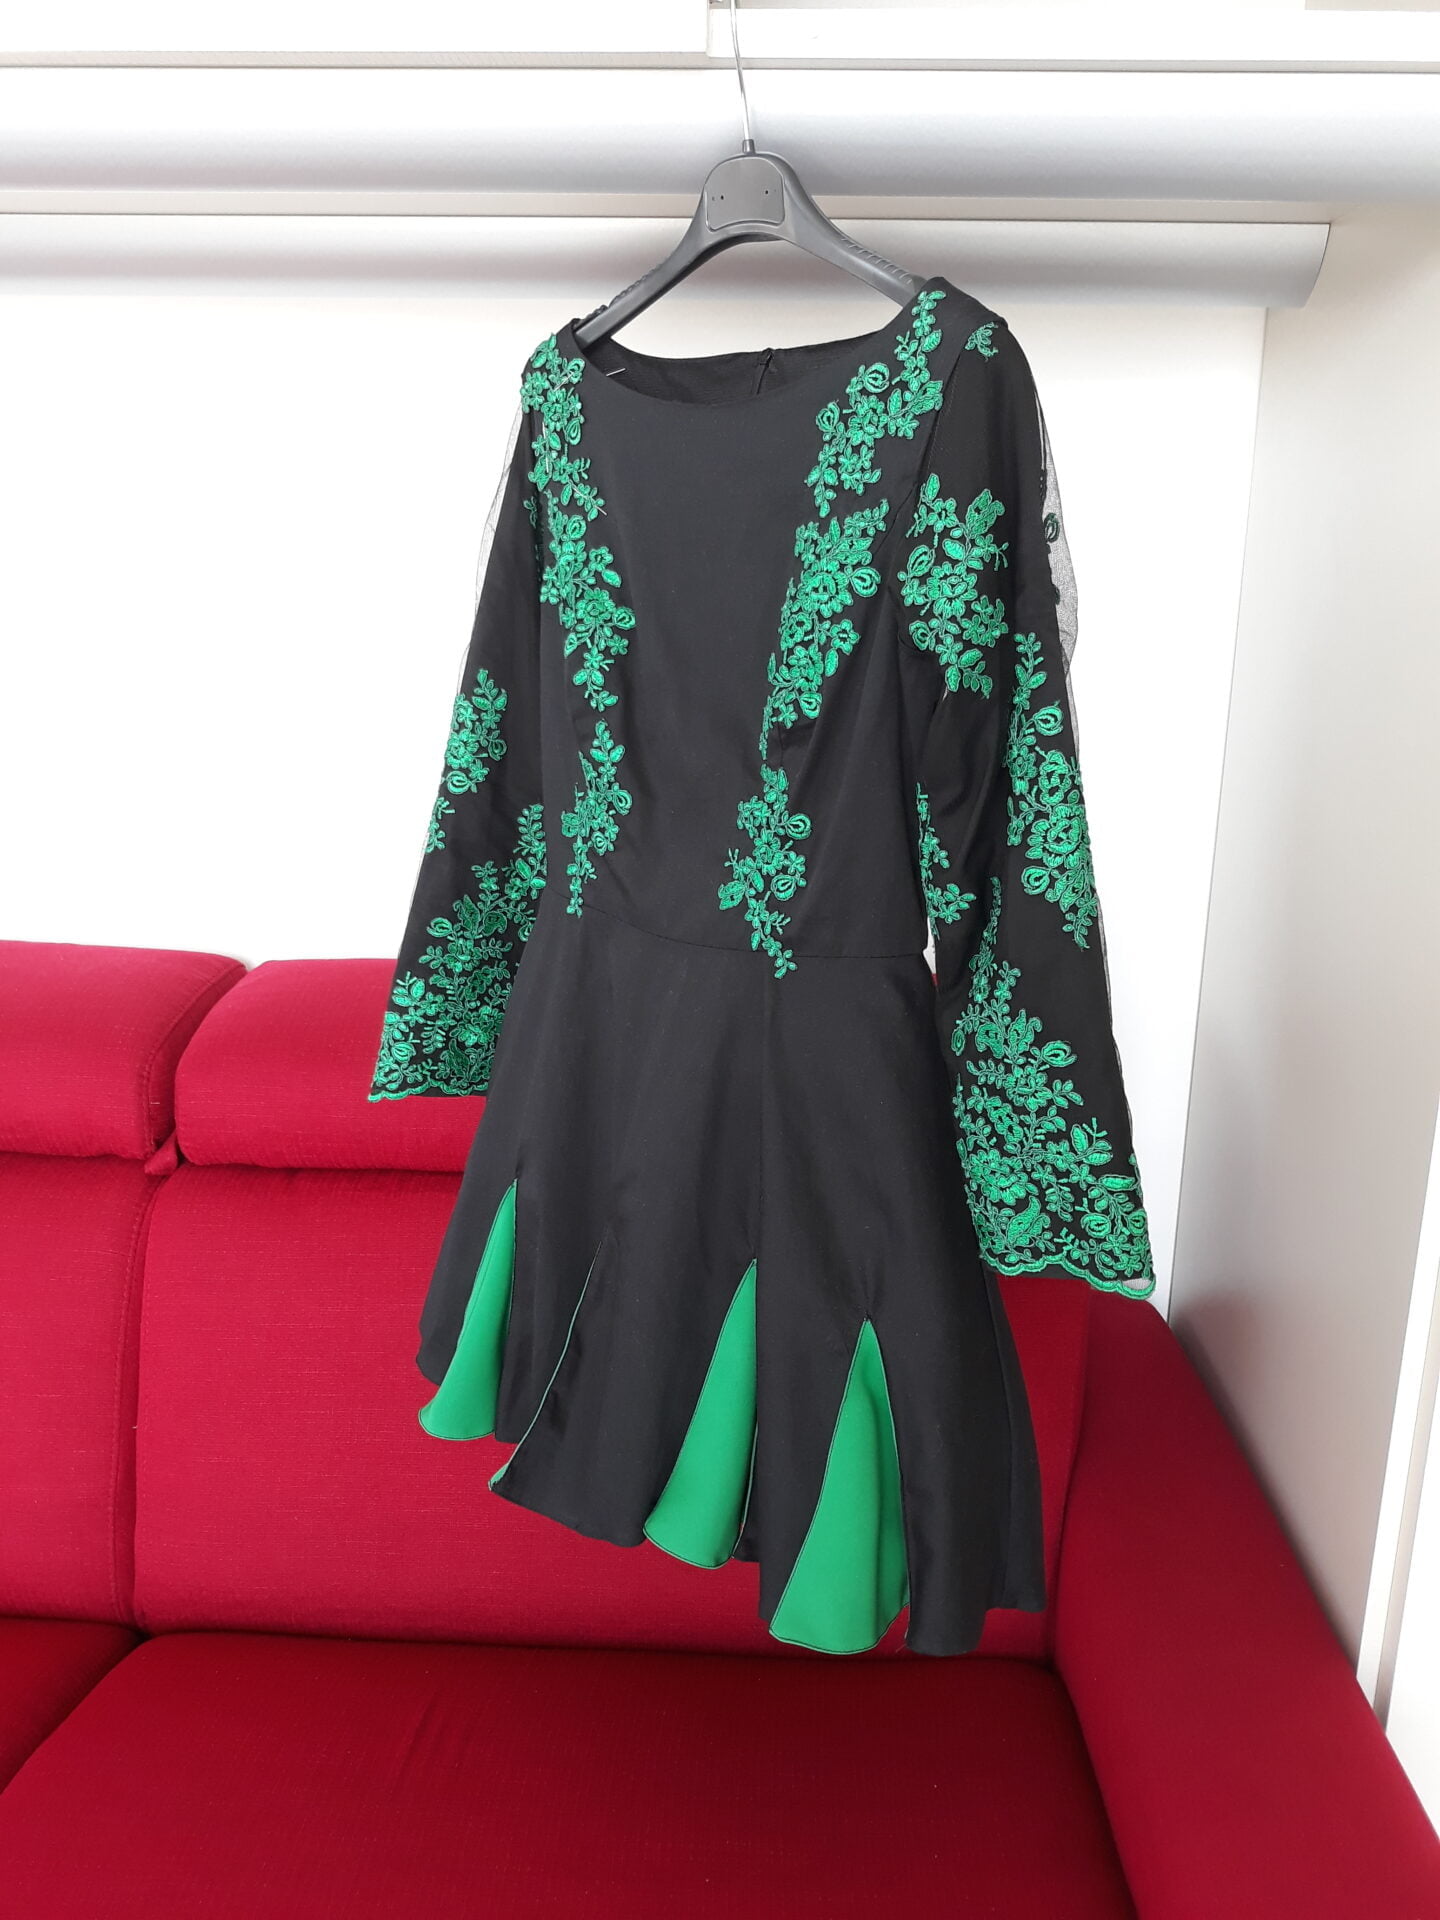
And, after this cut, I wanted to make things more complicated by adding ten green triangles all around. Not a two-layered skirt with cuts on the top layer as first planned, but a wider one, with colored inserts.
An engineer husband can be useful in ways you can’t suspect! Well, I have to say mine is also the grandson of a seamstress, so he saw a lot about dressmaking in his youth.
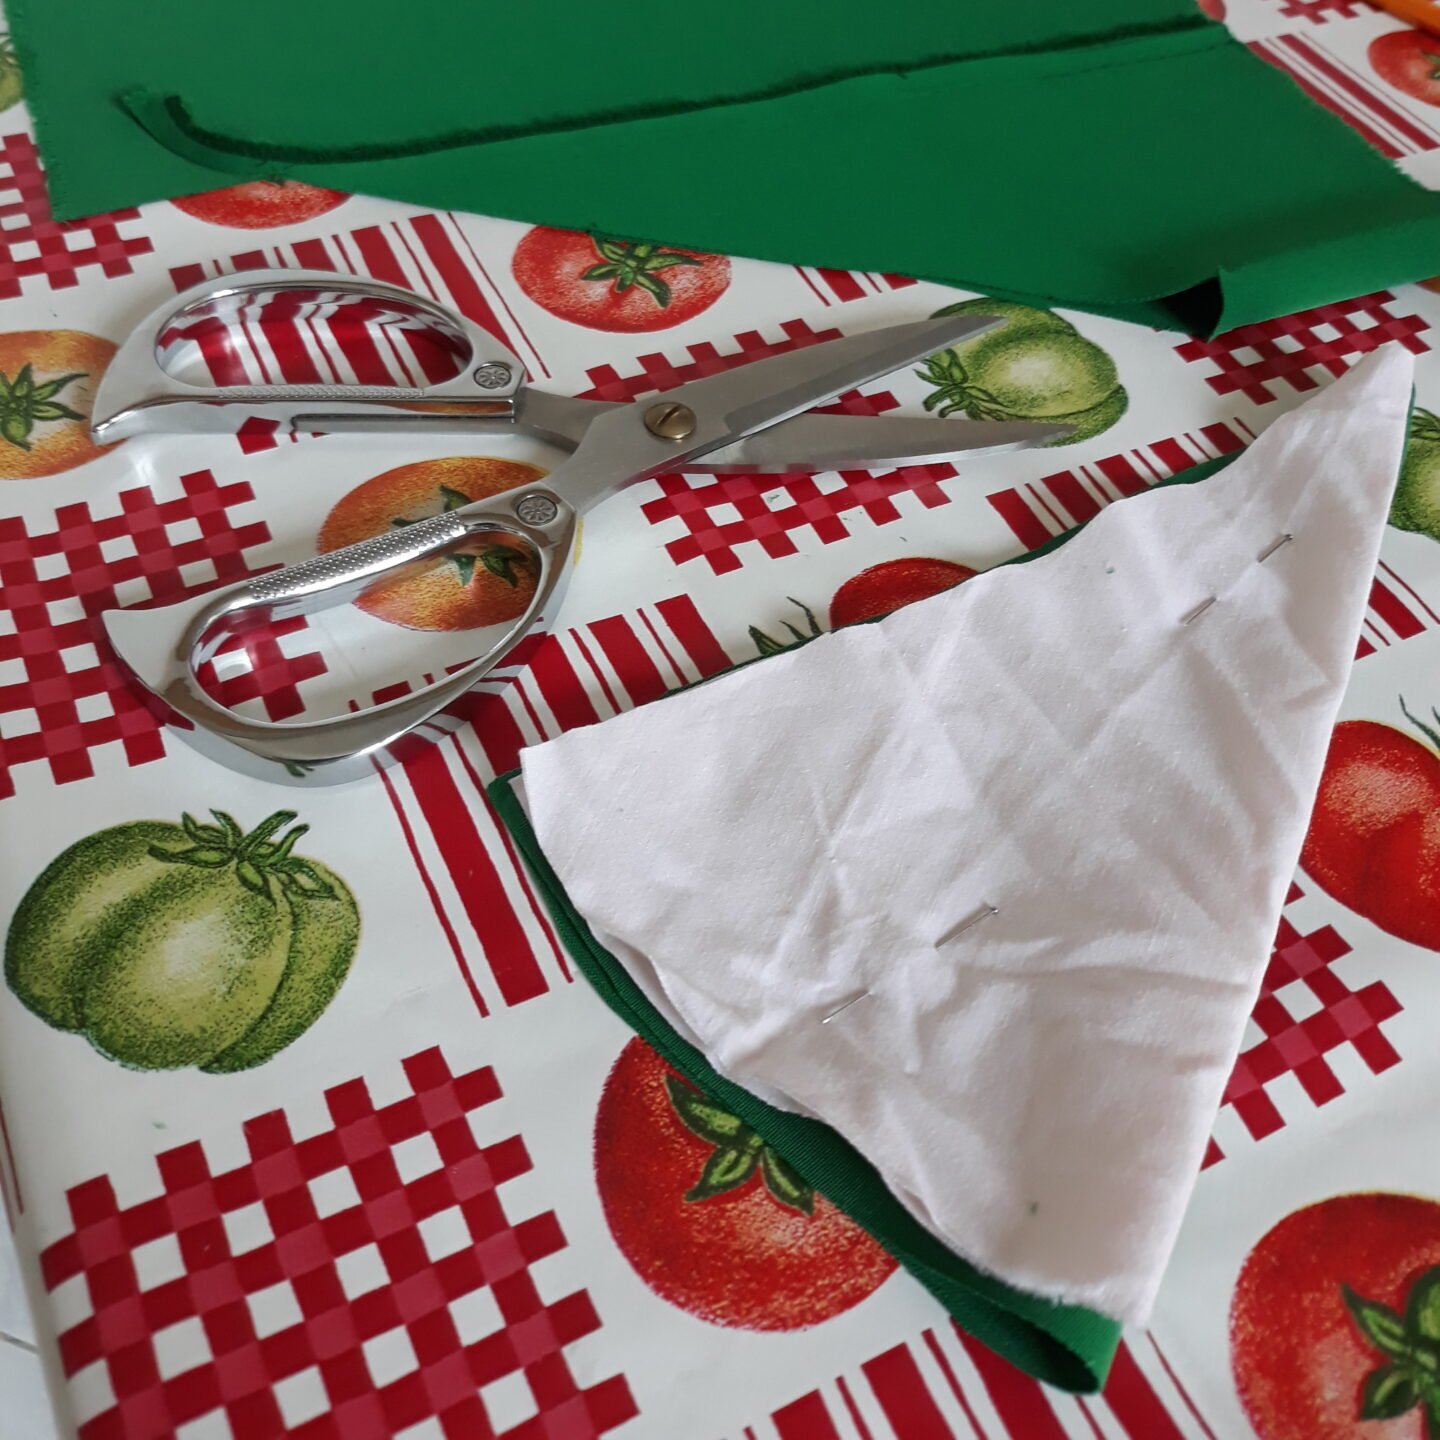
We measured ten triangles in green fabric to be added to the black skirt, and all the planning of how to cut and sew was his. First, we made a prototype on scrap fabric, then used it as a pattern.
I carefully basted all of them and loved the outcome! For the machine sewing (mainly because the next dance competition was approaching), we asked my husband’s grandmother for help. She took no time to finish sewing those triangles to my skirt. She also refinished the lenght of the underskirt and lining and sewed the lining hem.
It began to resemble a basic Irish dance dress! But something important was still missing, and that meant my favourite part had come: the decorations!


How do I wash my DIY solo dress?
Irish dance competitions are tough, I need to wash the dress after every use. This is why I gave so much thought to the washing methods. Before beginning with the project, I machine washed all the fabric (tulle, lace and dress, too) using a normal 40° cycle. Everything went fine, so I thought that a gentle machine wash could be good on the finished dress.
Spoiler. I attended a few competitions with my finished dress, I machine washed it after each one with a gentle cycle (the same used for wool items) and inside a laundry bag: not a single problem!
So I tried with a normal cycle, 40° temperature, always inside the the laundry bag: the dress is great, no shrinking, not a single rhinestone came off, the lace looks like new.
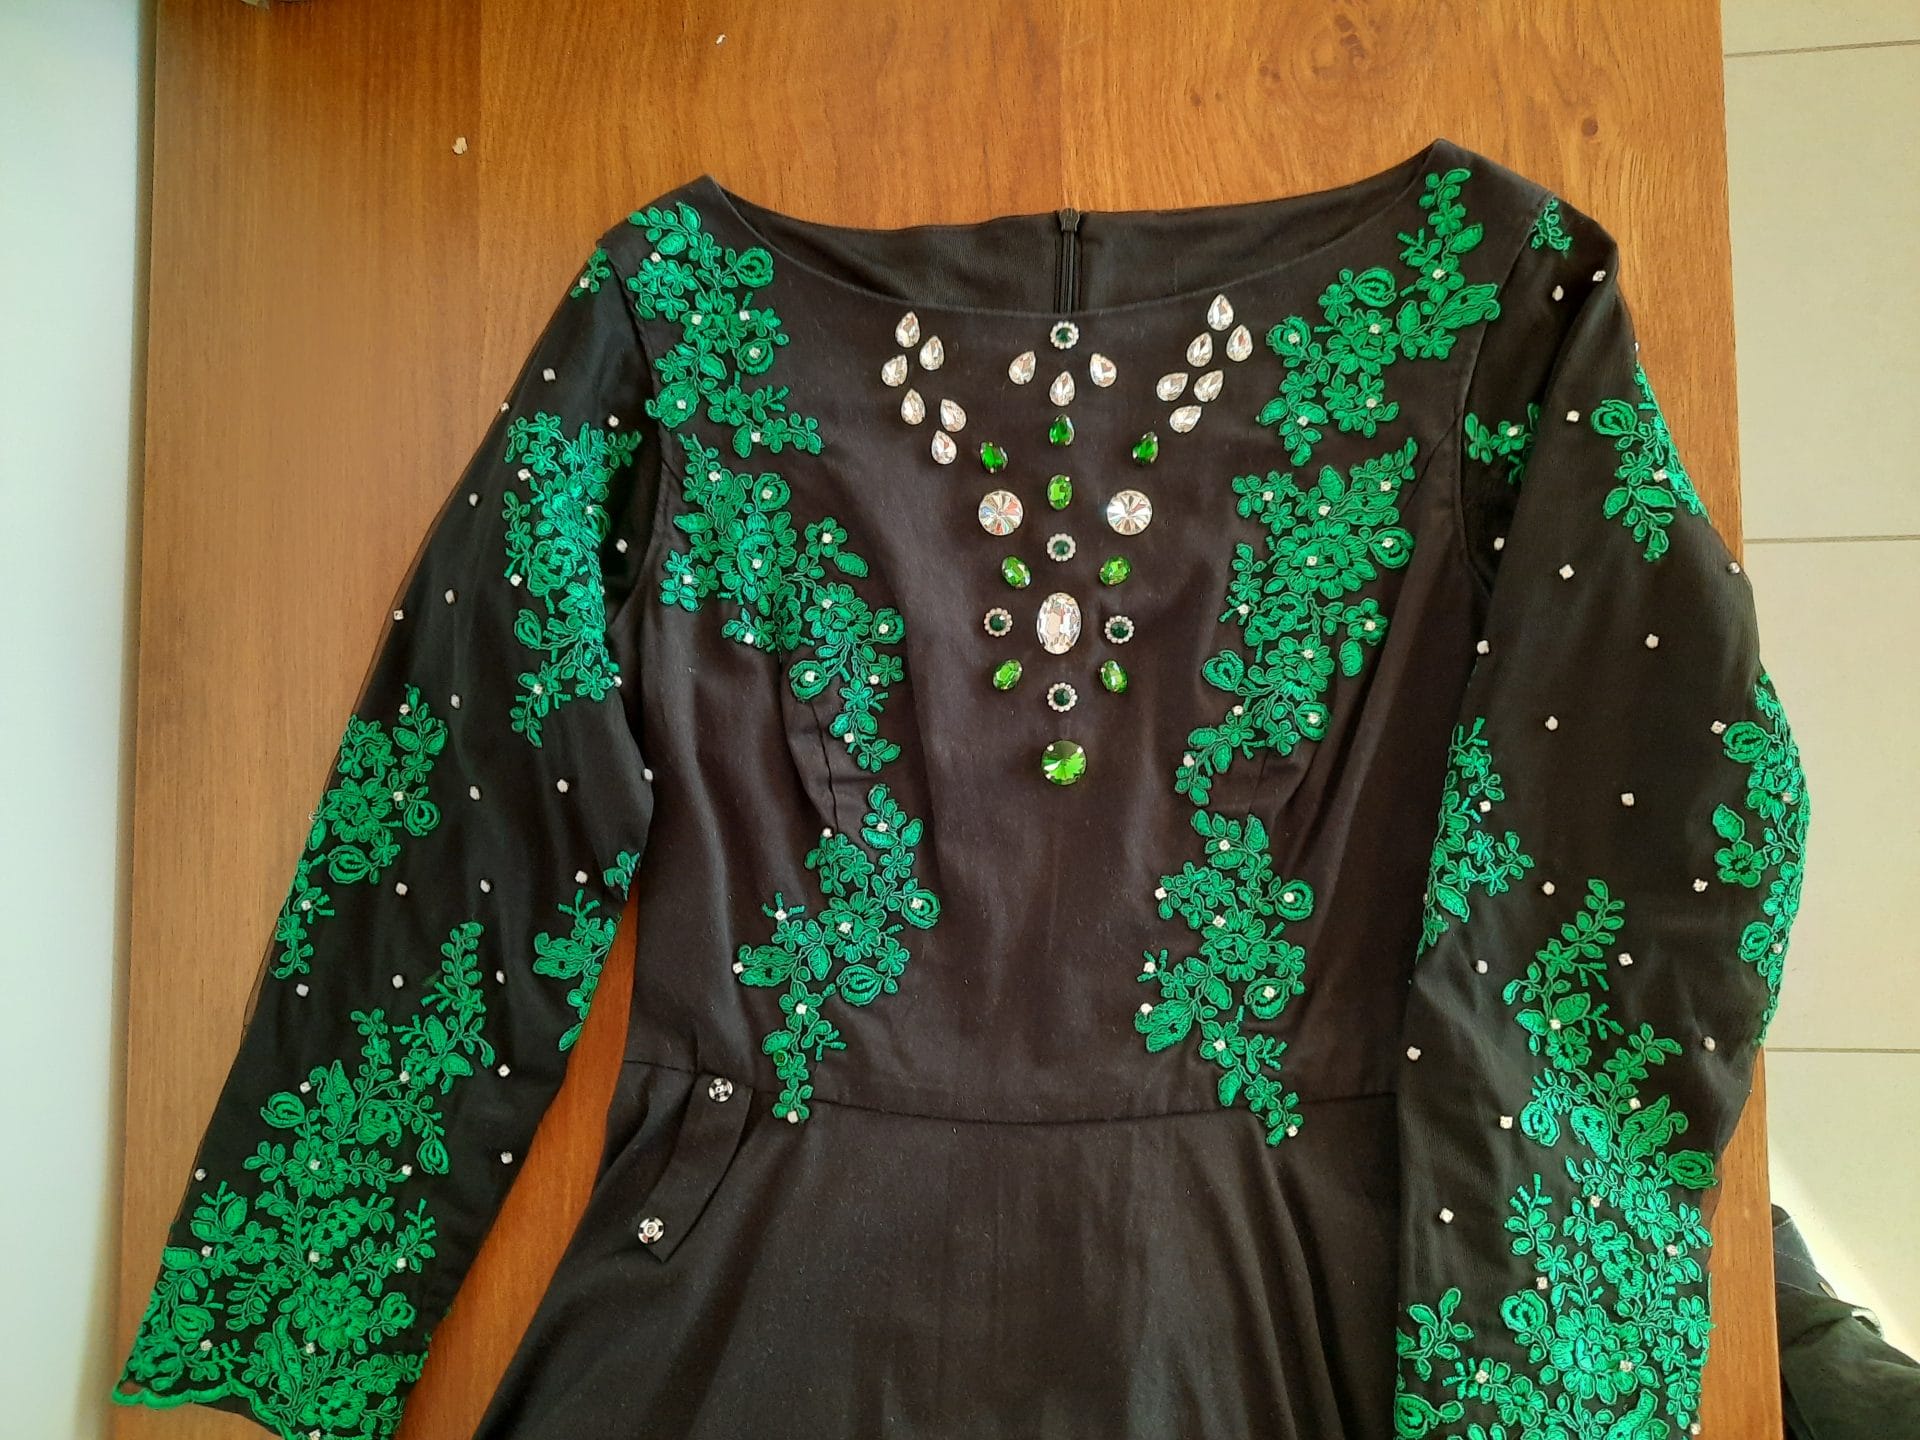
Decorating my Irish dance Solo dress


Adding matching lace on the front
When I began the decorations, I literally had to run to be able to wear the dress during the upcoming feis. I wanted to add all the green decors to the bodice and skirt, just to dance at the competition with a dress that wasn’t totally black.
Seeing the dress in front of me at that stage, I changed my original mind about handembroidery. I wanted to go on with the same lace used on the sleeves. I love it so much that I thought it wasn’t worth spending endless time with another kind of hand decoration.
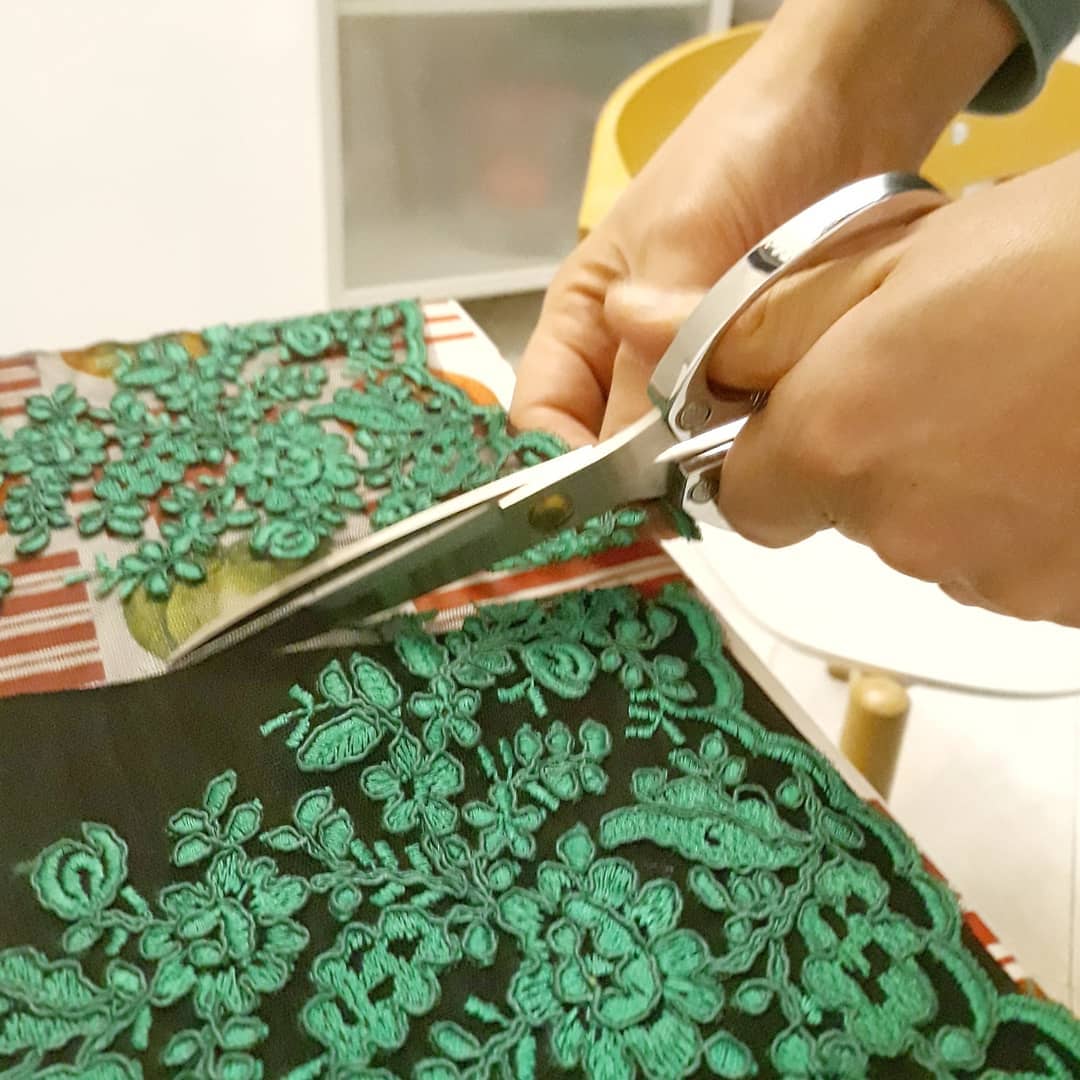
So I carefully cut out single pieces of green decorations to add where the dress was too black. I positioned them on the dress, took photos, reexamined them over and over with my husband, changed several times how much I wanted to add and where.
The first goal, just for the competition ahead, was to add a bit of green where it lacked color, then complete the decorations later, after the end of the competition season.
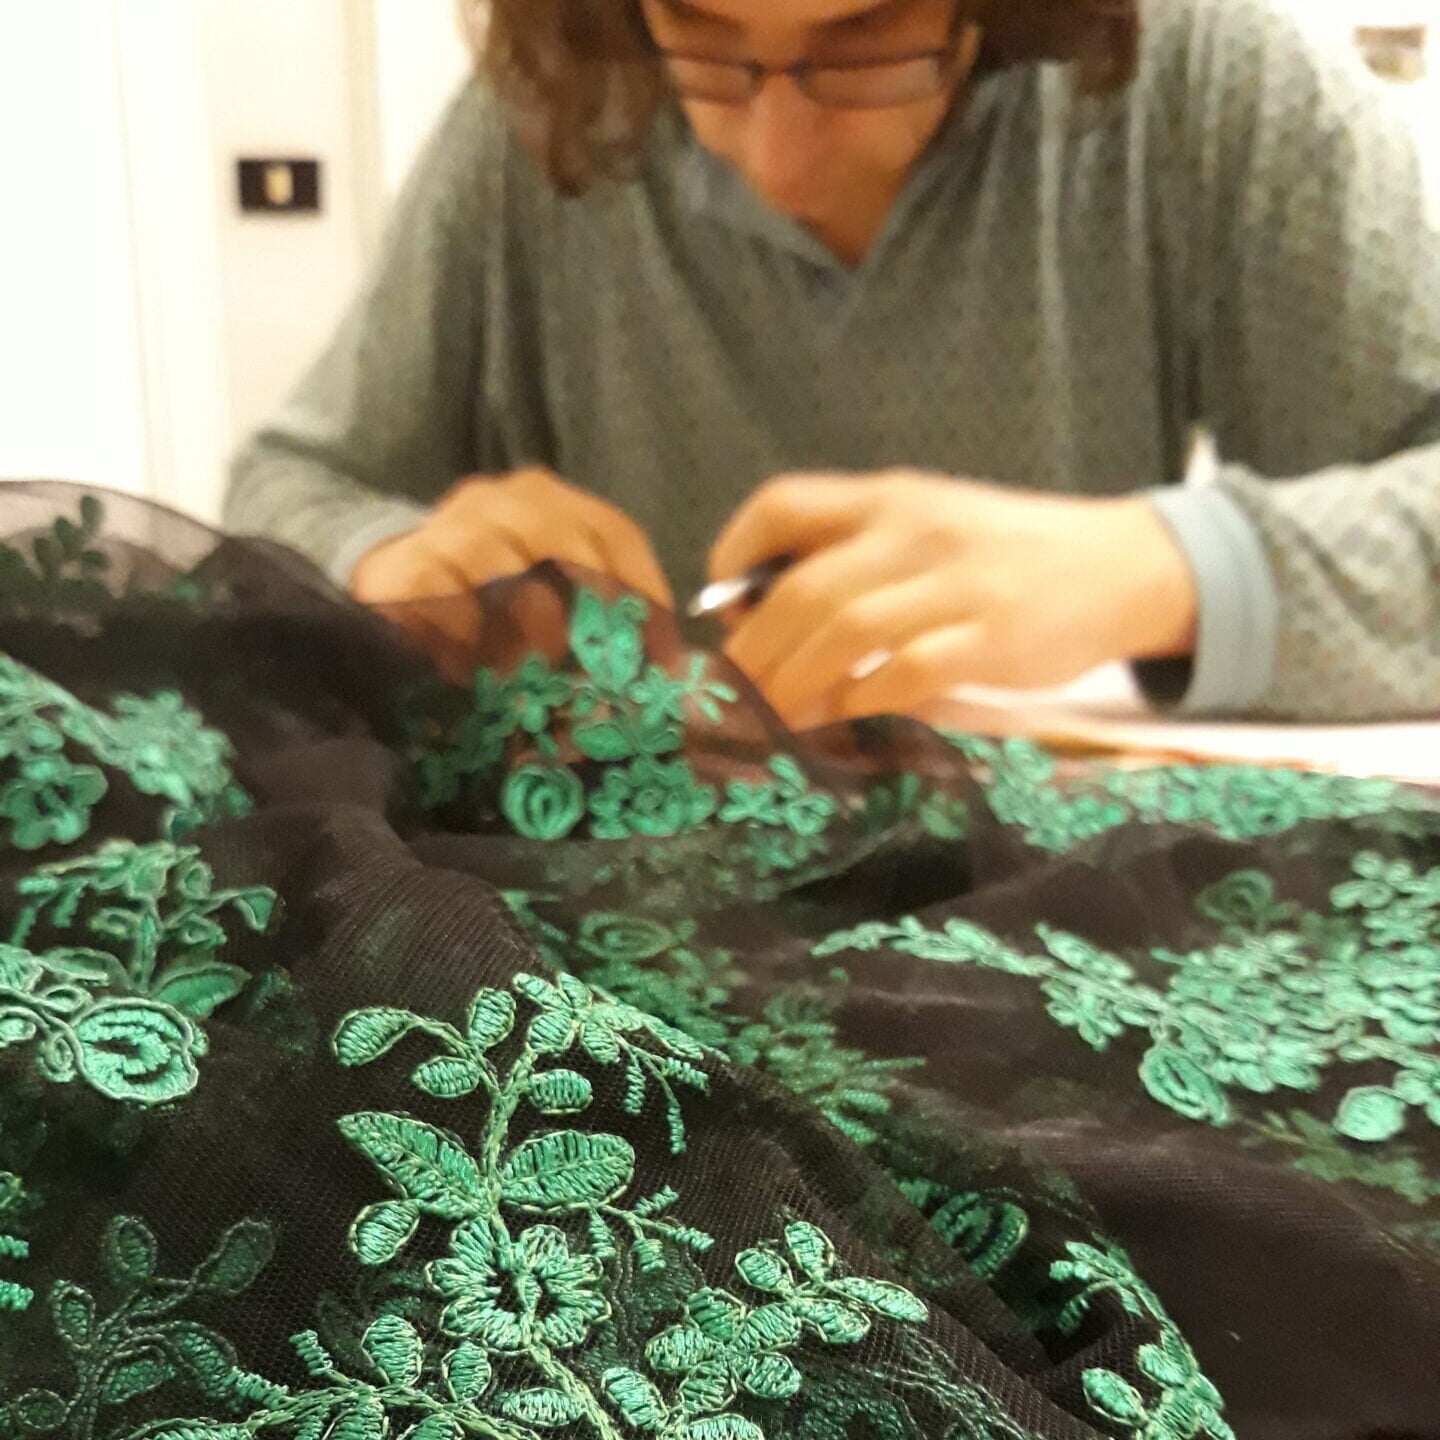
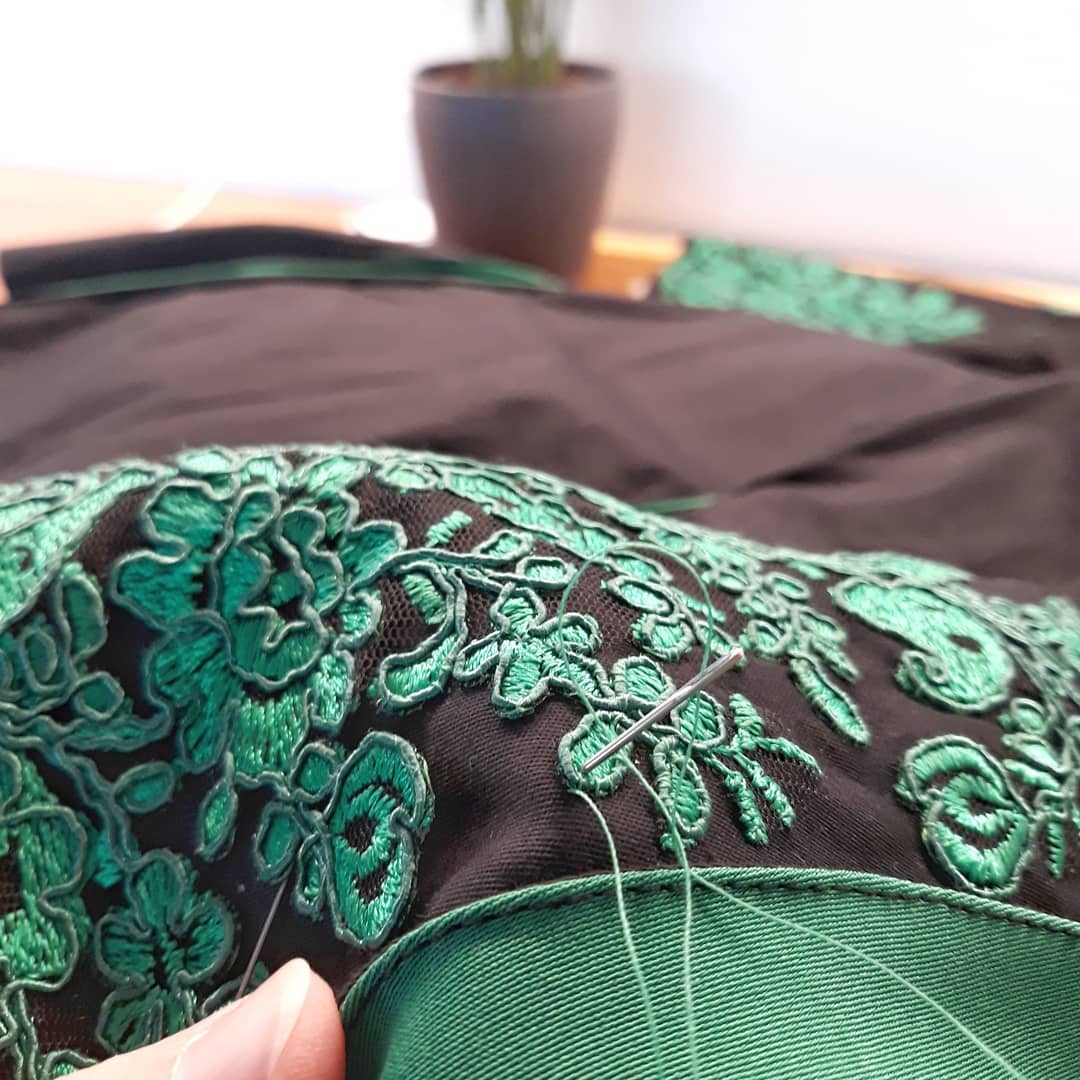
I handsewed all the green lace. And I was more than careful doing that! I strongly stitched every single twist and turn and curl, leaving no place unstitched. The main goal was to make the dress and its decorations sturdy and strong to resist even the most daring dance.
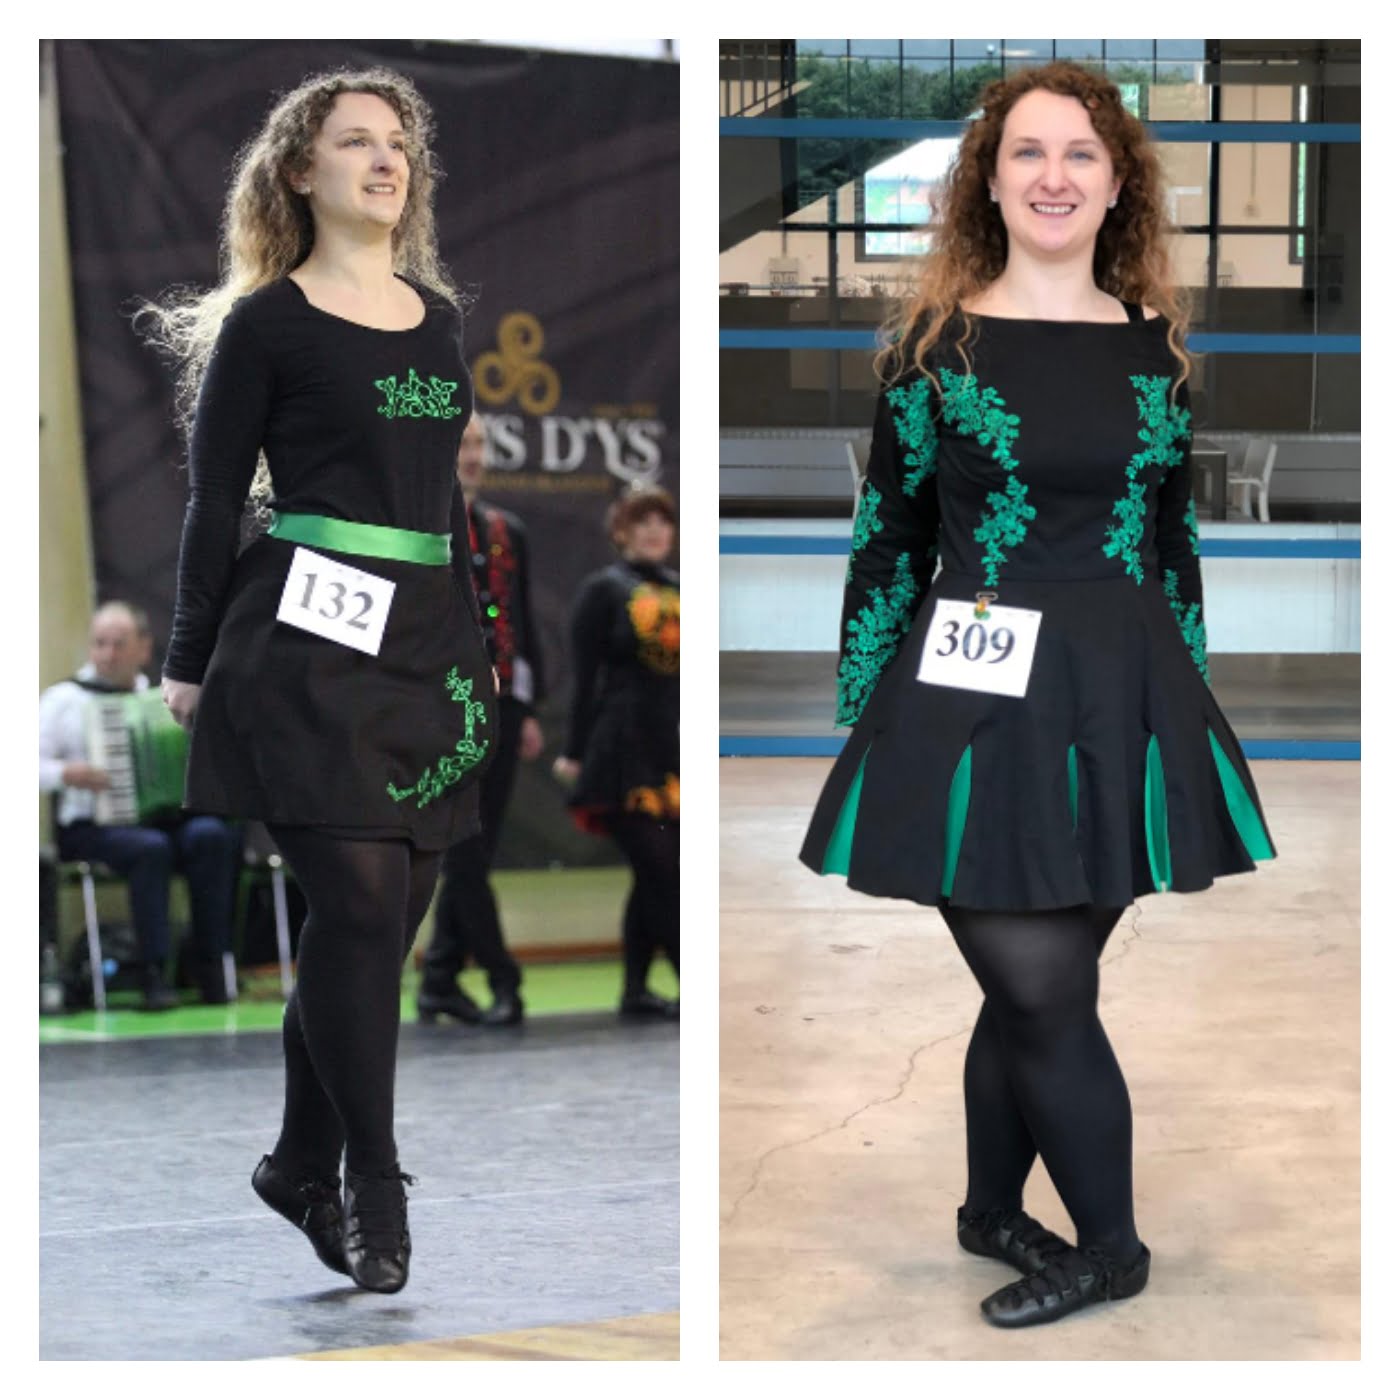
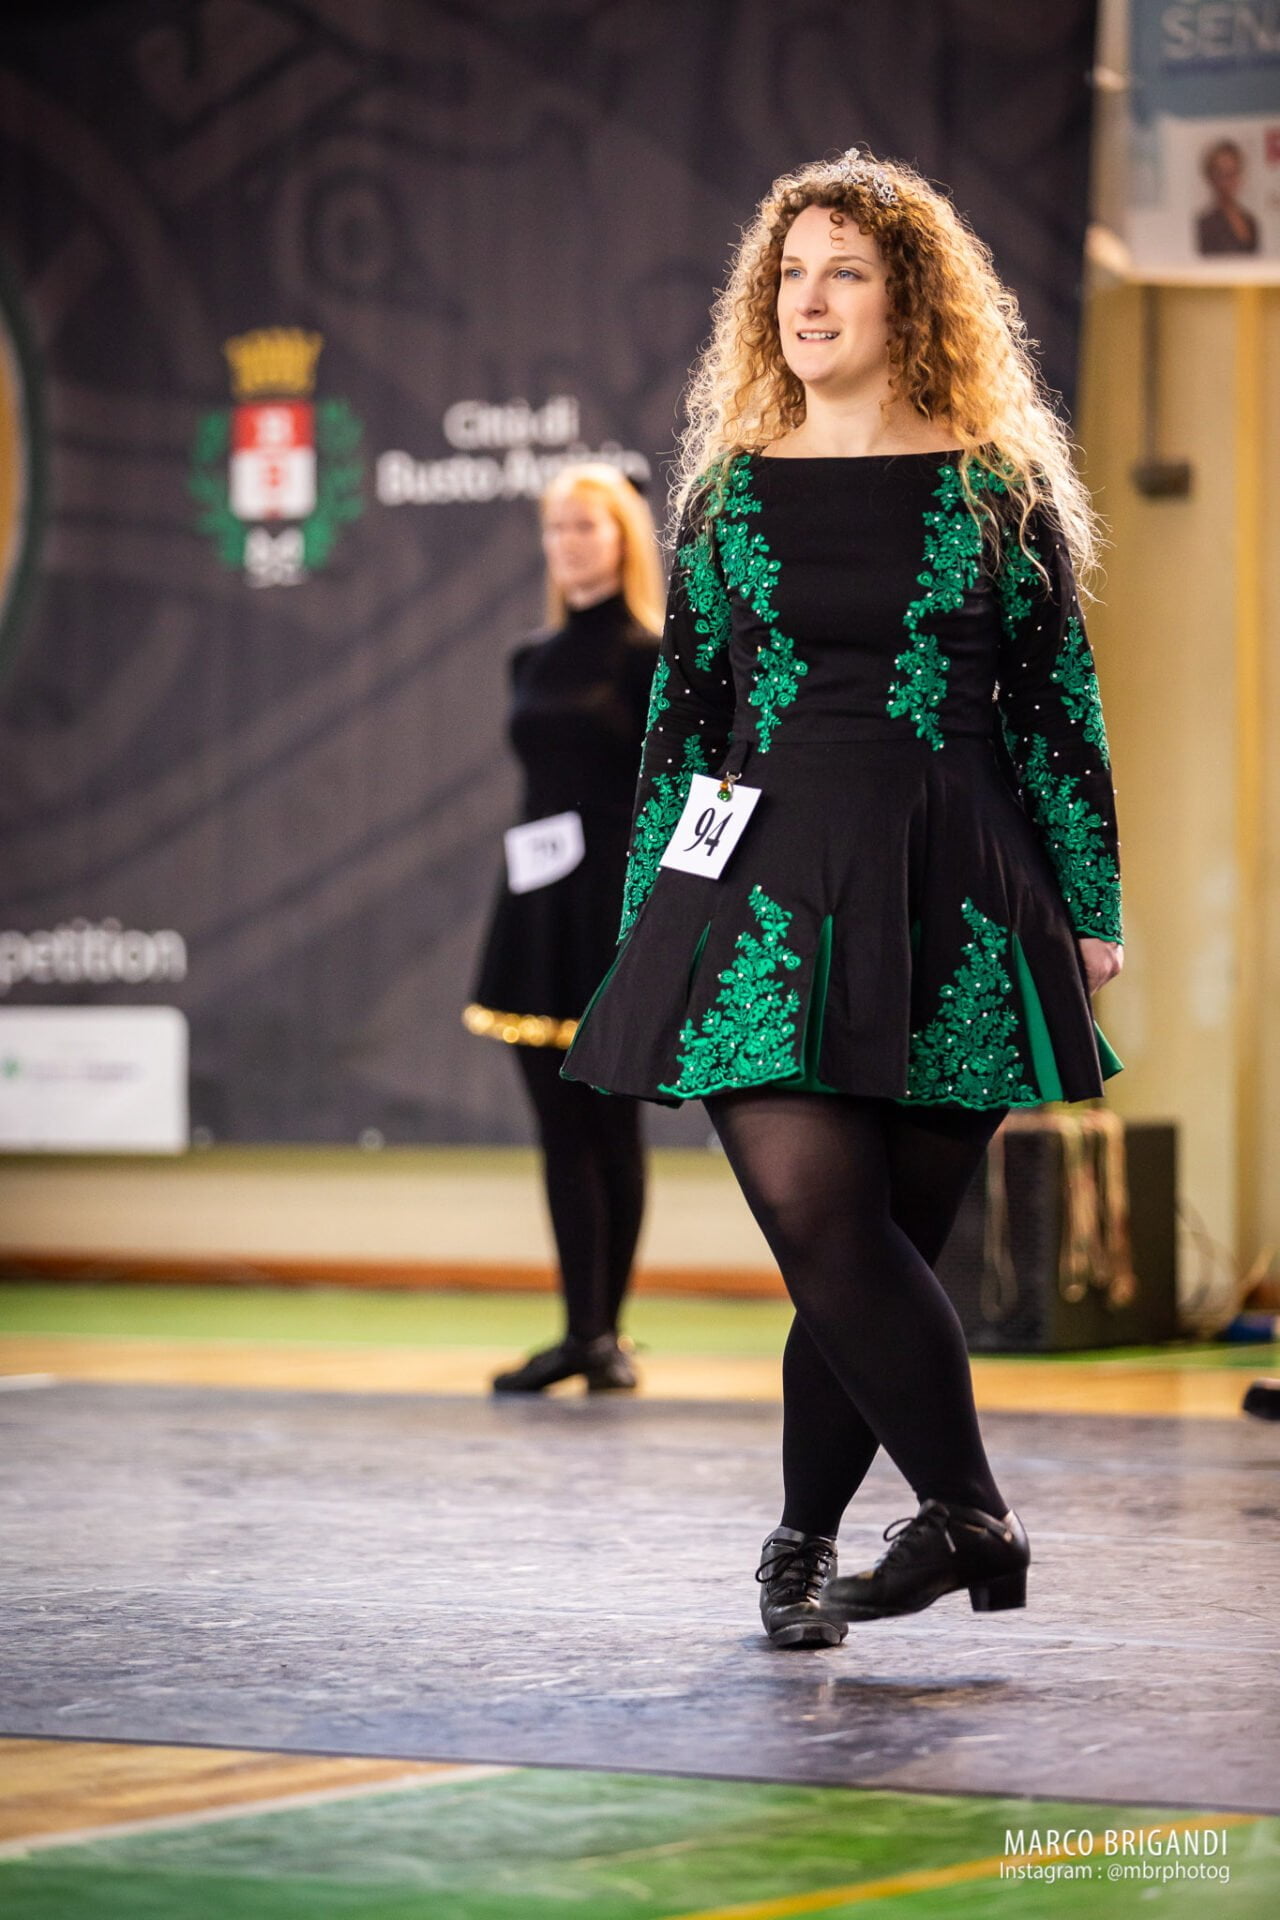
Finally, in May 2019 I was able to wear my Irish dance Solo dress for the first time! It was comfortable, it behaved just like I imagined it. And it gave me a more “professional” look next to more traditional dresses than the class skirt and t-shirt I used to wear.
I had time just to sew the green lace to the bodice, I had to leave the skirt all black. Well, I have to say I was glad the work was not finished yet! I enjoyed a lot working on my dress.
It came out quite different from the dress I drew and planned. I renounced the swan collar because my basic dress had a straight neckline, and I did like it in the end. The lace was the main reason my dress came out as it is, and I’m glad I’ve found it at the fabric store.
After the end of the 2019 competition season, I had my plan to finish adding the green lace to the skirt and then adding sparkles. They are so ubiquitous in Irish dance, I couldn’t go without.


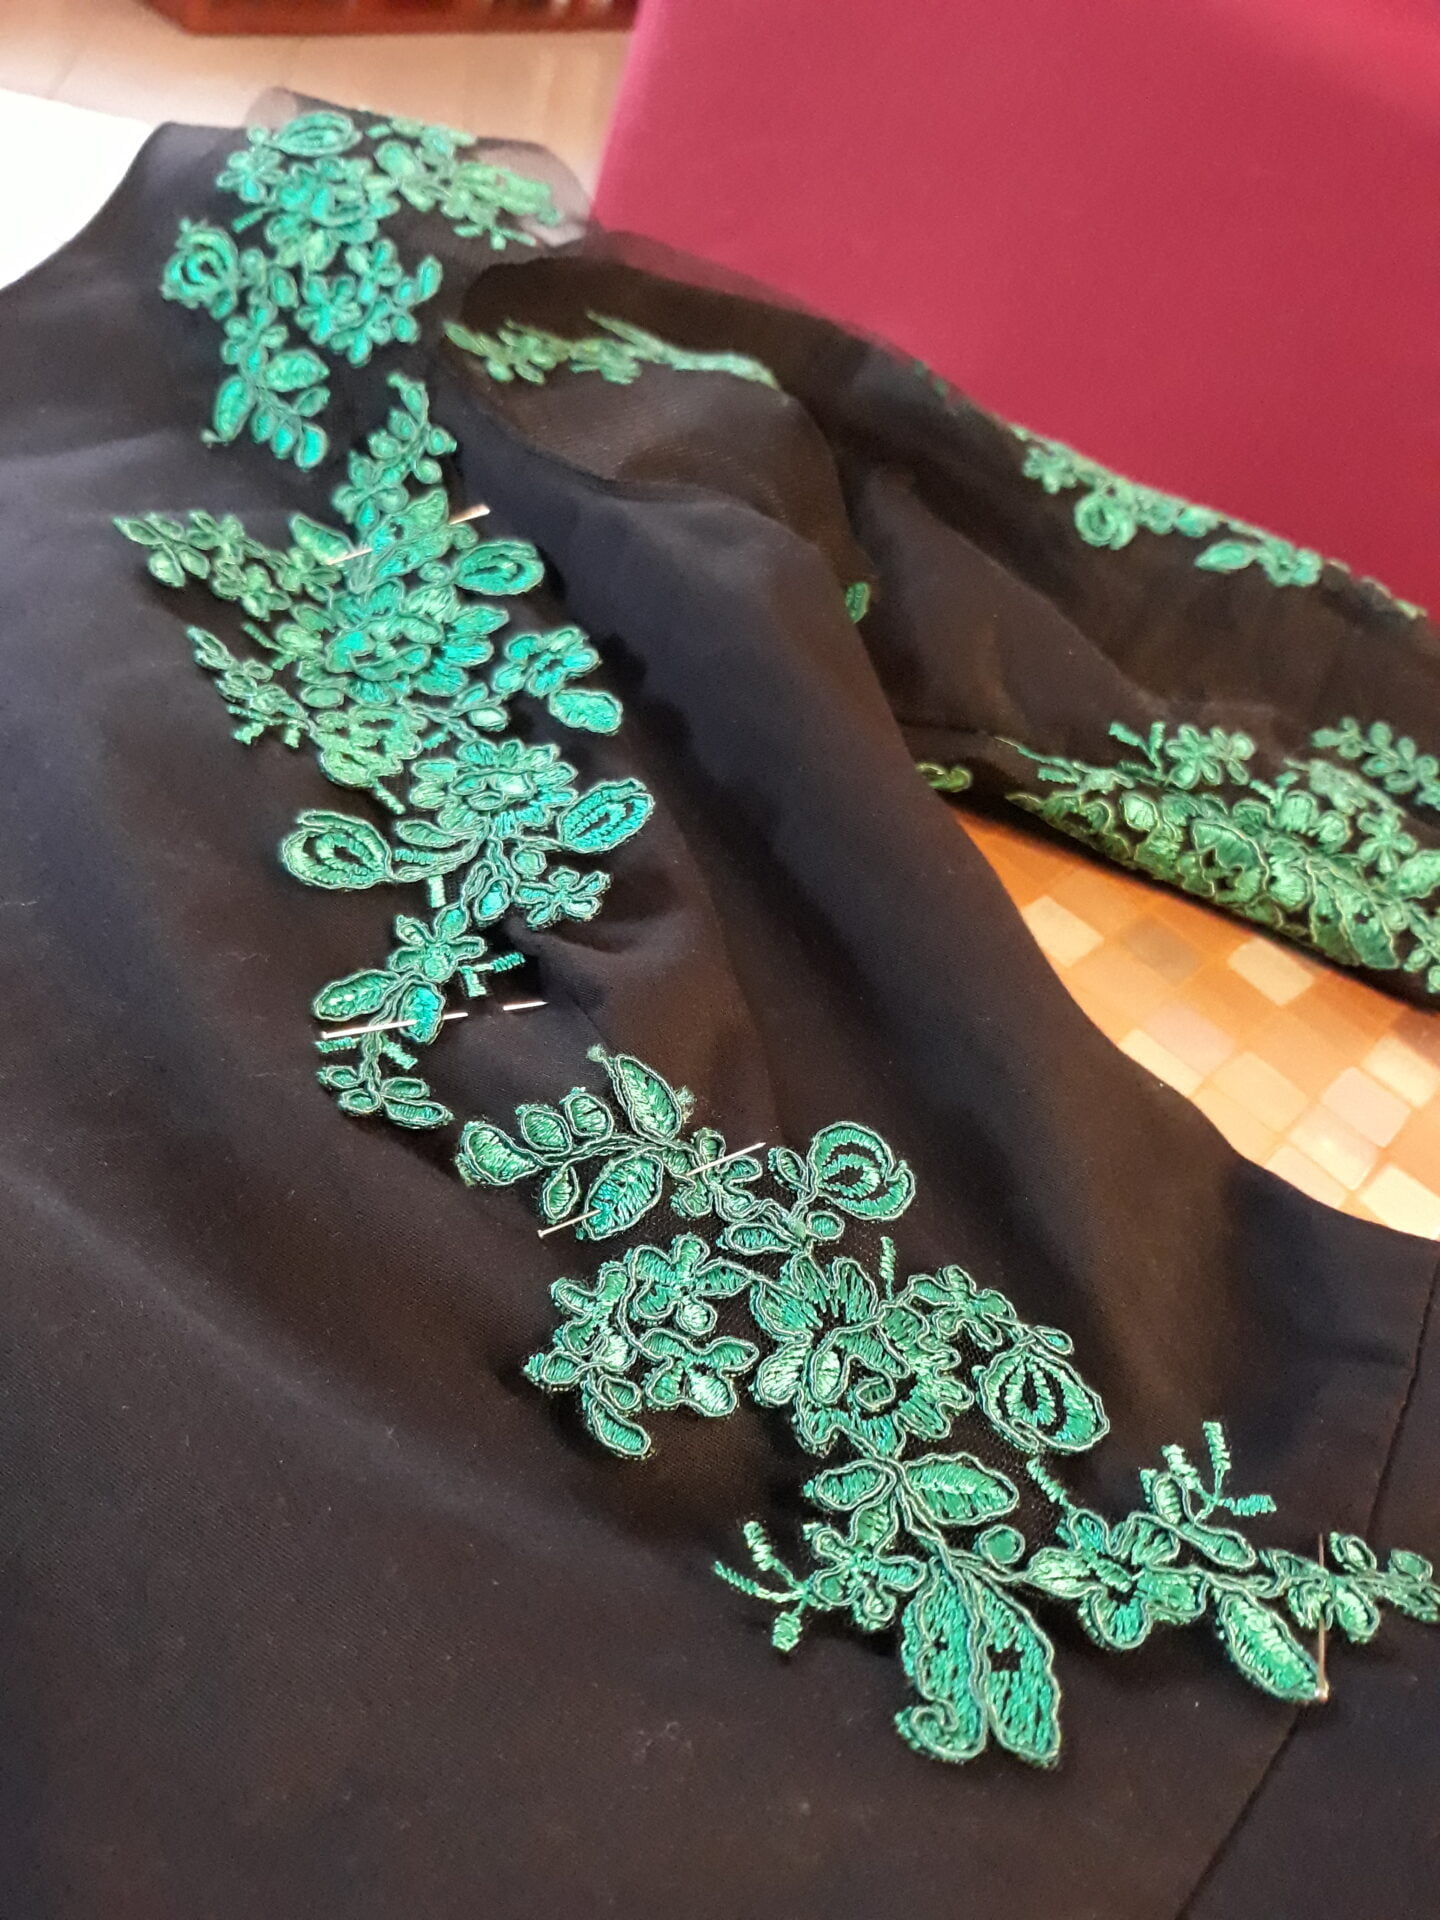
More lace additions on the skirt
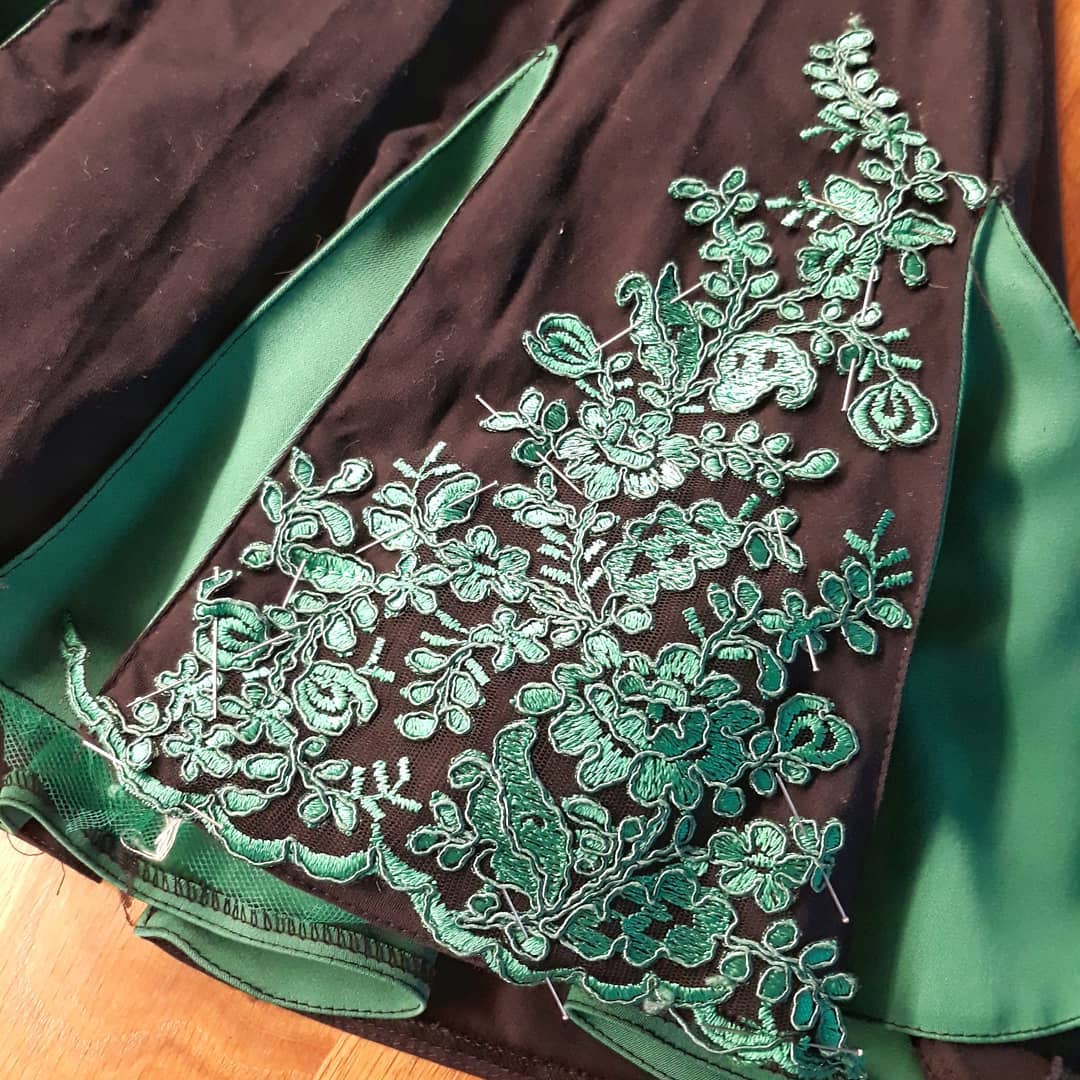
About the skirt, I had metres and metres of stitching to make to attach the green lace all around. A seemingly endless work! But this is the part I longed for most, so I enjoyed each single step, being careful in all my hand stitching.
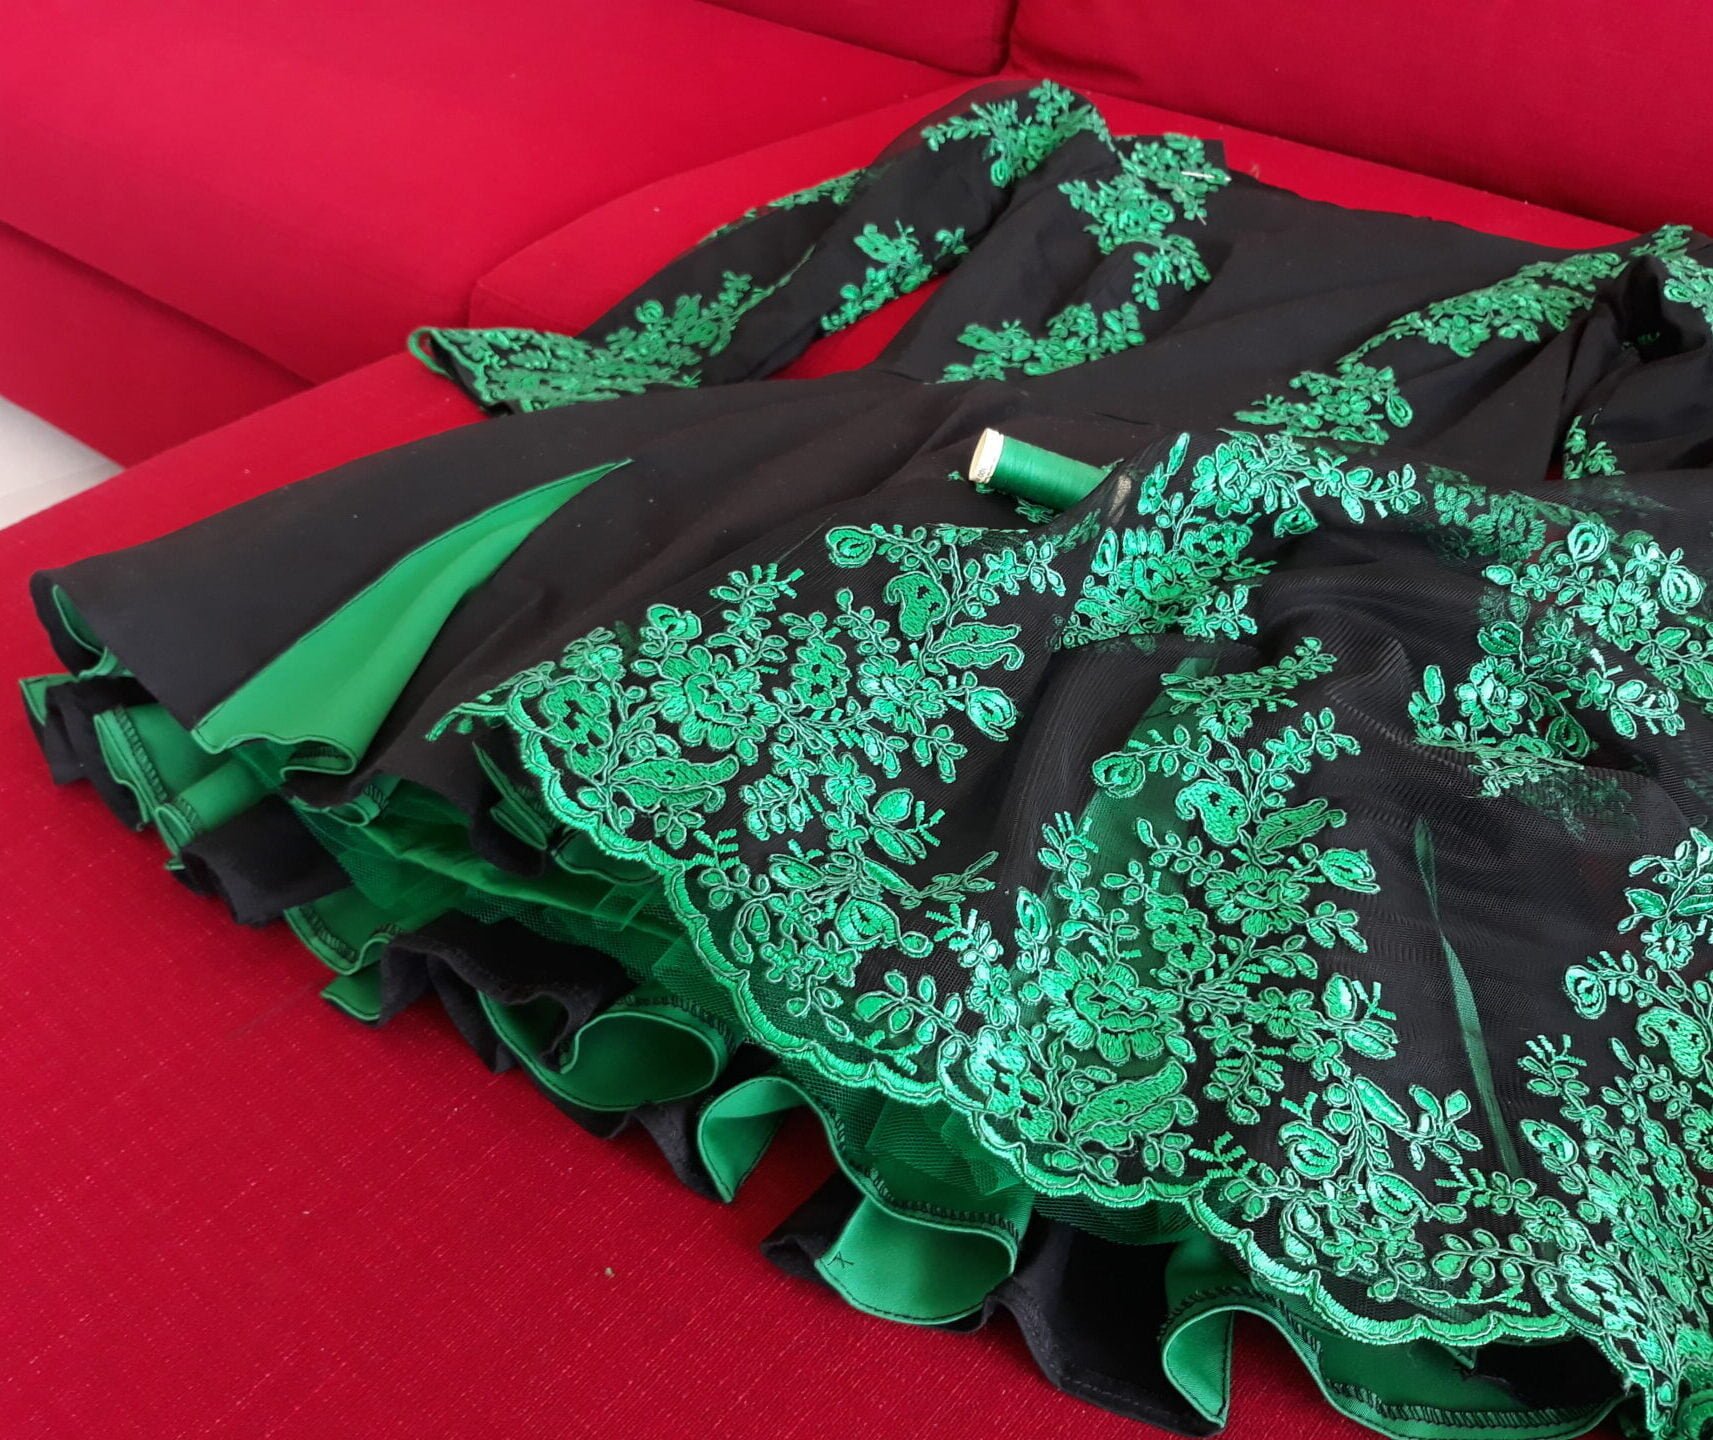
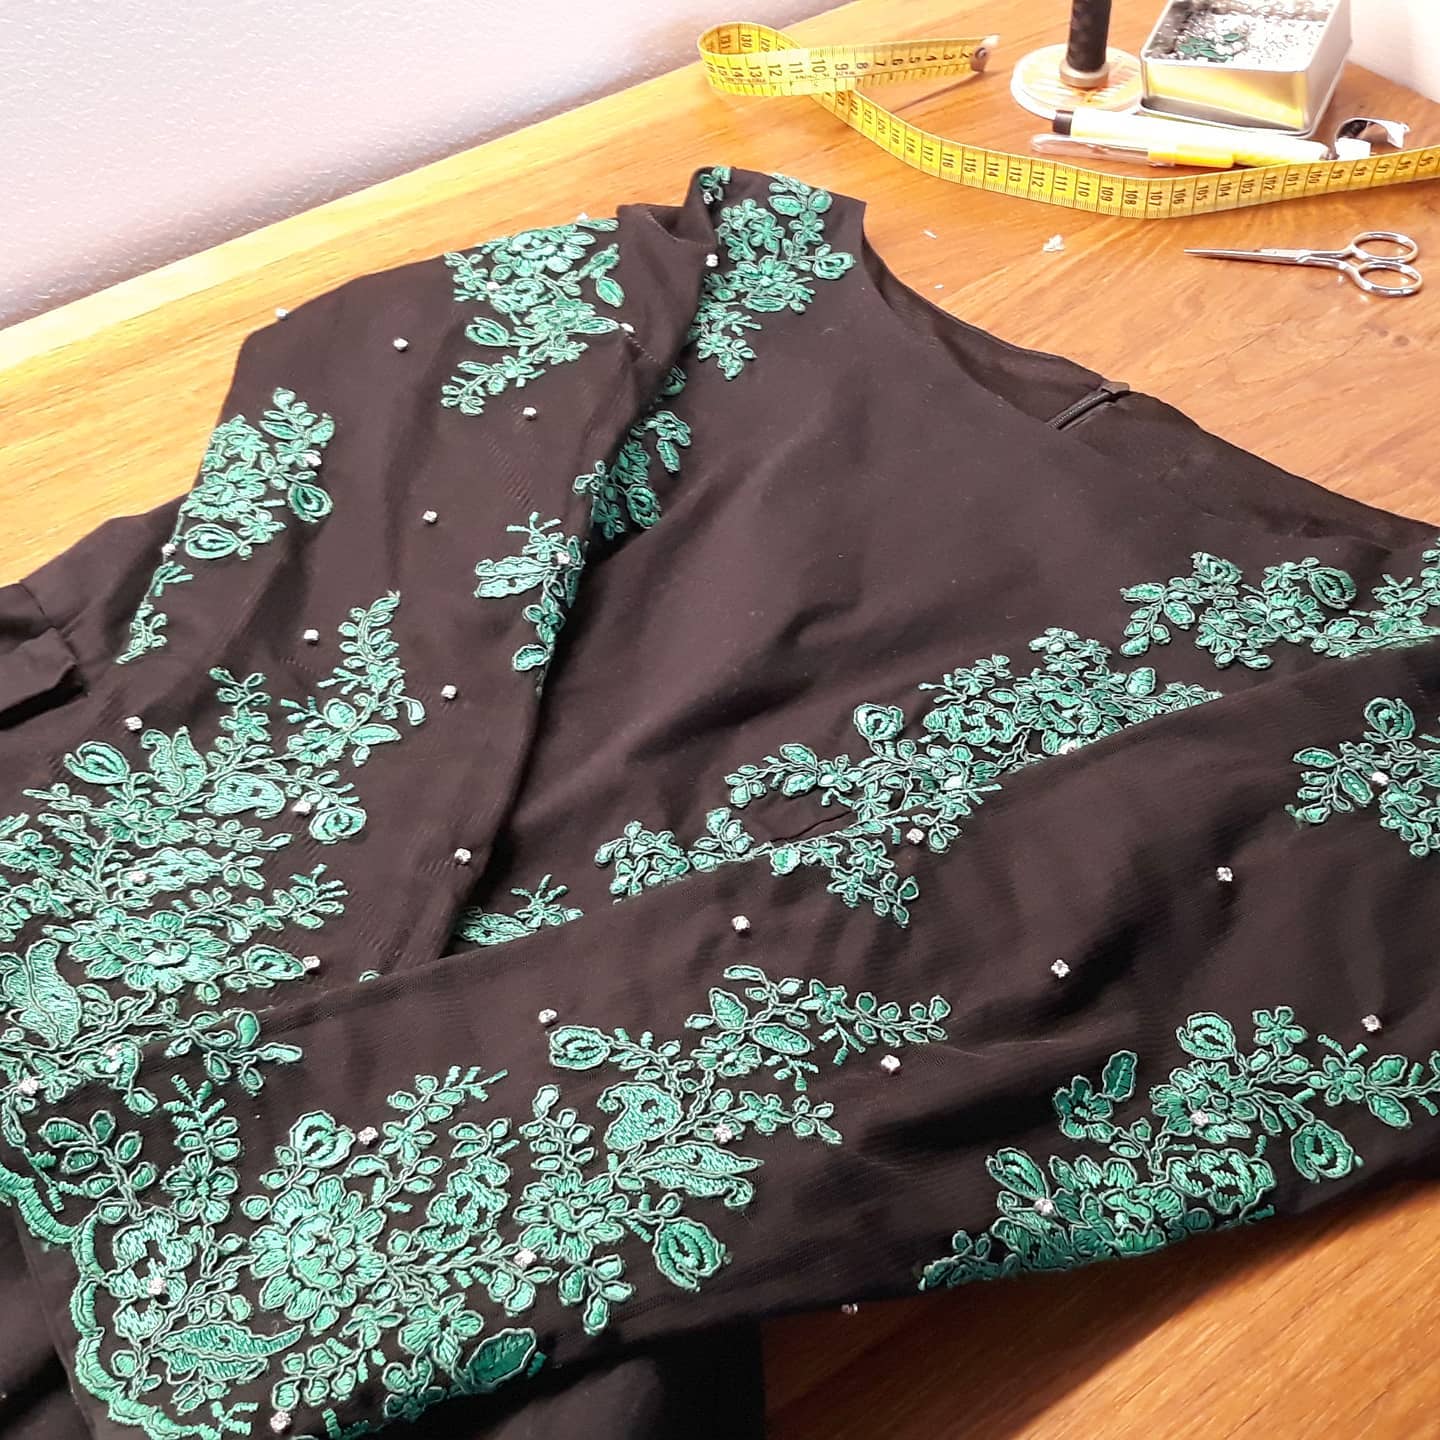
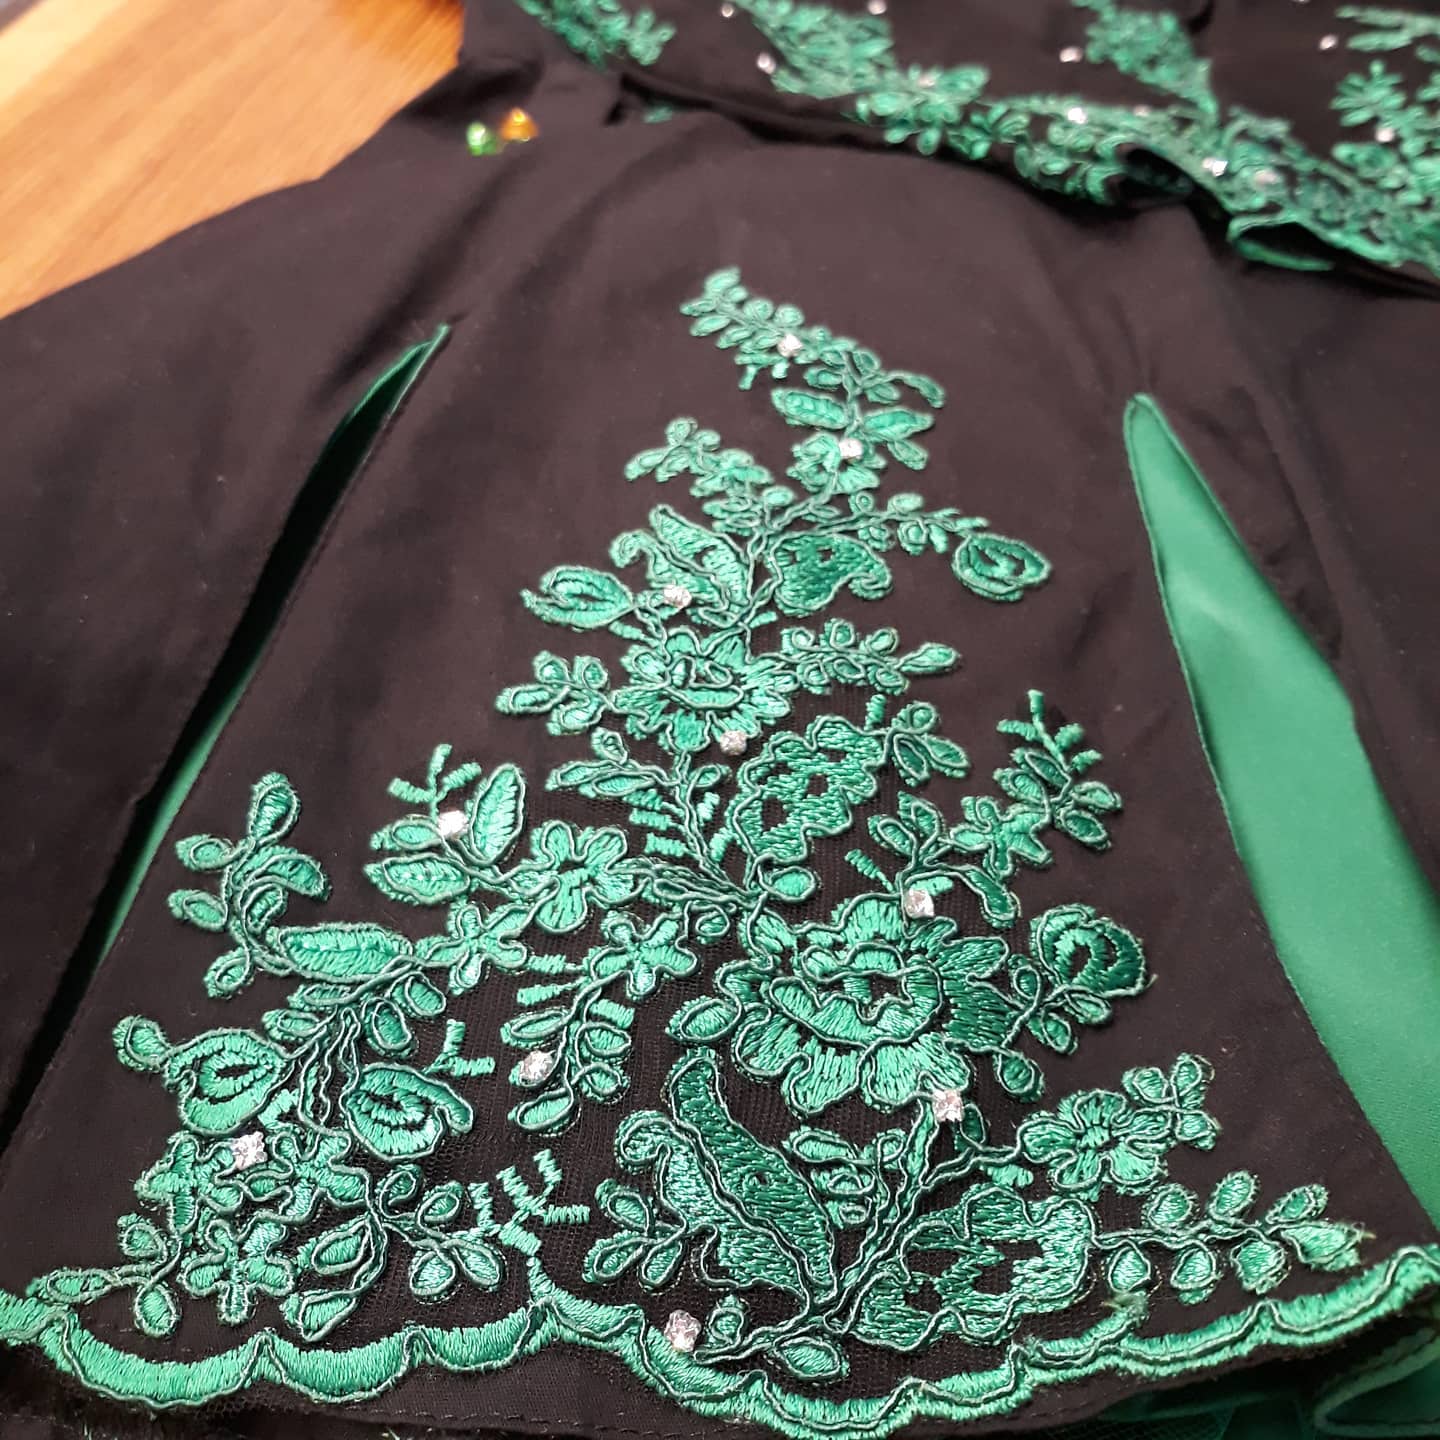
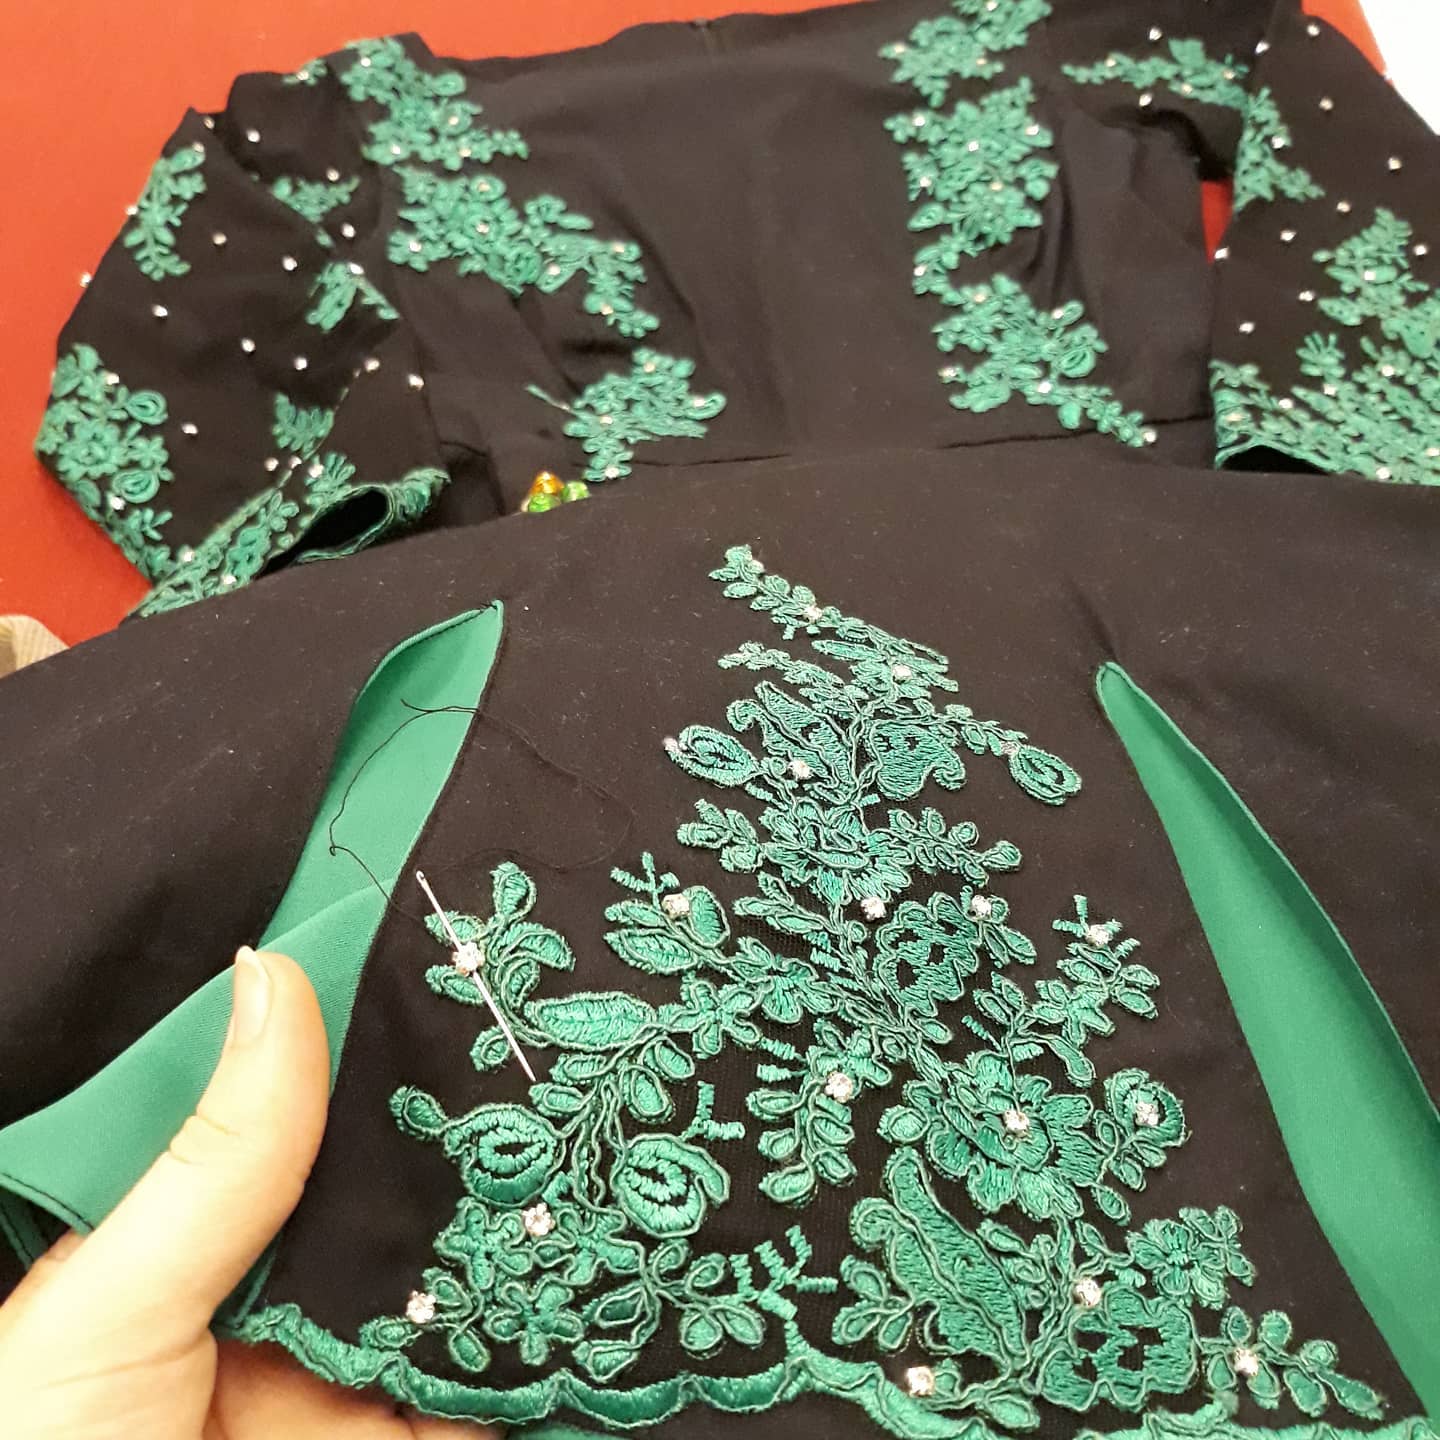
My lace had lovely triangular patterns that were perfect to cut-out and the right size to cover the fabric. I chose the triangles close to the lace edge, so I could use its own border to refinish the lower edge of my dress.
I had ten black triangles to cover, about a couple of metres wide in total at the edge, but in the end I decided I liked the skirt with alternate triangles, one black and one with lace. Nonetheless, every single piece of it needed to be strongly attached with resistant stitches, so the task was about three months long!
I stitched all along the edge of the lace, following each single leaf and flower. I wanted the decoration to be as sturdy as possible.
Sparkles: sew-on or glue?
Besides the long had-stitching, with my husband’s help and the suggestions from my Feis friend Alessia, who was going on with a similar dress project, I was browsing around for sparkles to add all around.
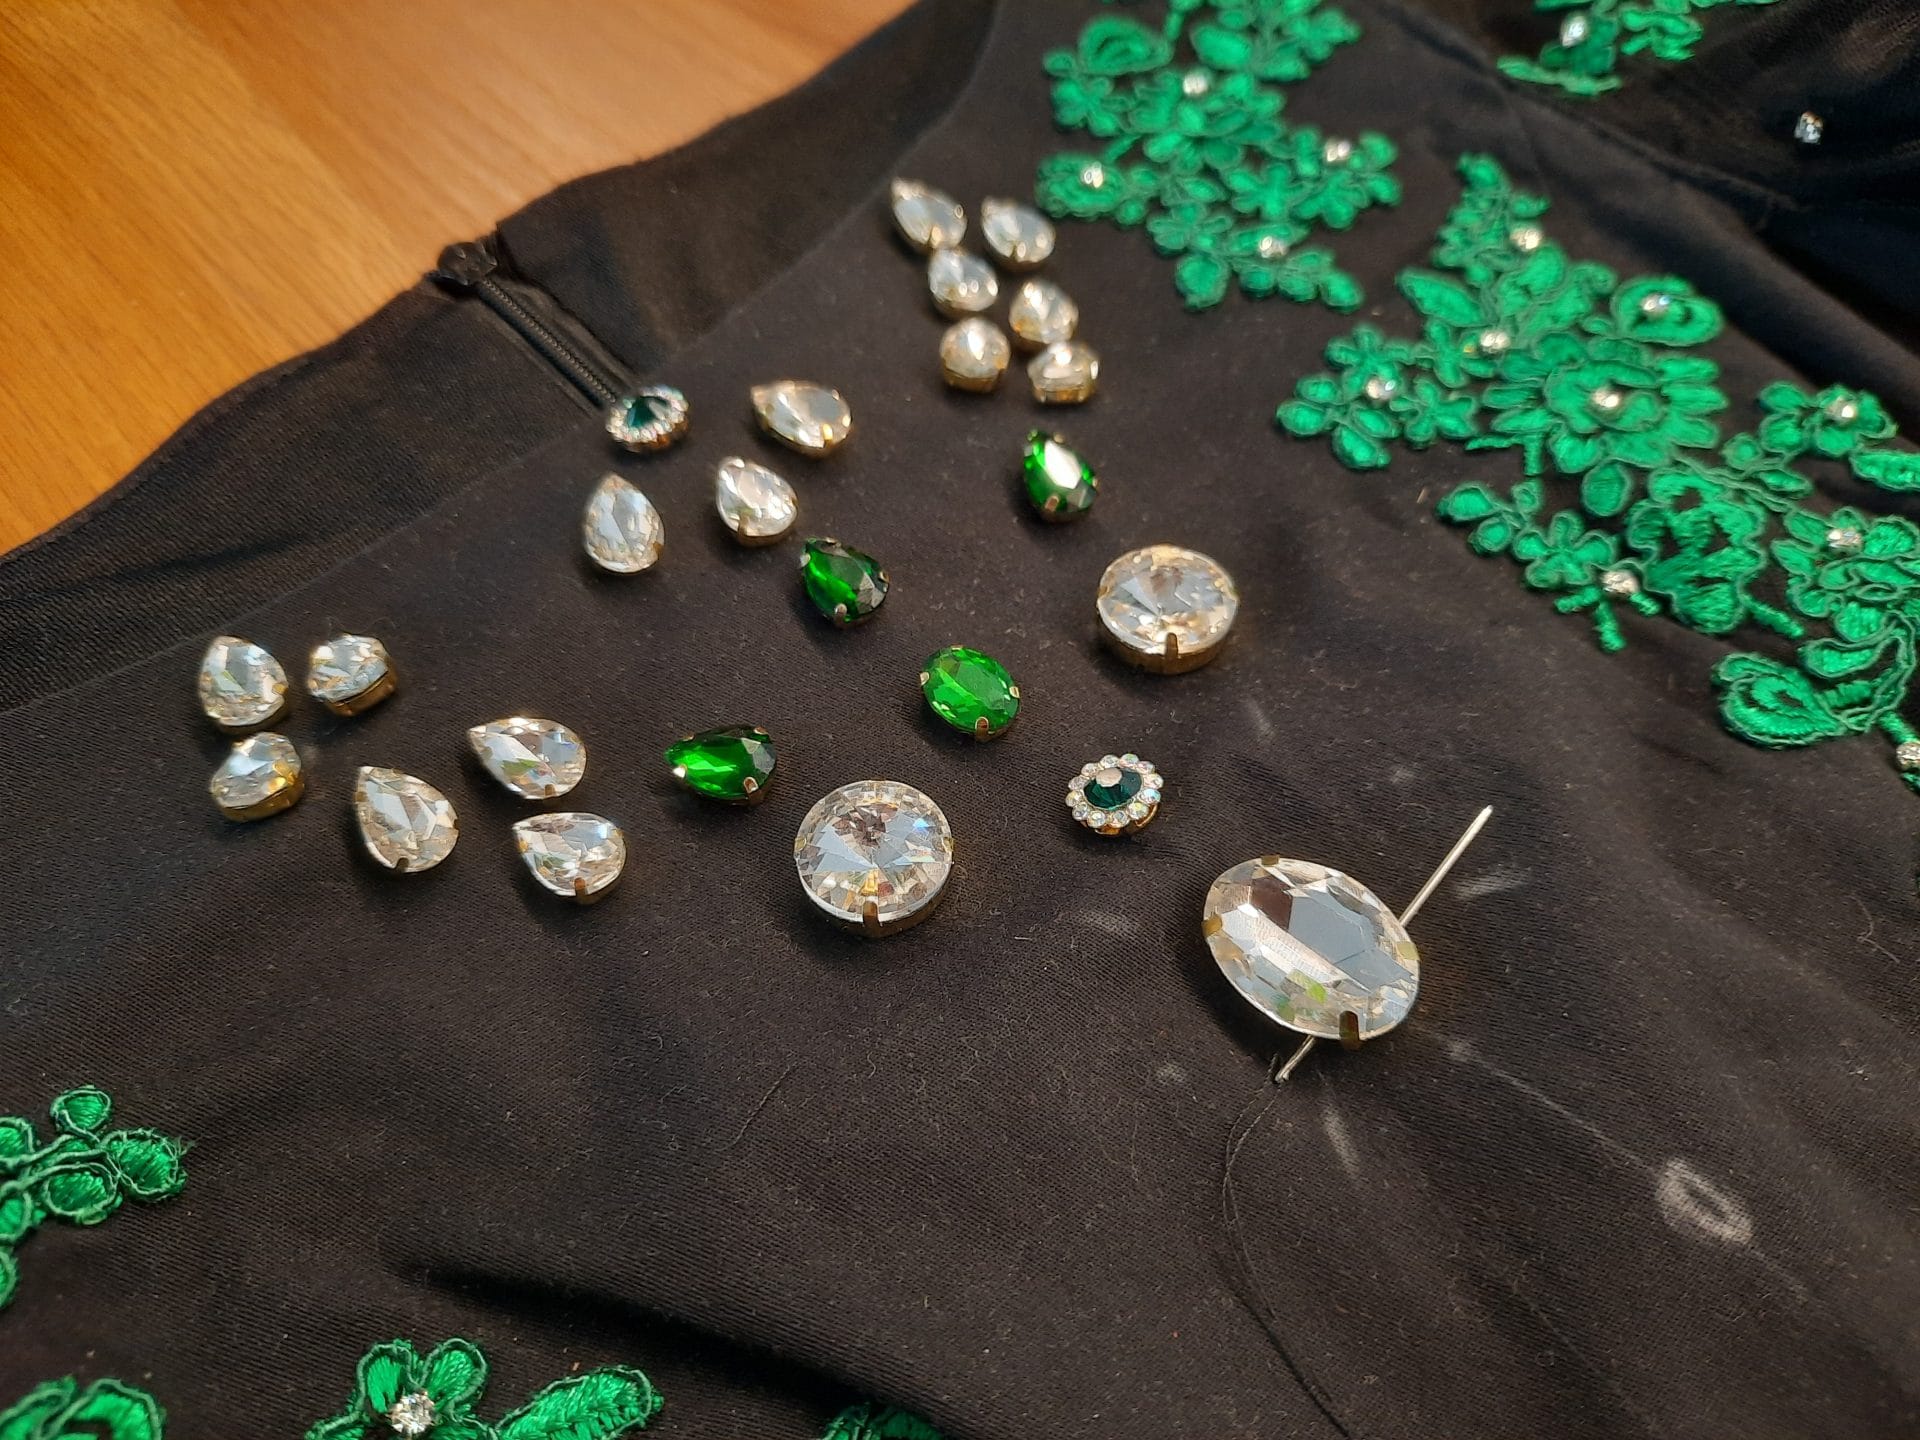
Thinking about sparkles, the new doubt was: should I glue them or sew them?
There’s a whole world behind it I never imagined! Glueing or sewing was just the first choice. I had no idea that such a huge world was behind crystals for dance dresses! With my Feis friend I learnt a lot about sizes, glue, brands, shapes, colors… I quickly felt dizzy!
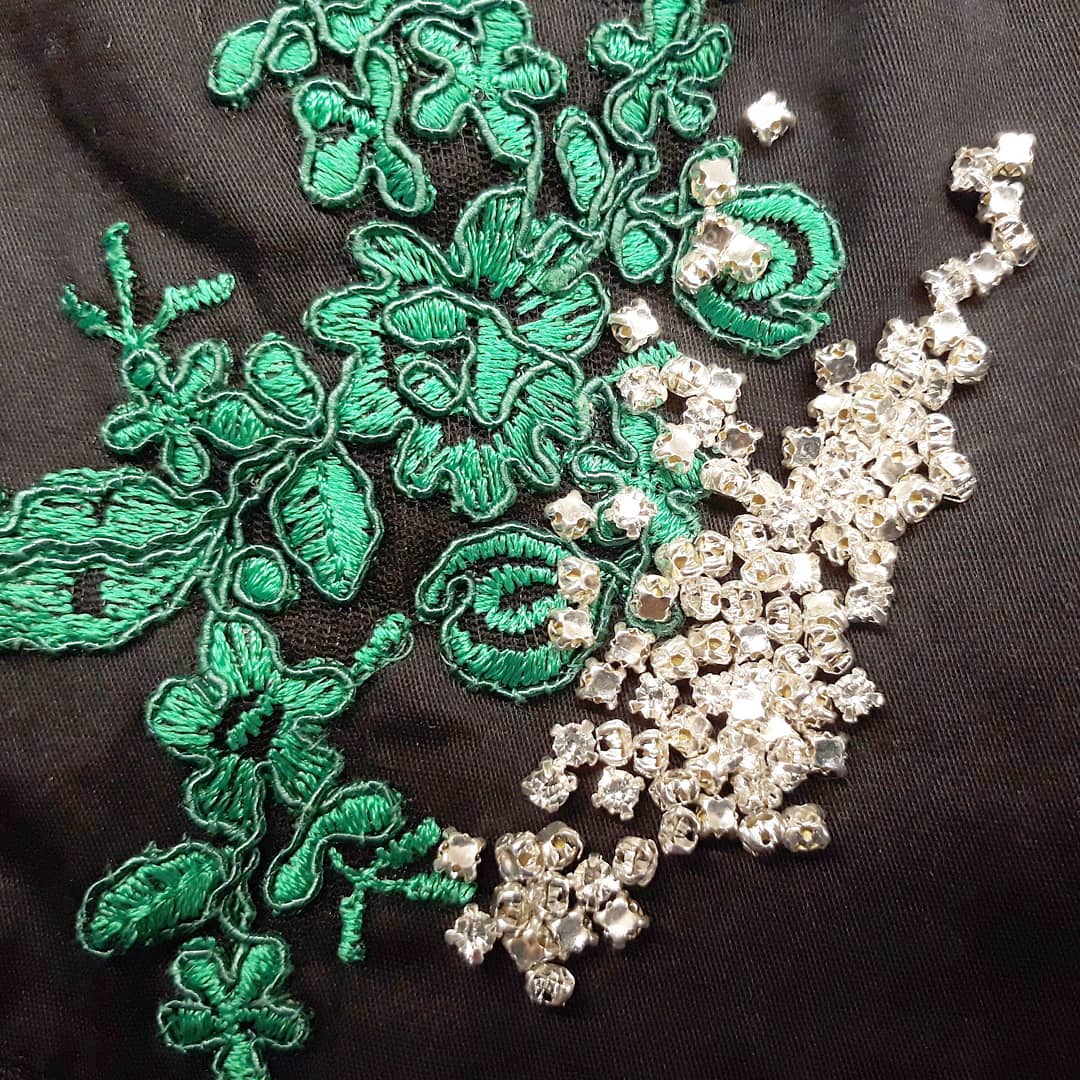
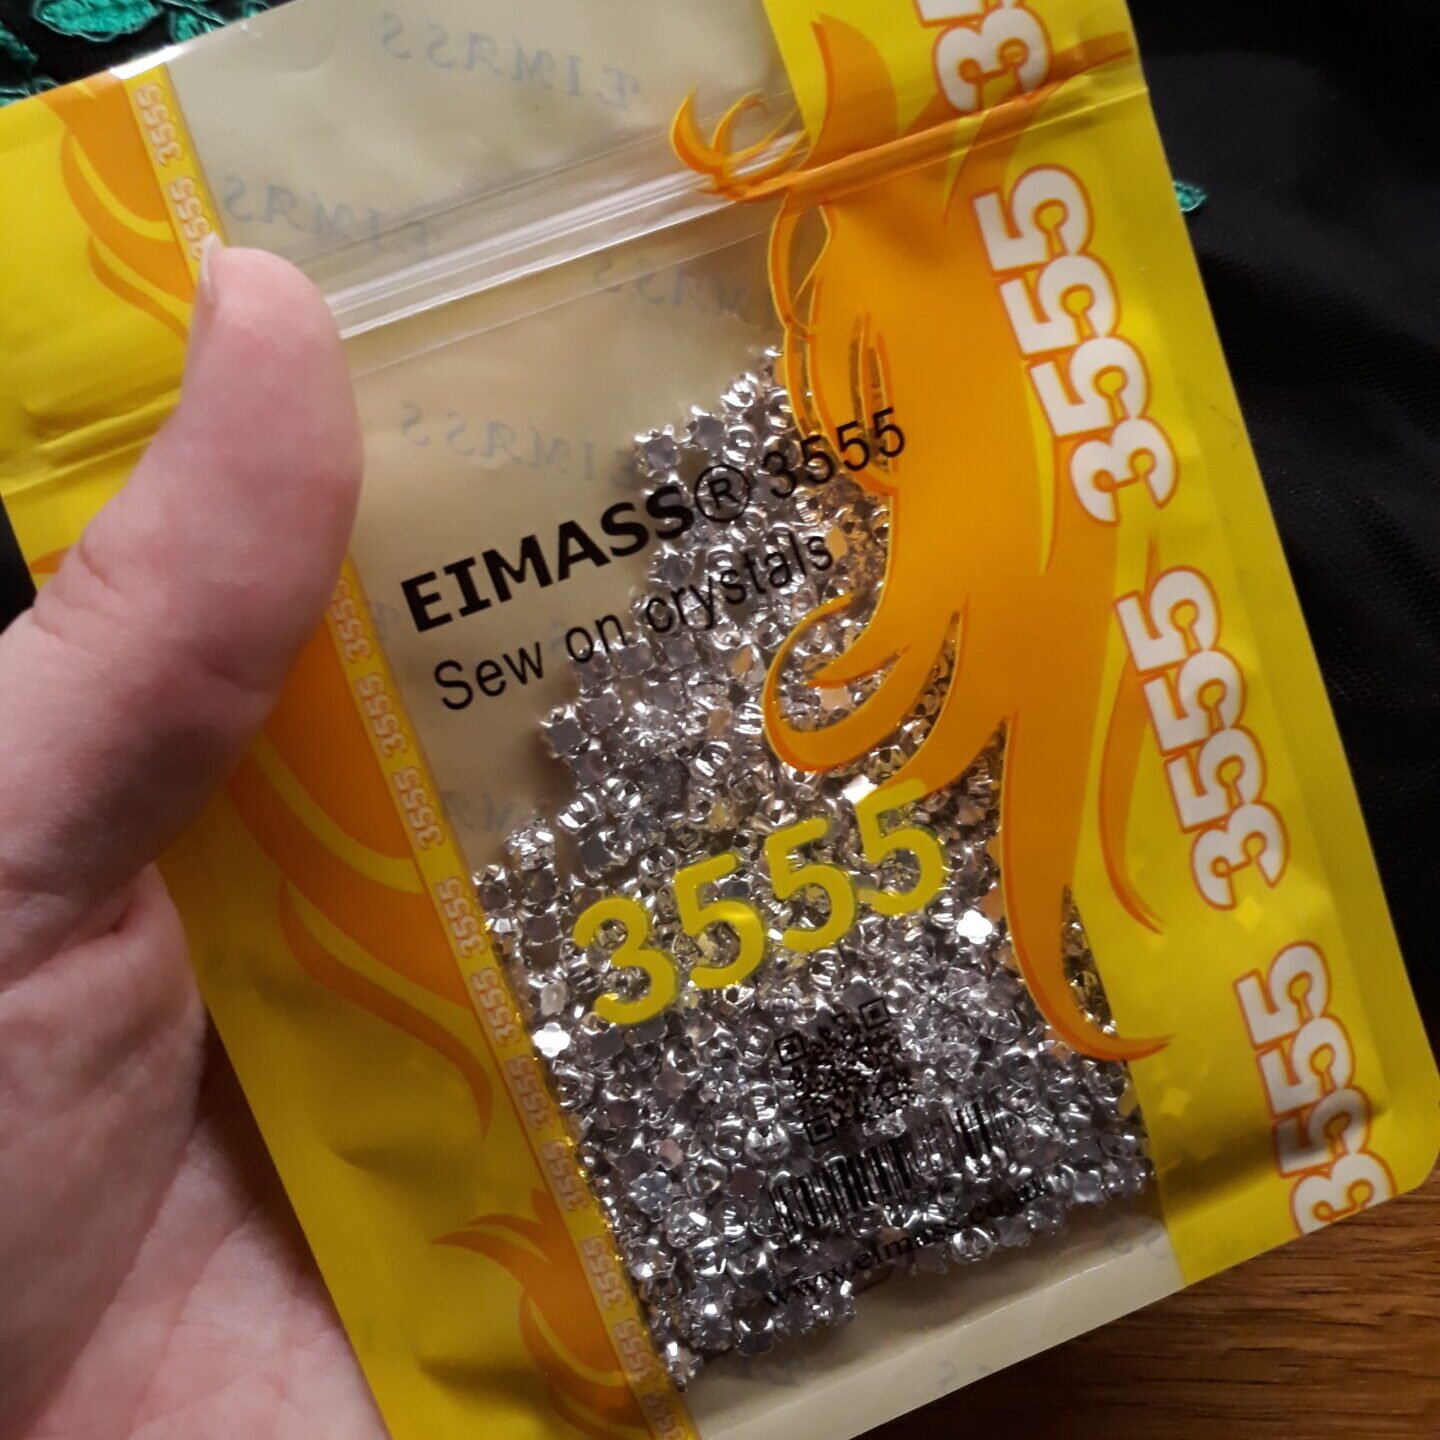
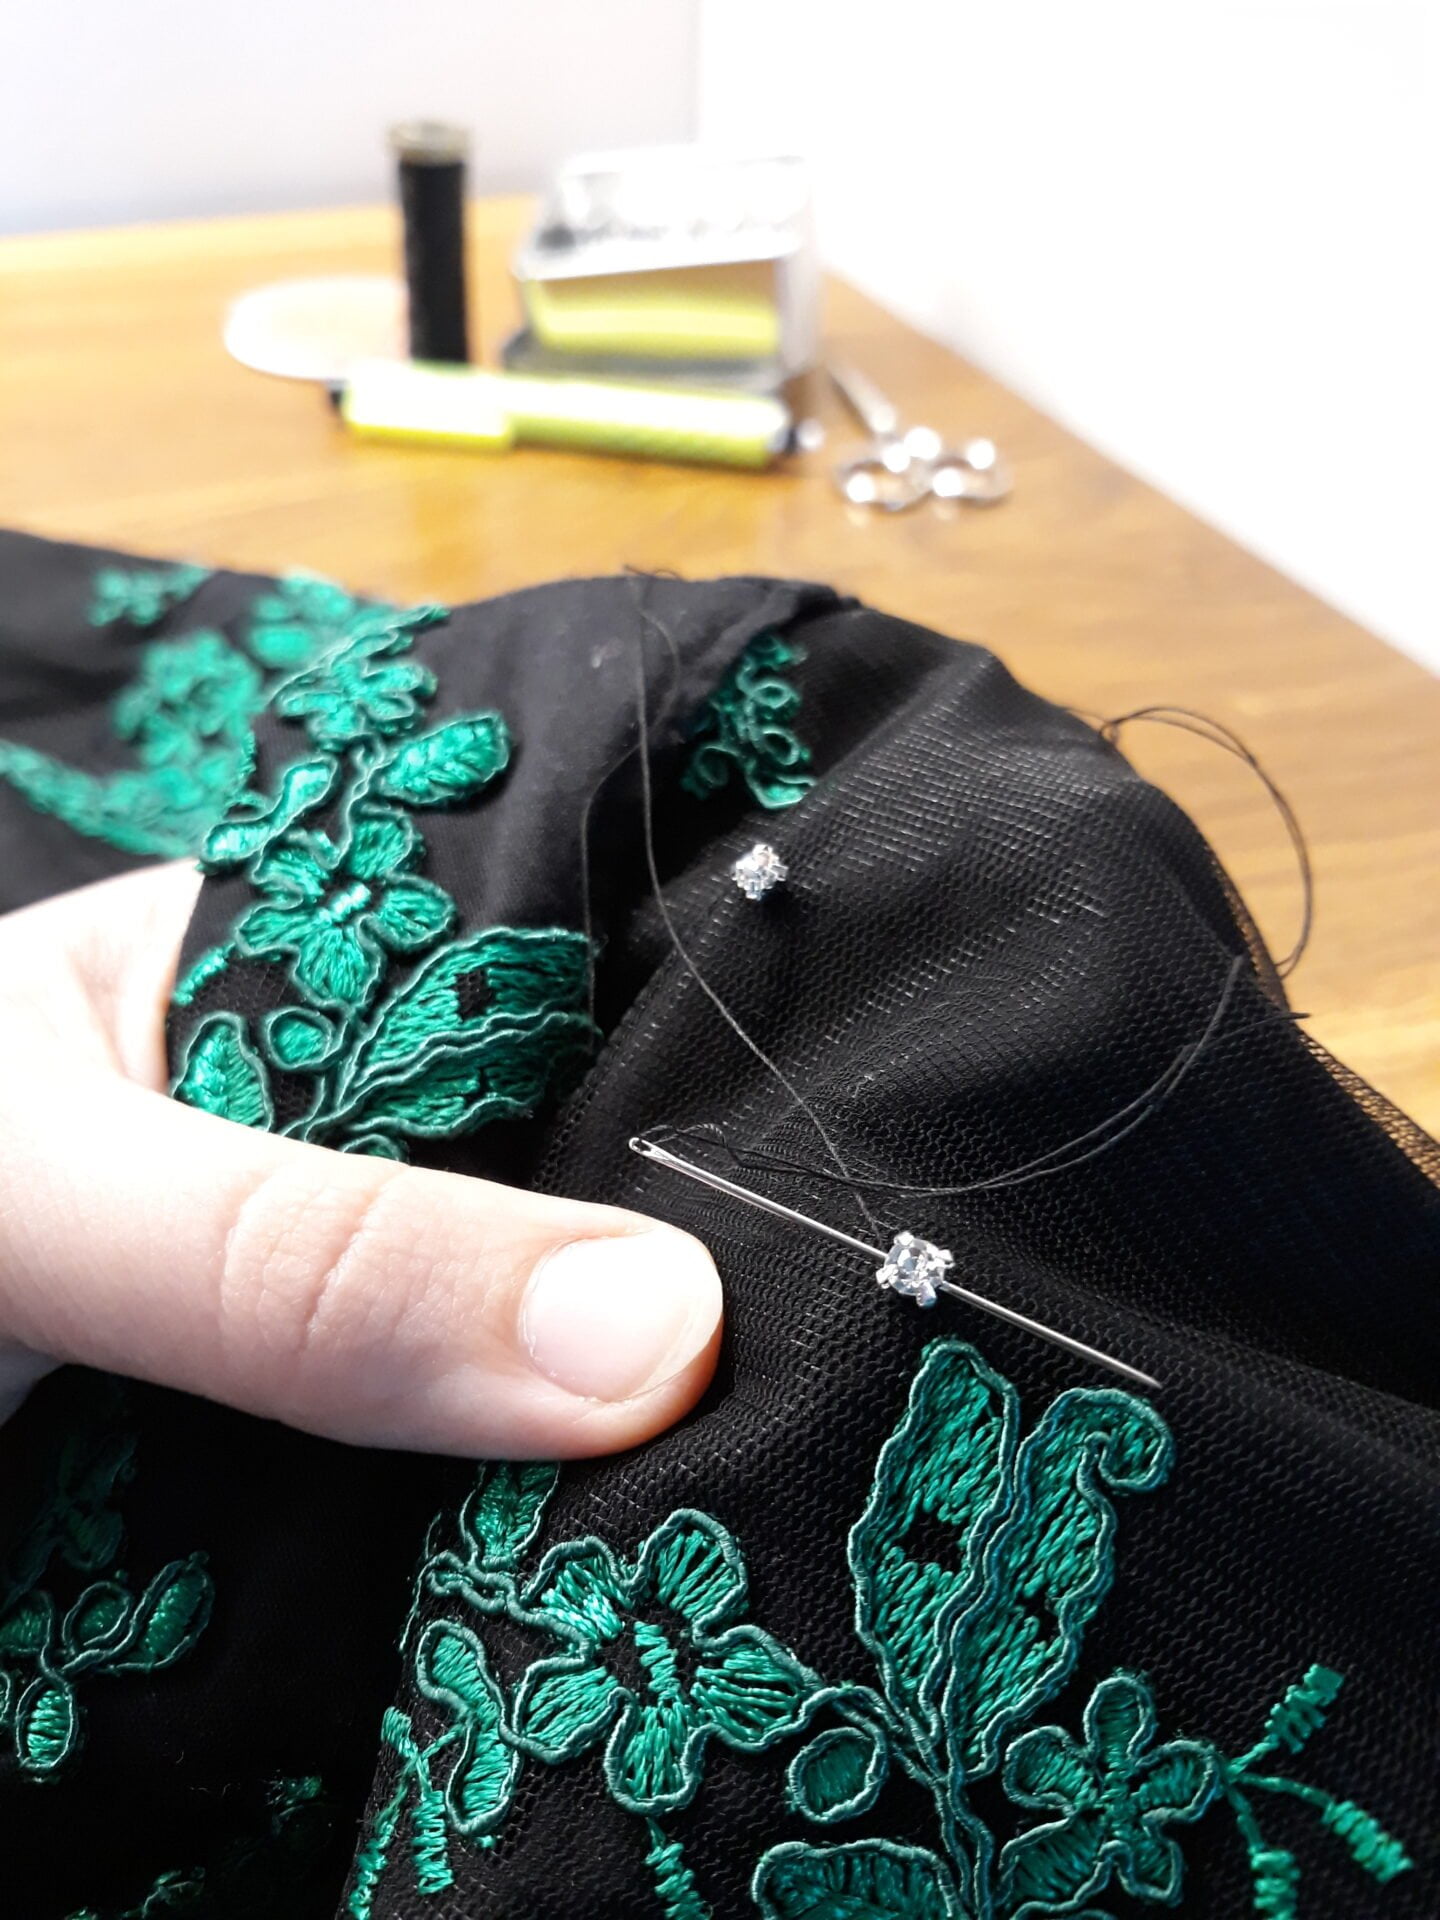
In the end, I chose the sew on kind: a cabochon with four holes gave me the idea of being more stable.
I went for the classic white crystals, instead of the colored ones. I decided to buy one pack of the SS12 size (3mm), to begin. They were so many to stitch! But I had no fear of the job in hand: that was exactly what I was looking for, a new excuse for hand-stitching!
What I needed to do next, was planning where to place them.


Sewing rhinestones
Another long step was awaiting me, I didn’t know if as long as the lace part or even more.
My first idea was to sew them only on the lace, but my husband saidys that, on the sleeves, it would be better if I placed them all around, also on the black fabric.
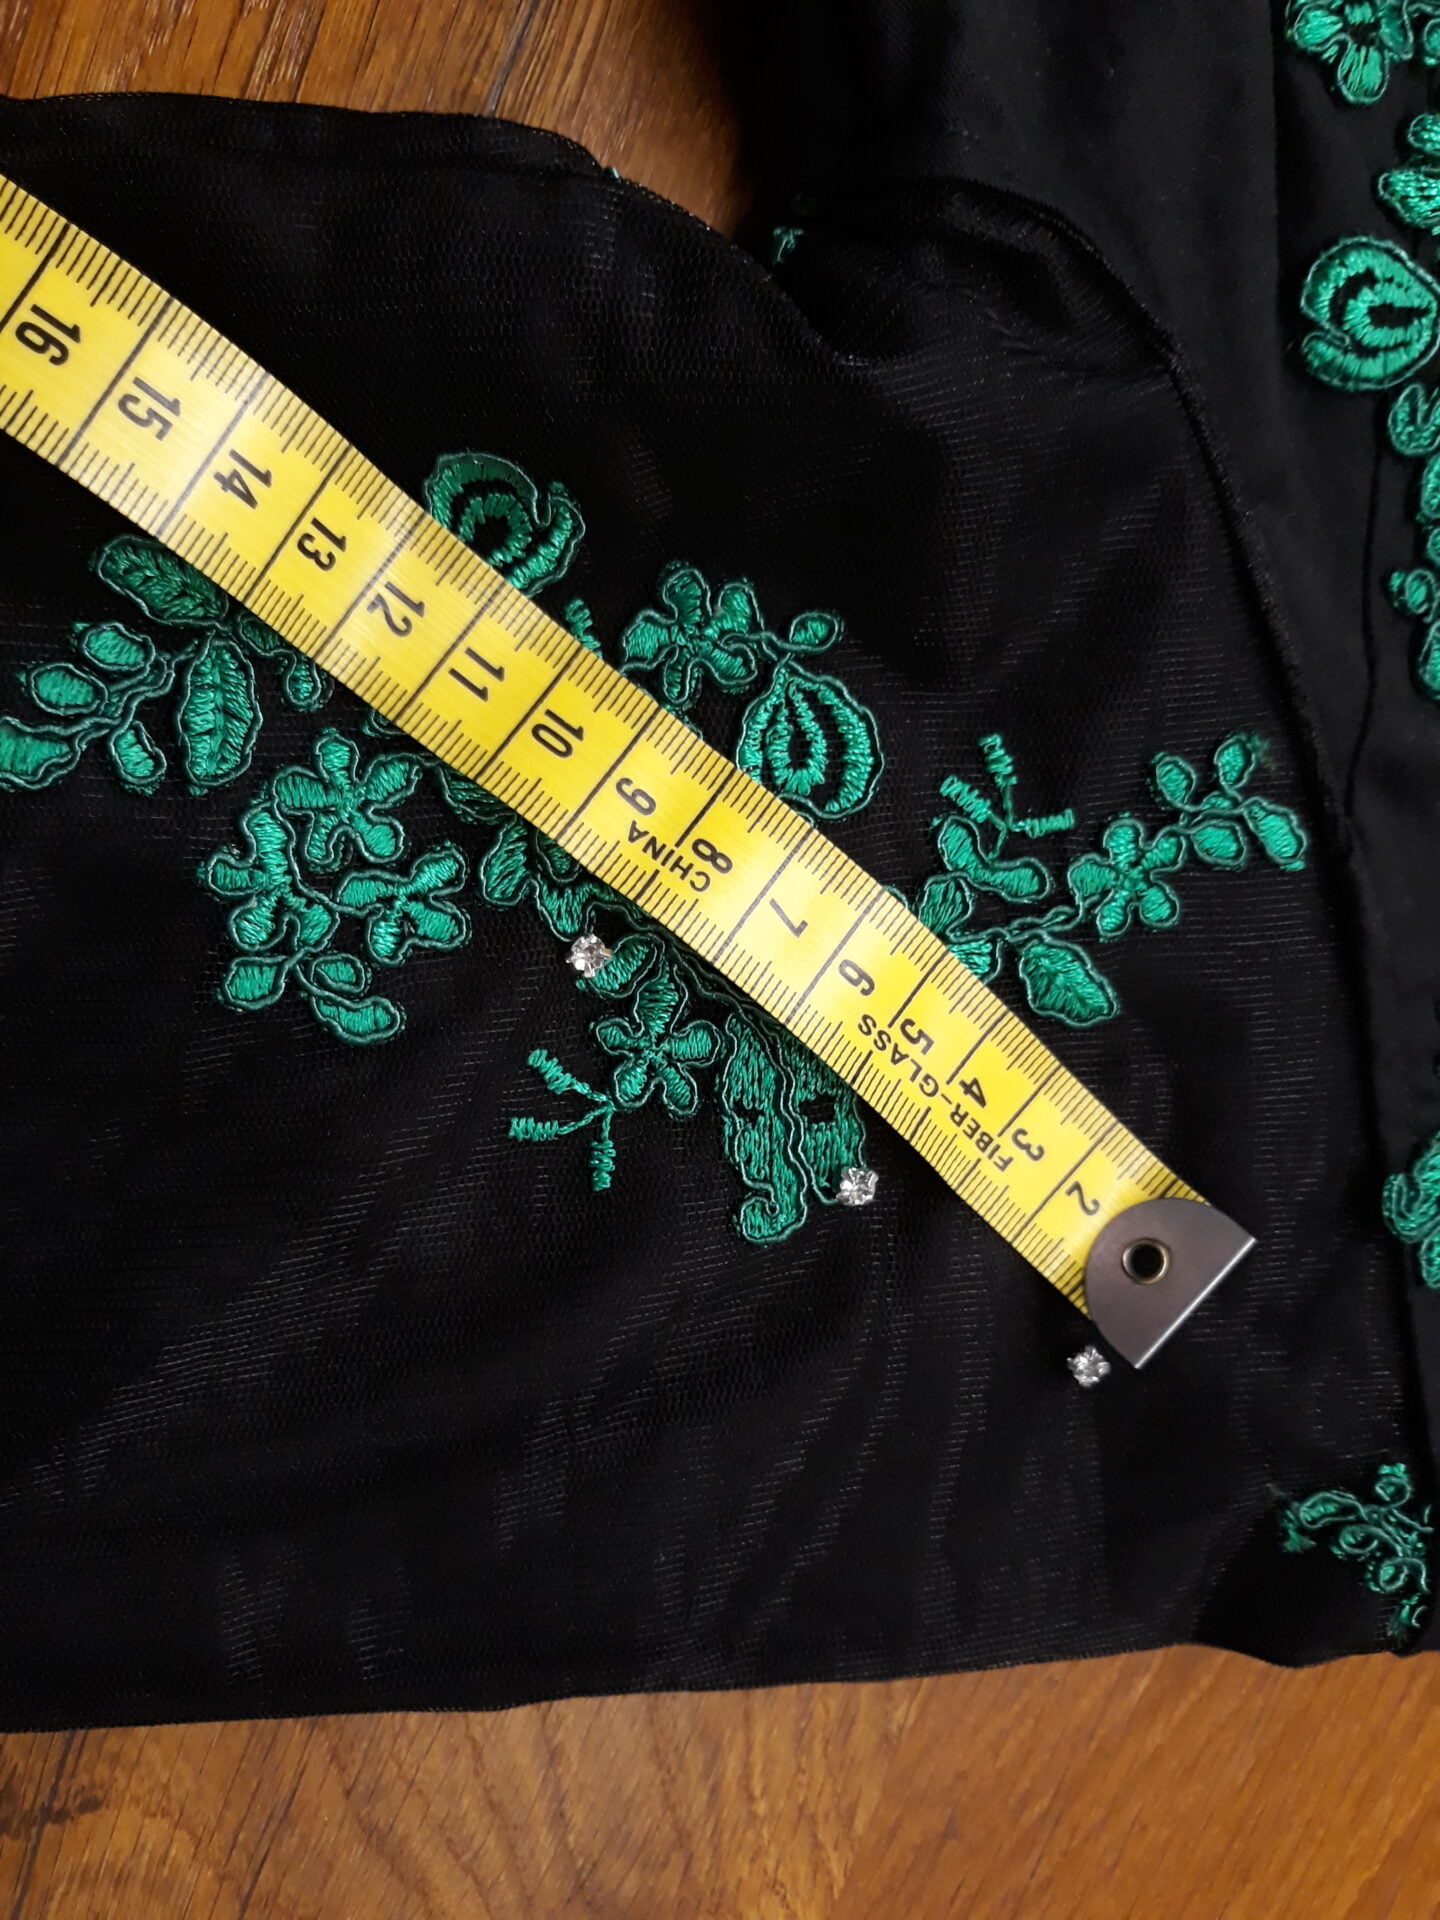
I tried and I have to say my husband was right. I decided to cover all the sleeves with a uniform grid of sparkles, then sew more on the lace of the skirt. I drew a grid with each rhinestone 8cm apart from the next ones. That was just to begin: I told me that, if I found they were not enough, I could add more in the middle.
At first I thought the sewing would have been harder. The hardest part, mainly at the beginning, was keeping the two fabrics of my sleeve evenly together, to keep the sleeve smooth while adding one crystal after the other. I had to be careful placing each crystal in place and keeping where it was intended to stay.
Also, following a regular grid was not so easy: I had to consider the position of each rhinestone keeping watch of all the surrounding ones, were they already in place or not.
Well, as always, going on with practice makes you quicker and helps a lot finding the right way to complete your work.
After finishing the sleeves, I decided to move on to the skirt. I wanted to see the rhinestones all around the dress before deciding if the quantity was good.
I expected the sewing to be even quicker on the skirt, because I had just one layer of fabric and I didn’t have to plunge into a tight space as the sleeve is. Also, I chose not to stick to a regular grid.
Here the plan was to give each triangle with lace its own touch of sparkle. Then, to refinish the look, I planned to sew sparkles also on the bodice.
Well, as soon as I saw the triangles completed with just 10 crystals each, I thought it better to redouble them. First of all, though, I wanted to refinish the front, so I could have a glimpse of the final look of all the dress.
I knew for certain, at this stage, that I needed to add more crystals everywhere to achieve the effect I was looking for.
At the end of the crystal sewing on the bodice, I was ready to start over, adding more sparlkes everywhere on my dress.
When I began the sewing, I thought the crystals I planned to use were enough, but the more I went on, the more I saw I needed more. Not too much, though, I have always been careful not to overdo. Paying attention not to exaggerate was better than repenting at the end of a long work.


How many rhinestones?
Yes, I counted them all! I bought a 500 pieces package and was able to use many of them but not all:
- Sleeves: 81 on one side + 82 on the other side
- Skirt: 100 (no more, no less!)
- Bodice: 50
Total: 313 hand-sewn rhinestones
Dancing with the stars


After what felt like an endless sewing adventure, my Irish dance solo dress was finally completed!
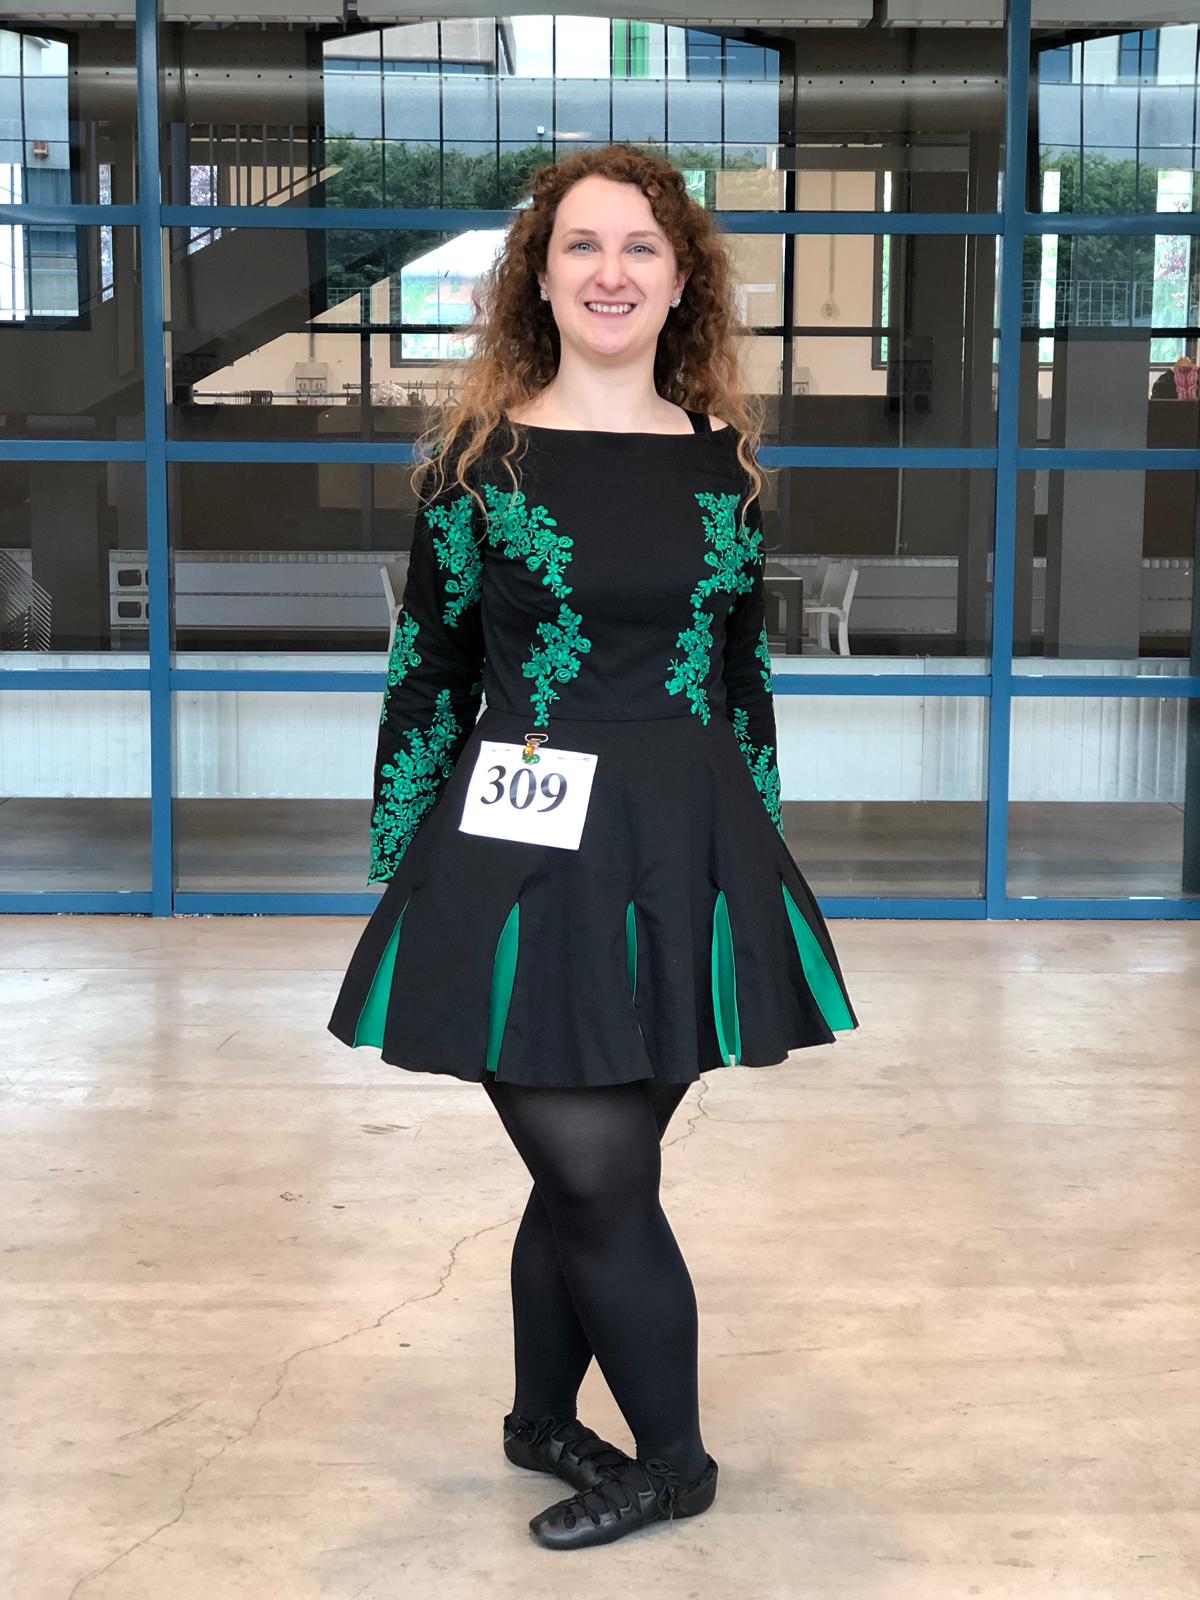
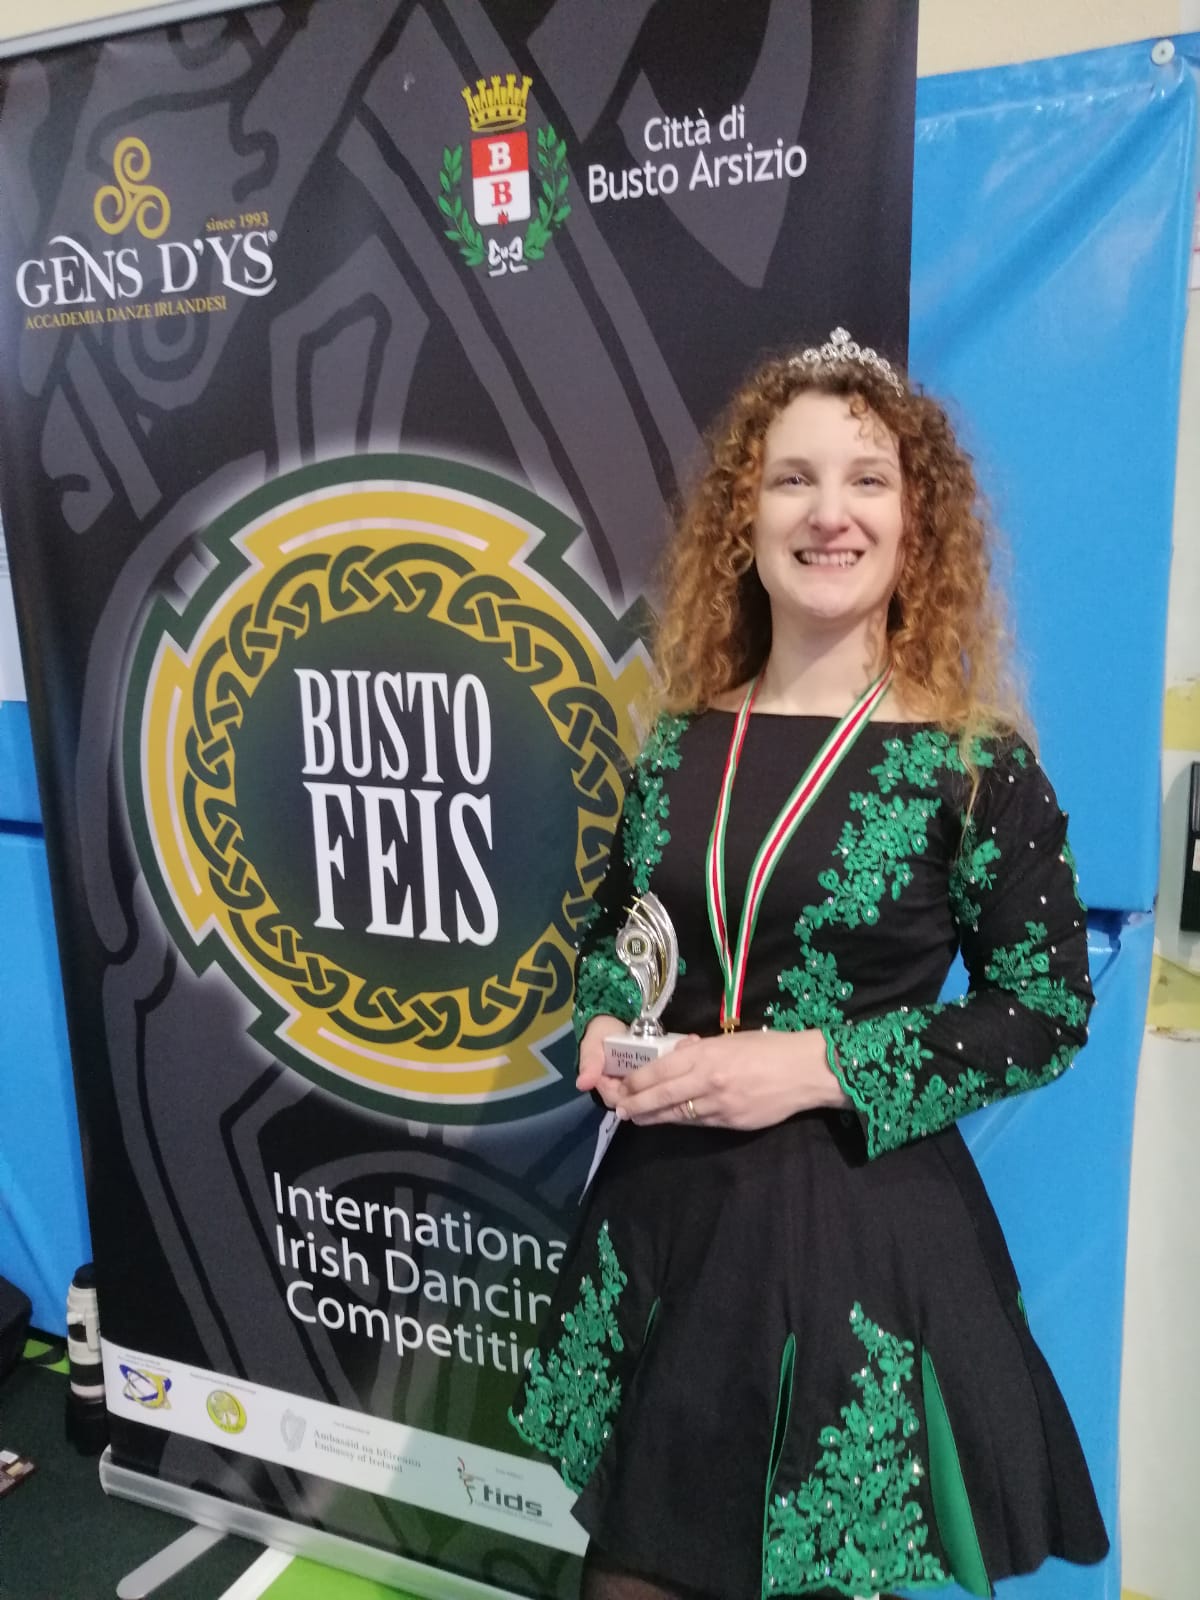
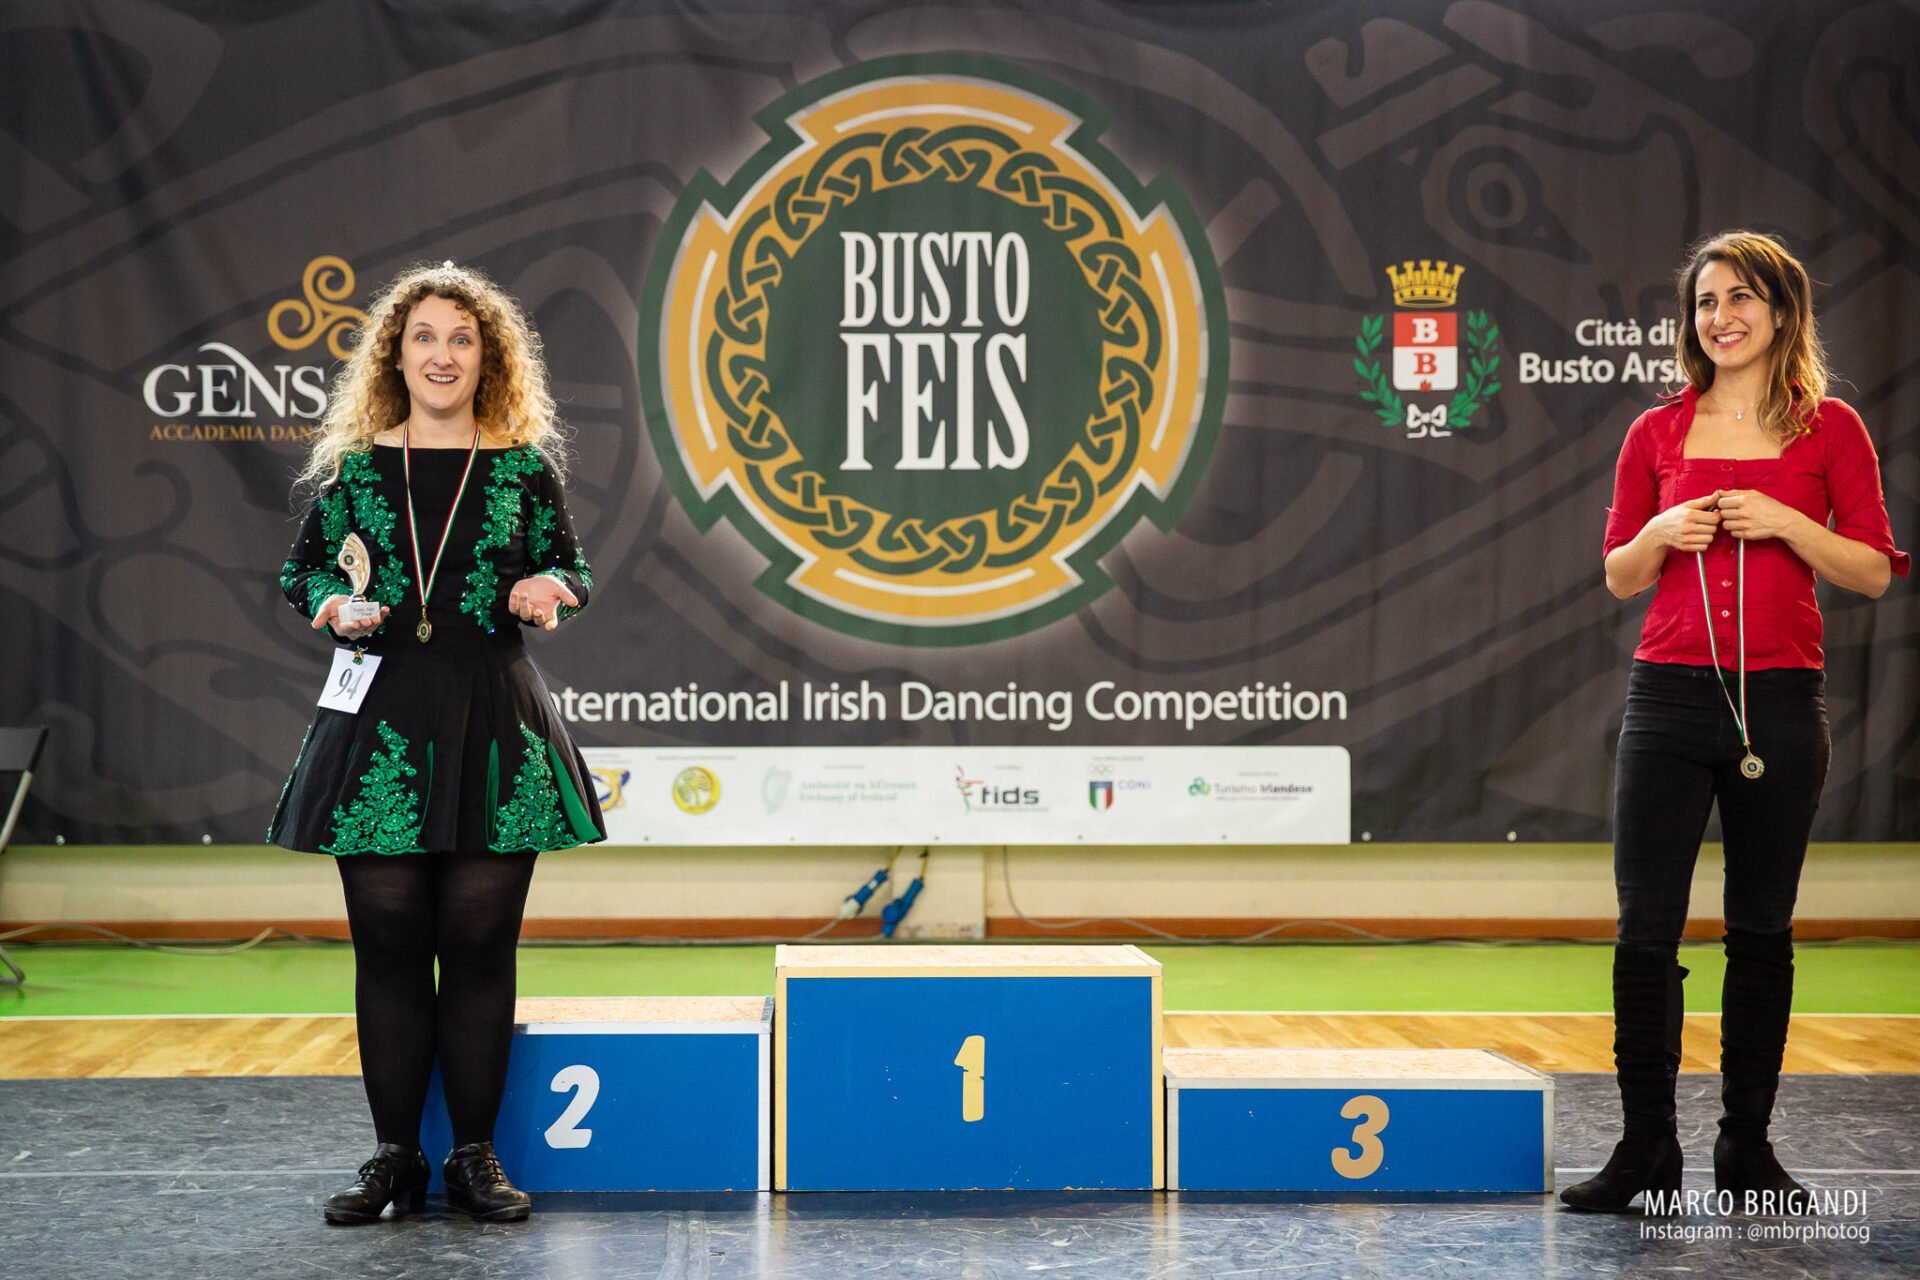
Wearing it during the February 2020 Busto Feis competition was an unforgettable experience. I still remember the thrill of stepping onto the stage, surrounded by other dancers in their dazzling, colorful dresses, knowing that I made this. It felt surreal to wear something crafted stitch by stitch with my own hands. Also, I felt at ease among the other dancers, with their colorful and shiny dresses.
That day, as the competition ended, I decided my dress was complete… for now. I was proud, satisfied, and happy with the result. Yet, I admit I felt a pang of sadness too. The journey of making it had been so fun and rewarding that I missed having it as my ongoing project.
Almost three years later, I happened to find me reflecting on how I might approach it differently if I were to start over today. With the sewing skills I’ve gained since then, I think I’d be brave enough to skip modifying a pre-made base dress and instead start entirely from scratch: just fabric, floss and a vision.
As for my current dress, though? I wouldn’t change a thing.
Well, maybe I’d experiment with a different main color, but that’s a story for another time!
About the cost
I said the Irish dance Solo dresses could be expensive. You’ll have troubles finding even a basic class dress for less than 150€. What about my costs for this dress? Let’s sum up:
- Basic dress to adapt: 29€
- Fabric, lace and floss: 50€
- 500 rhinestones: 17€
Total spent: 96€

Back to working on the dress
New lace and crystal additions
After a long break from competitions due to the pandemic, I decided it was time to revisit some unfinished ideas and make a few updates.
As I advanced to higher levels in competitions, I found myself comparing my dress to others I saw around me. While I didn’t want my dress to become overly elaborate (I’m an adult dancer, after all), I started to feel it was a bit “too black” for my taste.
My first focus was the skirt. Originally, only five of the ten panels had lace, so I decided to add lace to the remaining panels. I had plenty left from the initial project, and wanted to put it to good use. To complete the look, I adorned the new lace with crystals to match the existing embellishments. This addition gave the skirt a more cohesive and polished appearance.
I also added lace to the back of the dress, placing it over the shoulder blades. I chose to keep this area free of crystals to avoid any interference with my hair during performances.
A word on sew-on crystals
Over time, I’ve become a big fan of sew-on crystals. Unlike glued ones, which I’ve seen fall off during performances, sew-on crystals stay securely in place.
However, they come with their own challenges: their cabochons can snag on fabric (especially lace) and hair. Despite this, I love the durability and reliability they offer.
While finishing the skirt updates, I attended a craft fair and stumbled upon a crystal vendor. After spending far too long browsing through their shiny boxes, I came home with a selection of larger crystals. I arranged these into a white-and-green composition on the bodice, adding much-needed color to the predominantly black fabric.
At the same fair, I picked up some beautiful paillettes for extra shimmer. While they looked stunning during their first wear, I was disappointed to find they dulled significantly after a single wash.
Now, I plan to remove them and replace them with sew-on beads, which are more durable and easier to maintain.


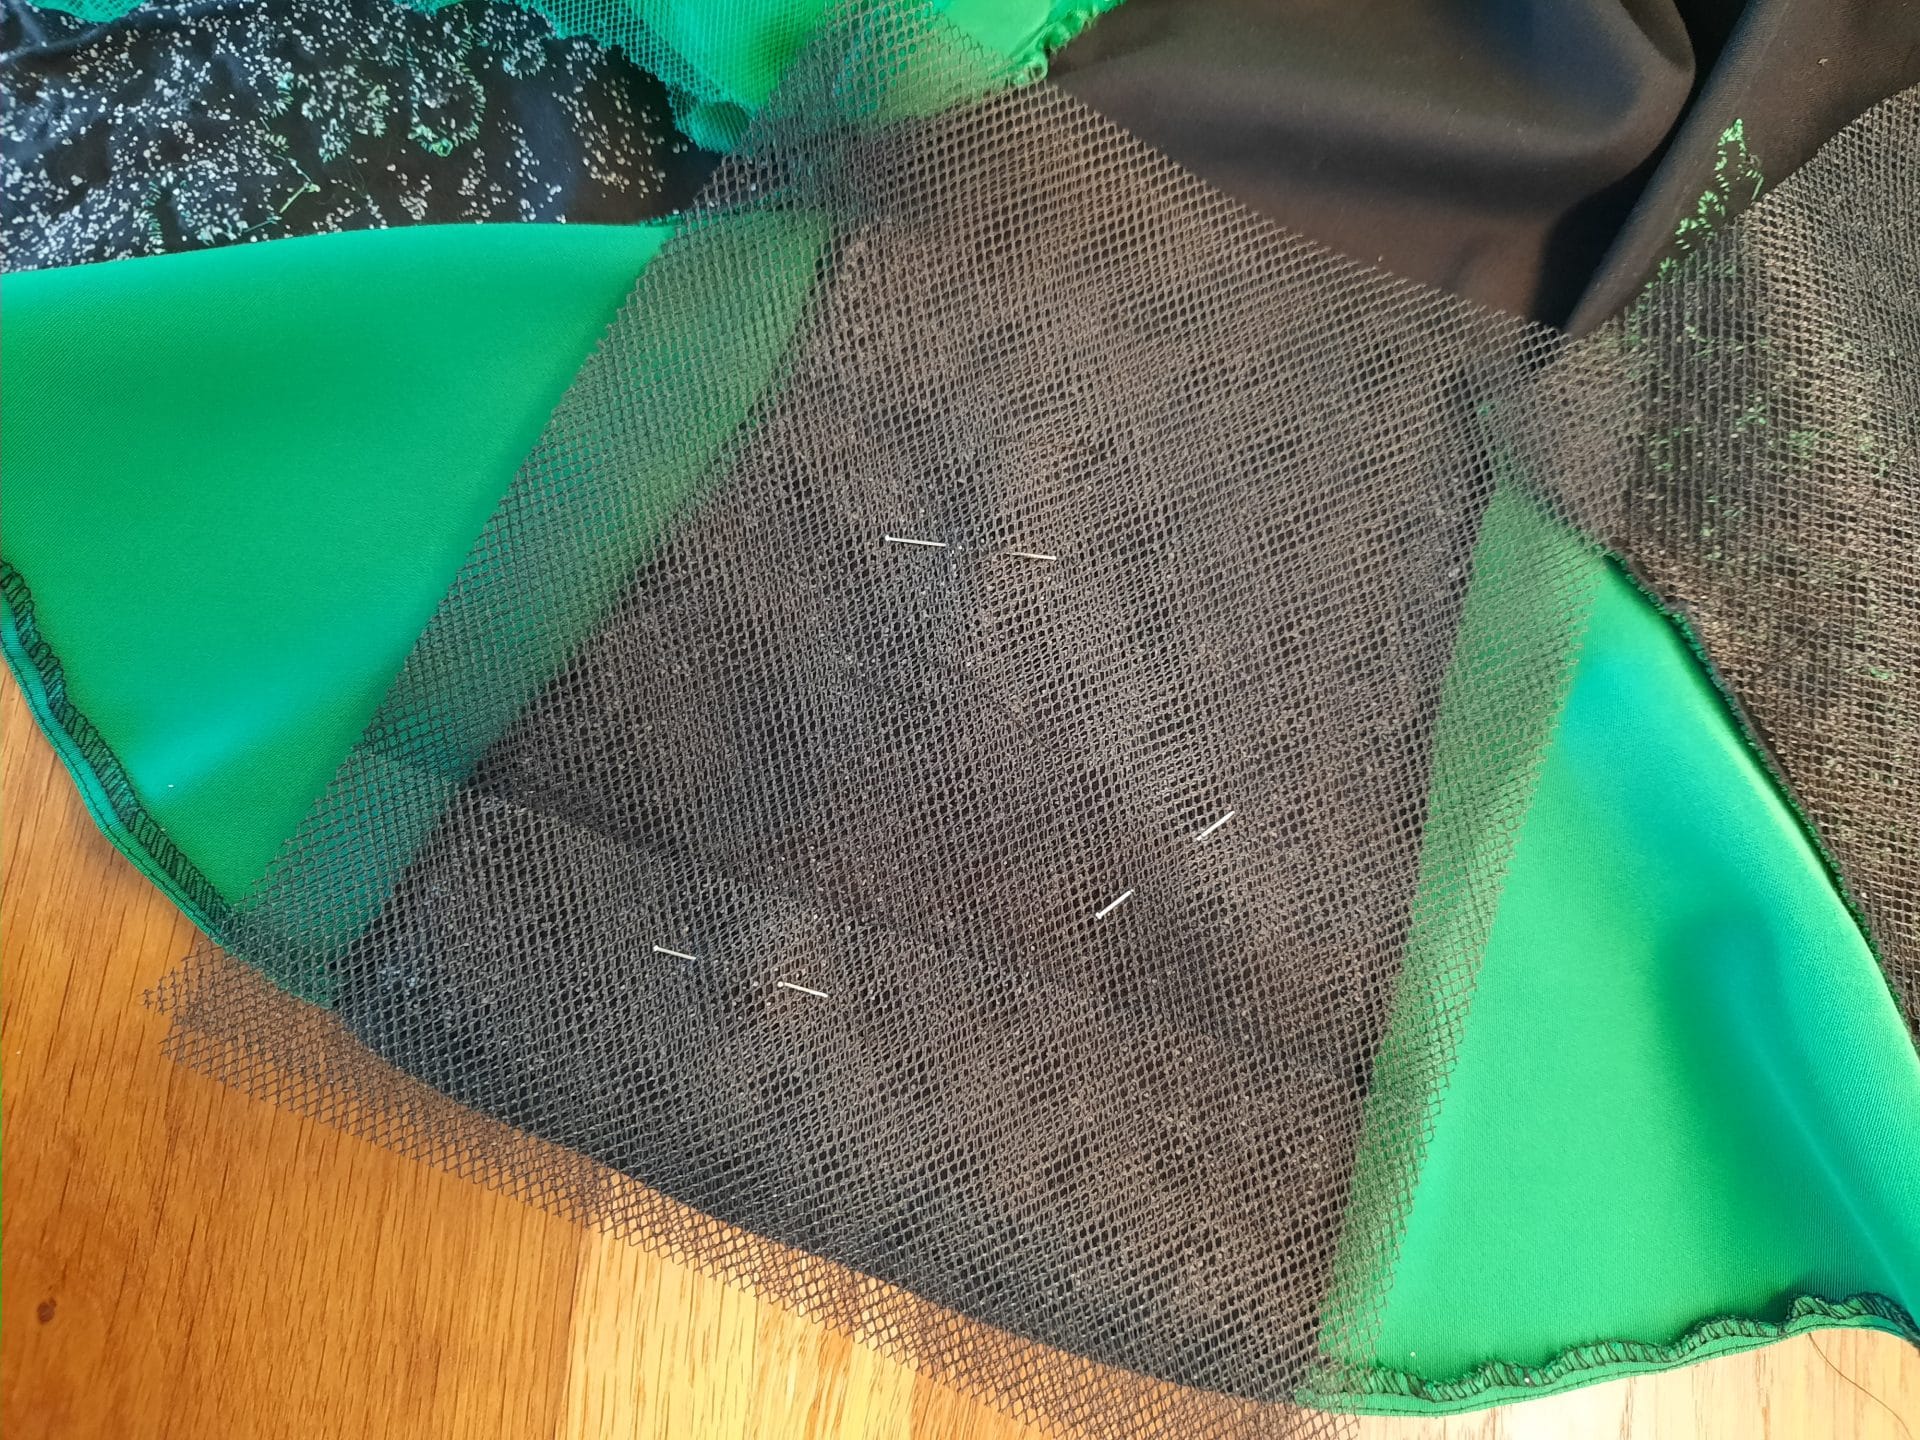
Adding structure to the skirt
Returning to competitions with each new addition made the dress feel fresh every time, almost like having a new outfit. However, I started to feel the skirt lacked the structure that Irish dance dresses are known for: rigid enough to showcase movements, while hiding unwanted hand gestures.
I don’t particularly like the modern skirts with large rigid panels on the front: I prefer a more natural flow that complements the dancer’s movements. Still, I wanted to add subtle rigidity to the ten panels of my skirt to enhance its look.
I was introduced to a thermoadhesive fabric called fliselina, often used as a backing for men’s jackets and favored by older seamstresses in my area. I decided to give it a try, applying it to the back of my skirt panels. To ensure durability, I didn’t rely solely on the adhesive, but I also sewed it down.
Unfortunately, this was a mistake. While it looked great at first, after washing, the material wrinkled, leaving the fabric crumpled and unsightly. I realized I hadn’t tested it thoroughly enough before committing. Lesson learned: when experimenting with new materials, always create a test piece using the intended fabric, then wash and observe how they interact.
After removing the fliselina and undoing all the stitches, I replaced it with a rigid net, a sturdier alternative similar to horsehair canvas. This time, the result was exactly what I wanted: structured yet flexible, with excellent durability even after multiple washes.
Costs update
The first part of my Irish dance solo dress (the first time I said it was complete, at the end of 2019), it had cost me a total of 96€.
The new additions meant additional costs:
- Crystals for the bodice: 17€
- Fabric (fliselina first, rigid net later): 20€
- More rhinestones and paillettes for skirt and bodice: 23€
Total spent: 96€ + 60€ = 156€
(And, sorry, this time I didn’t count crystals, paillettes and beads!)
An ever-evolving project
I’ve come to realize that this dress might never truly be “finished”. And honestly, that’s part of what I love about it. With each addition, it evolves alongside my skills and creativity, becoming a reflection of both my passion for Irish dance and my love of crafting.
Who knows what changes or improvements I’ll dream up next? For now, I’m grateful for the journey and the memories this dress represents.
What about you? Have you ever completed such a long creative project? I’d love to hear your thoughts: let’s chat about it in the comments!


)
6 Comments. Leave new
This is absolutely gorgeous! What a beautiful job you did, and it looks so good on you 🙂 You’ve made me want to start sewing my own dress now!
Oh wow thank you so much!! Yes, start sewing: it’s a really rewarding activity! And I discovered it requires less skills that I thought. Consider that ten years ago I wasn’t even able to attach a button 😉 And if you need advices of any kind, please feel free to get in touch. Thank you again!
Amazing job!Your dress looks so elegant! I love the green of the lace.
I feel so identified with your process! I finished my first solo dress last year and my previous sewing experience were also my medieval gowns ;P .
Reading the challenges you faced made me feel I wasn’t the only one. Just as it happened to you, my first idea was different from the final result and I had to change things along the way but the result was SO rewarding!!! In my case I started from scratch adapting the pattern of a medieval gown for the bodice and then doing a LOT of research to construct the skirt. The good thing about making your own dress is the pride you feel while dancing in it! 🙂
Thanks a million! And wow, I love life coincidences! I’d like to know more about your projects, both Irish and Medieval 😉 You are more than right: it’s super rewarding, you feel the pride of the seamstress at each step. It could be that your homemade dress is not the most “wow” around, but you always feel like it is really.
Your dress looks great. I made my daughter’s dresses back in the ’90s. They have changed a lot!! One thing the girls did back then….wear a light weight t shirt to absorb any sweat and the dress itself was rarely ever cleaned. Velvet could never be washed. Good luck with all of your future dresses and competitions.
Oh thanks a million! I’d love to see how your dresses came out! The t-shirt trick is really useful. Velvet and all the materials used in Irish dance dresses are rarely washable with water, and that’s something I really wanted to do with my own home-made one. Thank you again!